FAQ/Patents
For Quikr self-help, please scroll and expand (+) questions to find your answer, and/or search the page for your question using the CTRL + F keys (PC) or Command (⌘) + F keys on a Apple Mac.
Current Shipping and Payment Questions
UPDATED JANUARY 2025
We love to hear from our customers! If you want help on how to accomplish something specific, have a tip to help your fellow Quik Rack users, or have an idea to improve upon our products please feel free to fill out our Contact Form or email Support@QuikrStuff.com
UPDATED MAY 2026
Keep your rack clean and in good working order by simply using water and soap, nothing more. All metals corrode no matter what treatment they have, so the more you keep them clean, the better they will operate and last.
It works just fine to spray the rack off at the car wash, however we don’t recommend taking it through an automatic car wash.
Read this for step-by-step instructions.
Road salts are very corrosive, so you must be proactive with your rack to keep it in good condition.
NOTE: Do NOT use any greasy lubricants as they attract dirt and prevent the rack from working properly. They also mess with the friction that is necessary to keep the rack arms tight.
UPDATED MAY 2026
One of the innovative features of the Quik Rack Mach2 is the captive safety pin at the hitch (shown with the red knob in the photo below).
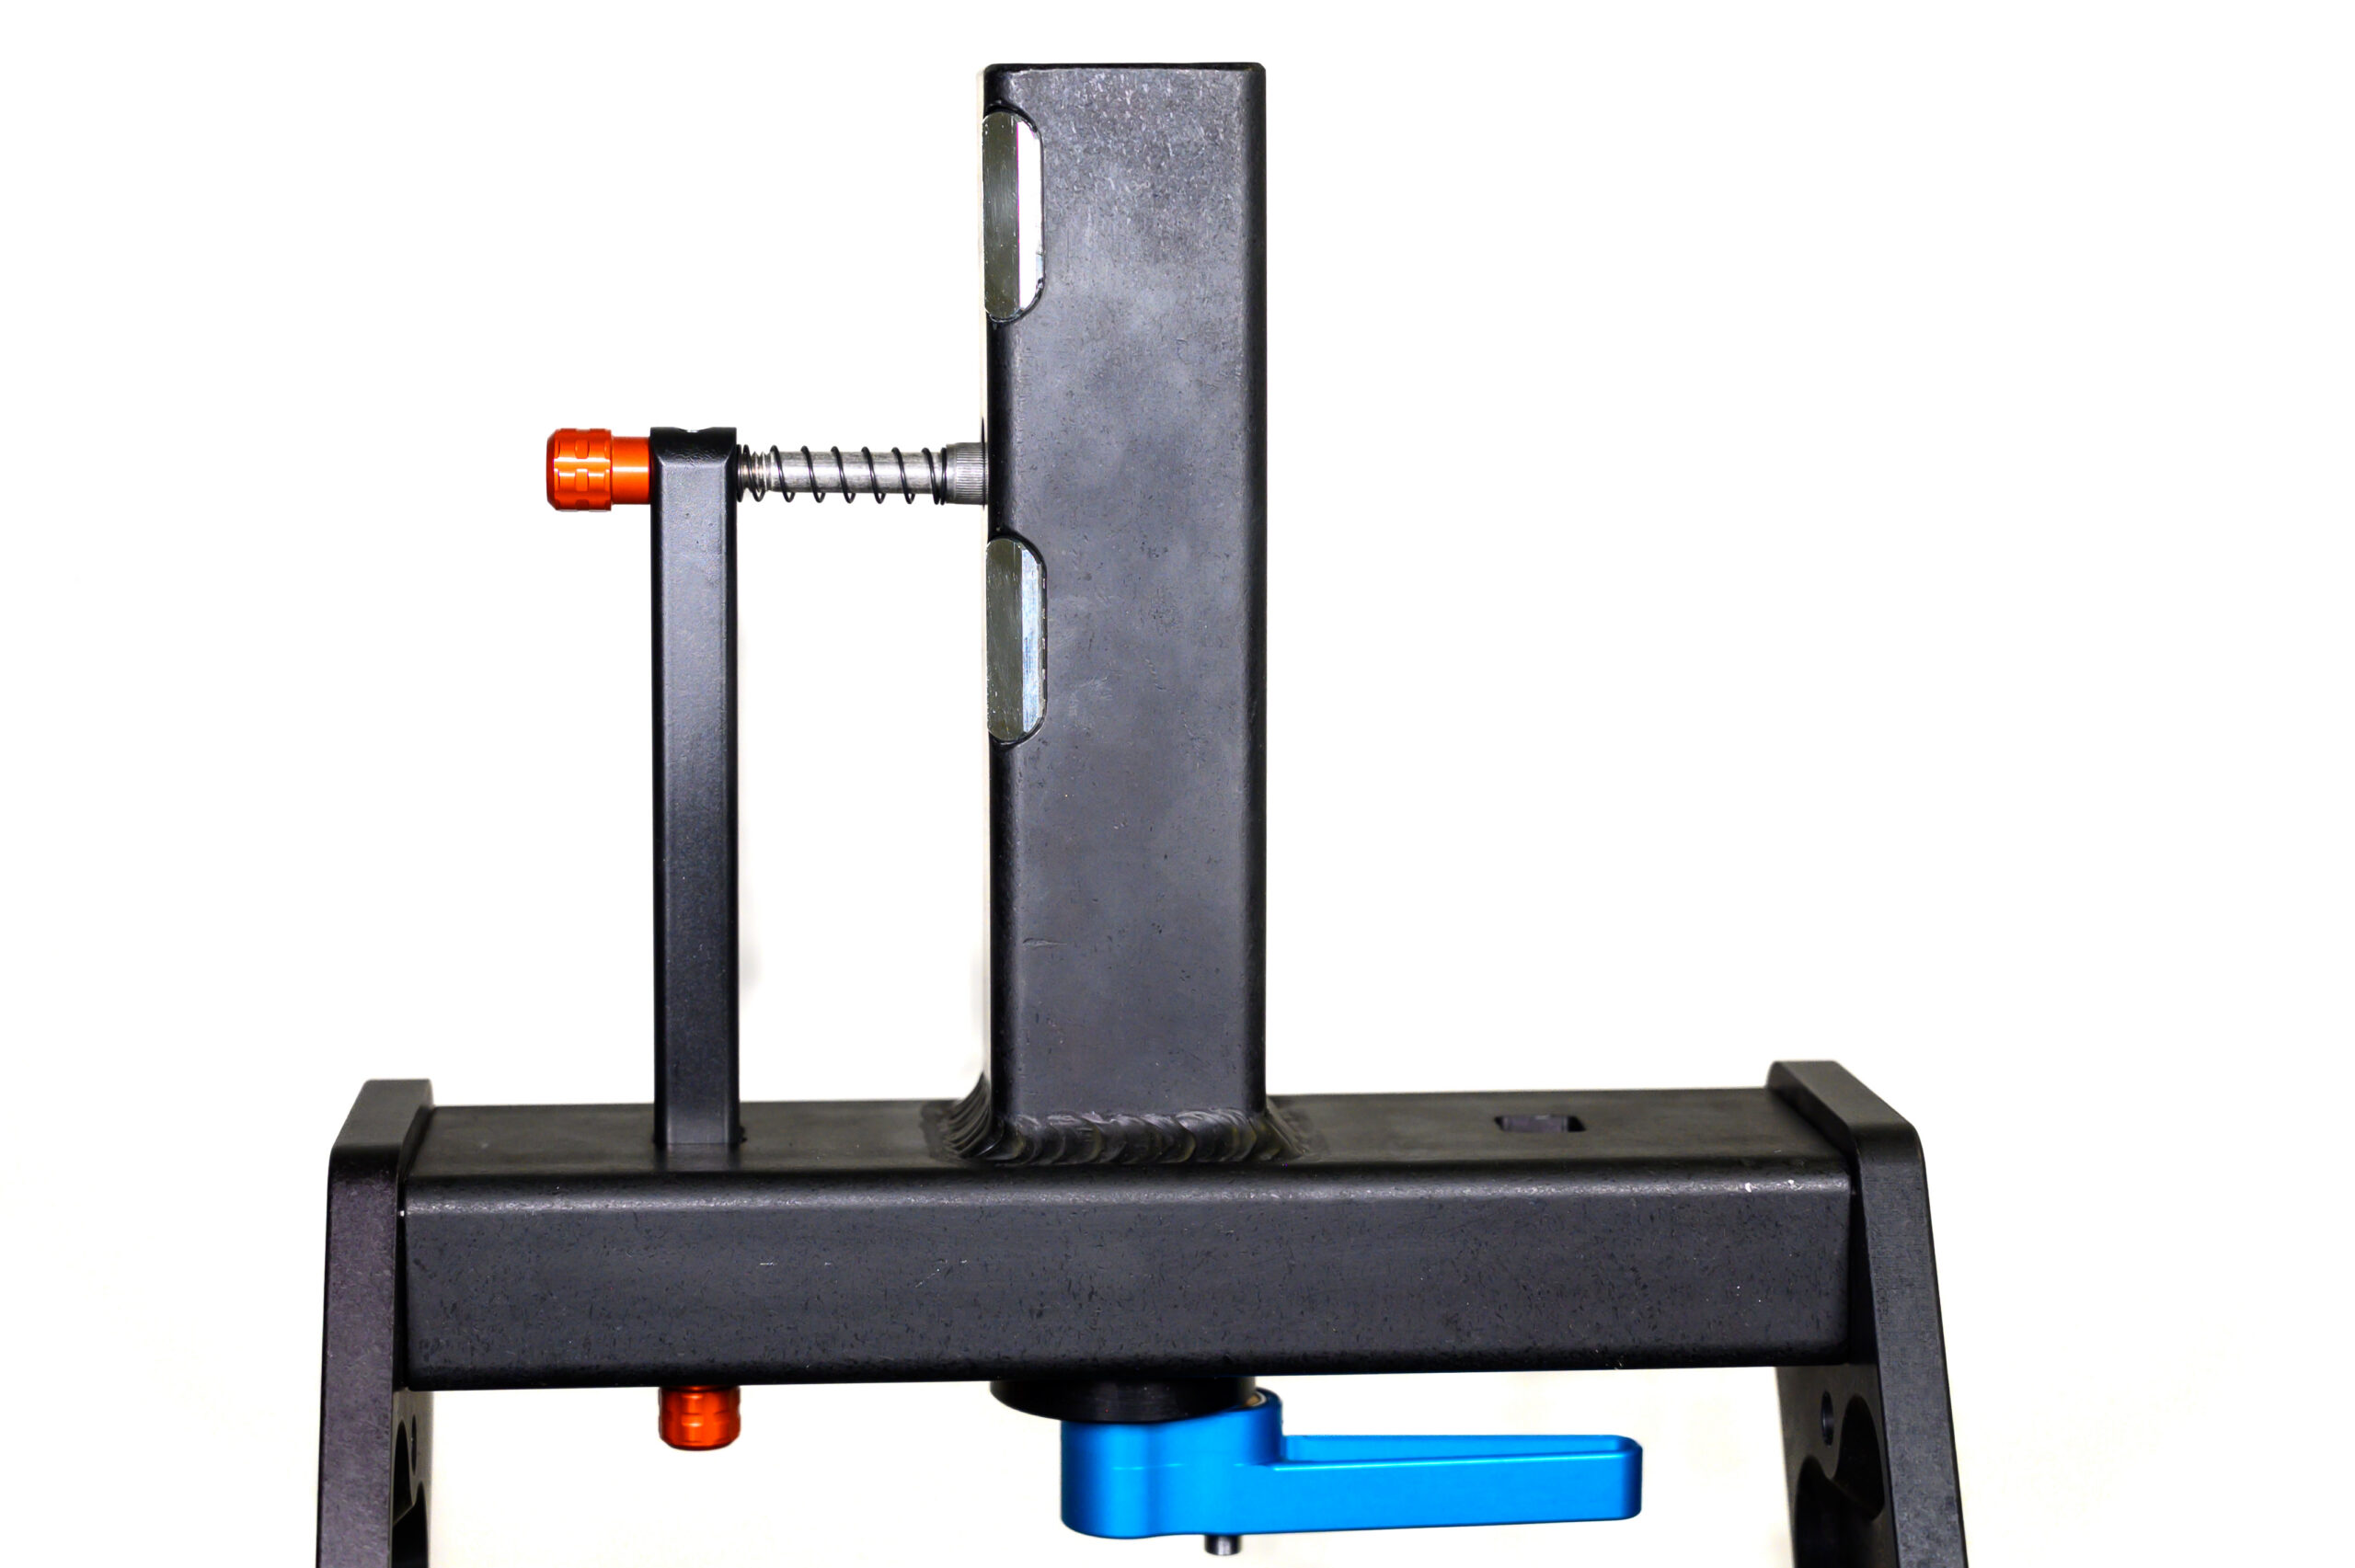
The captive safety pin serves as a fail safe if the rack were to become loosened and start slipping out of the receiver. The rack will only become loose if it isn’t tightened properly with the blue lever, locked, and periodically checked.
The captive safety pin was designed because, for whatever reason, there is no standard when it comes to hitch receivers and their hitch pin holes. We cannot rely on you being able to use a standard hitch pin so the captive safety pin solves this issue for most vehicles.
The captive safety pin does NOT need to reach or sit in the hole in your receiver; it just needs to sit behind the flange (lip) of the receiver. If it does reach and sit in the hole, that’s okay, but don’t worry if it doesn’t.
The captive safety pin can be removed entirely (though we don’t recommend it) and it can easily be switched to the opposite side. This is necessary with some vehicles due to space restraints and electrical connections in the area of the receiver. Once removed, you can use a standard hitch pin bolt with cotter pin or lock.
However, it is not possible to use a standard hitch pin with the 1.25″ hitch or the 1.25″ with the 2″ adapter installed. The reason is because there is no hole going through the adapter. In other words, you can only do this with the 2″ hitch model.
Also, the hole in the hitch insert will not align with the hole in the receiver on all vehicles. Please see the dimensions FAQ to measure the location of the hole and compare it to that of the hole in your receiver.
UPDATED MAY 2026
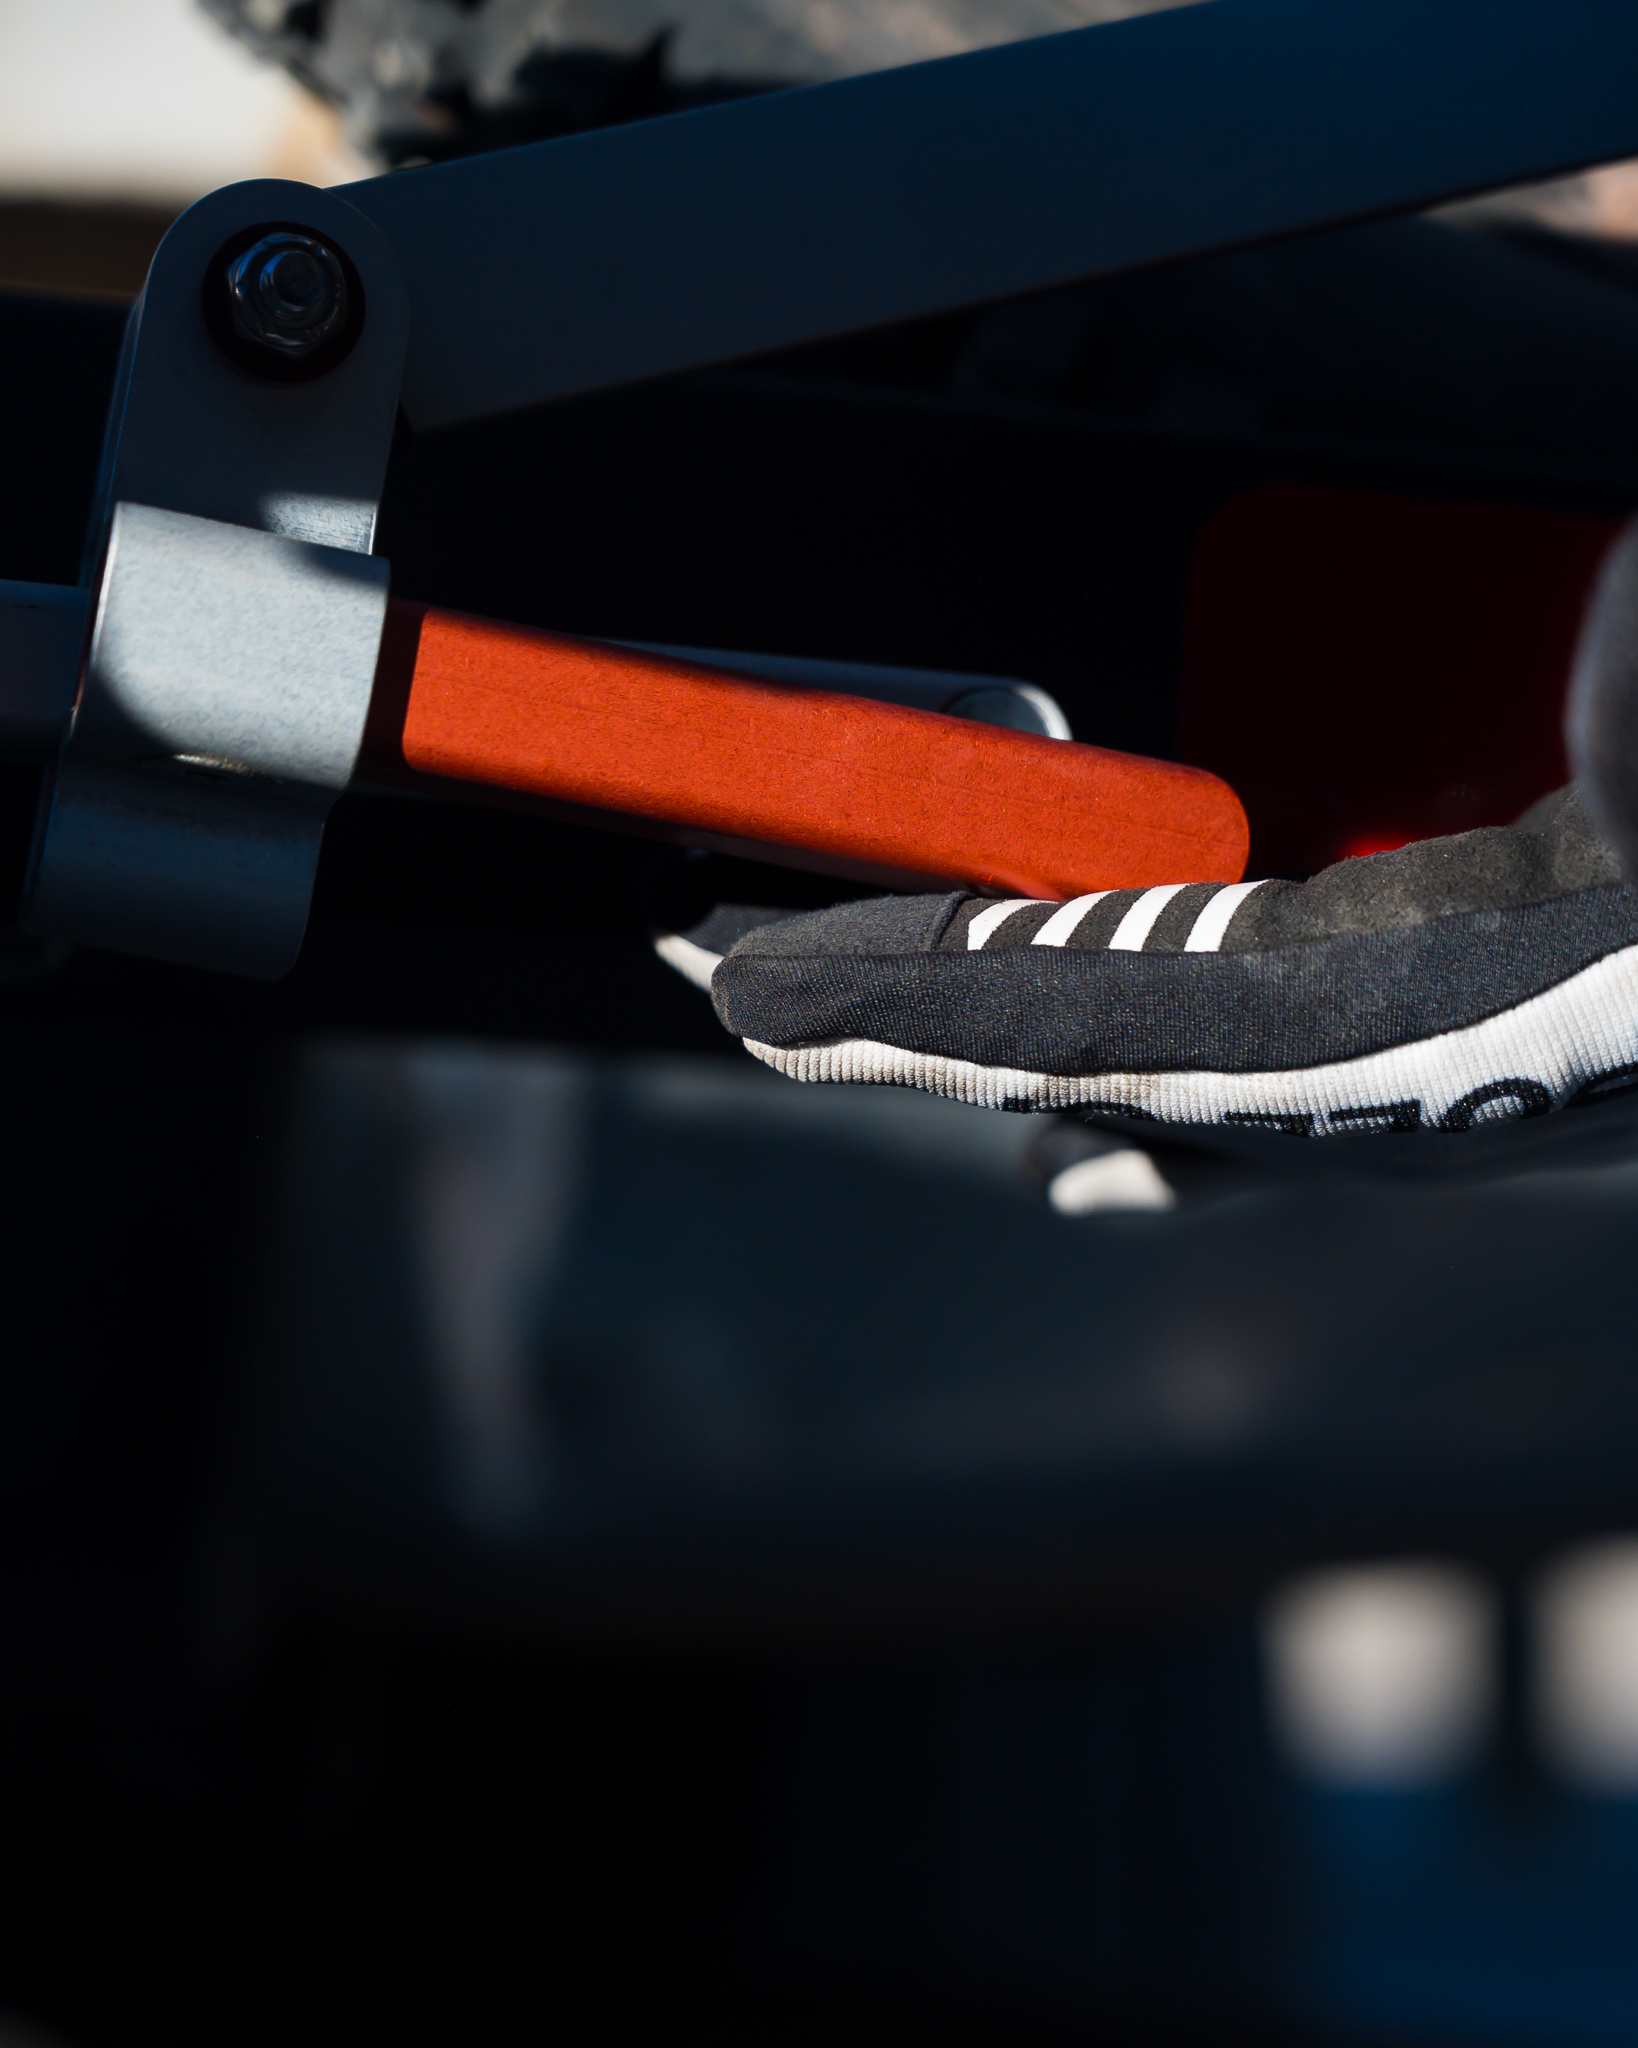
Some squeaking is normal. Usually there is no need to think that there is an issue with the rack. Do NOT use any lubricant as it will collect dirt and prevent the necessary friction to keep the rack arm locked in place. When operating the rack arm, squeaking can be minimized by lifting the red lever parallel with the silver bar as shown below. Also, be sure to periodically wash your rack with soap and water (you can spray it at the car wash) to keep it functioning correctly.
UPDATED MAY 2026
The red easy-access pivot trigger is front and center on the rack and each Add-On. This makes it easy to reach and use. This feature allows you to pivot the rack into four different positions:
- vertical storage position
- 45-degree
- horizontal standard carry position
- hatch access position.
The pivot trigger may feel too tight and too hard to move. It is intentionally made this way. It helps to jiggle the rack back and forth and up and down to get it to release or reseat.
After moving the rack between positions, ensure the red pivot trigger is flush with the two cross bars and not sticking out further than them (this is true for the vertical position and for standard carry position). Again, you can jiggle the rack around to help get the red pivot trigger to drop into its home position. Run your hand or thumb over the pivot trigger after you tilt your rack to check that it is flush with the two cross bars.
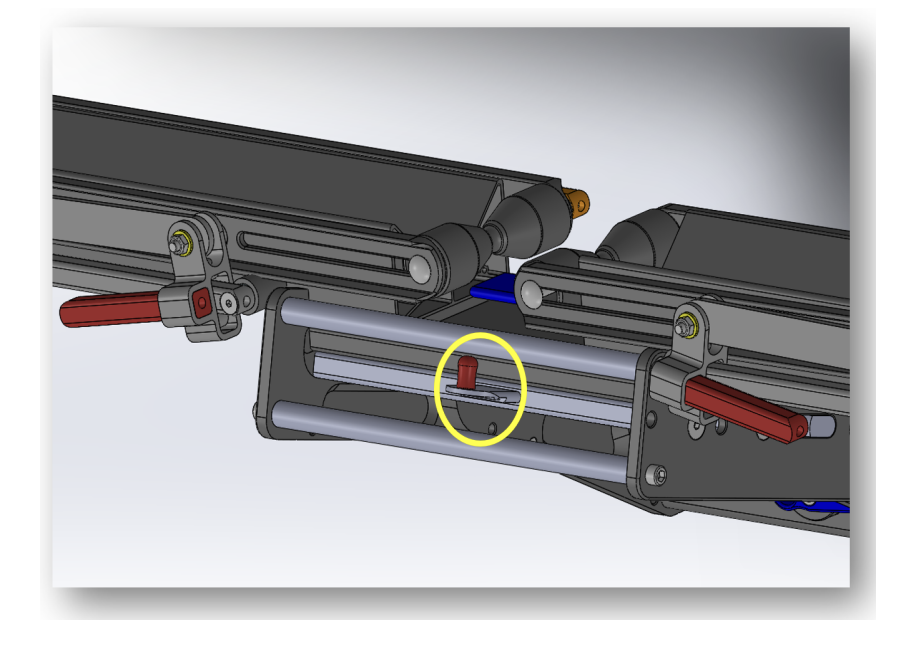
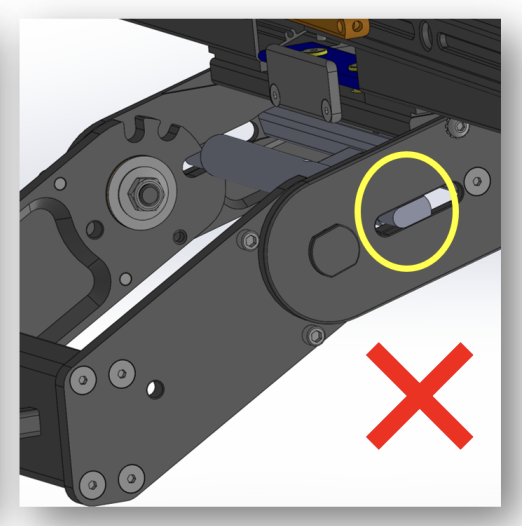
When the red pivot trigger is in its home position, the release bar (circled in yellow below) is reseated and safe to travel with. When you are hauling bikes, the release bar should not be left as it is seen in the illustration below.
See section 4.0 – Usage in the manual – HERE
UPDATED MAY 2026
You might notice that the tire arms on your rack look crooked or possibly even bent.
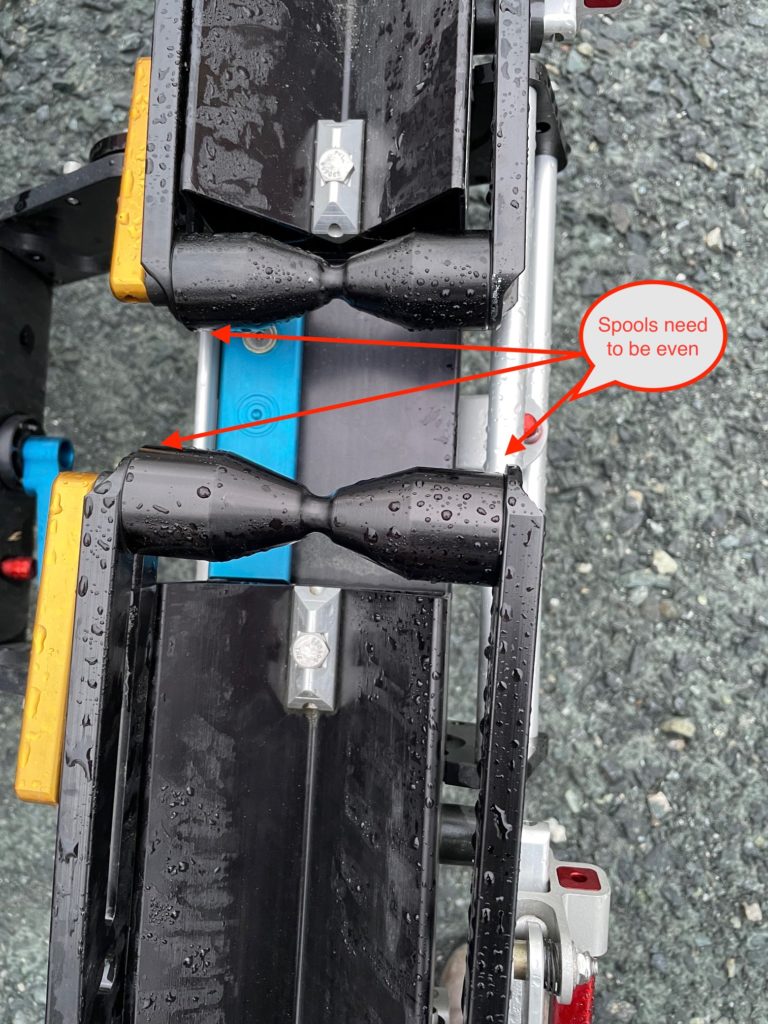
If the spool is slightly slanted, the arm may appear to “bend” and look crooked. Loosen and retighten the tire spools so that they are aligned/evenly positioned on the tire arm. Do this by loosening the gold handle.
Also, you might have to turn the carriage bolt a 1/4 turn either way to make sure the gold lever is tight and against the bar as shown in the picture.
Please watch this video for a visual explanation and solution.
Here is another video that talks about crooked tire arms.
UPDATED MAY 2026
The Mach2 is approved for general off-road use.
Know that going fast over big bumps is like quadrupling the amount of weight you have on the rack (i.e., slow down and don’t intentionally bounce the rack).
Use common sense. Drive slowly and carefully in all off-road situations. If you are driving too fast and hit a big bump that causes damage to your rack or vehicle, it will not be covered under warranty. If you are using the rack on demanding 4×4 terrain and drop off a ledge and bash the rack, this is not covered by warranty.
UPDATED MAY 2026
Our products are not compatible with other companies’ bike racks.
That being said, many customers have ordered the License Plate Kit and used it with other racks.
We cannot provide guidance on fit nor guarantee the full and safe function of our product when it is used in conjunction with third-party accessories, not limited to, but including: hitch extensions, reducers, adapters, swing away pivots, hitch adaptors, bike covers, etc. Any damages that result from the installation and/or use of products and/or parts on your QuikrStuff rack that are not unmodified QuikrStuff parts are not covered by our warranty.
UPDATED MAY 2026
- The Quik Rack Mach2 locks tightly at the hitch, and each add-on component, including the ramp, locks to the one before it. So unless someone has your key–or a saw to cut through the hitch–your QuikrStuff is staying right where it is. It’s unlikely that someone will saw a rack off because without a hitch the rack is nearly impossible to use or resell. If a thief calls us to get parts, we’ll be checking to ensure they are the original or current owner of the rack.
- Many customers check directly with us before buying a rack from a previous owner. They’ll confirm the serial number with us and, if everything checks out, we update our records to reflect the new owner.
- Park strategically–up against a wall, fence, pole, or tree–to make it hard for anyone to access the rack. Also park in well-lit, visible areas to deter attempted theft.
- You can remove and store the rack in your vehicle while you’re out riding. It might seem like a hassle, but the Quik Rack Mach2 is lightweight, folds, and installs quickly without tools.
- With many vehicles, it is possible to use a standard locking hitch pin with the Quik Rack Mach2. You could also add a cable lock.
- Each component–such as the add-on and the ramp–locks to the one before it, so no part of the rack can be easily stolen.
- Be sure your rack is covered by your vehicle or homeowner’s insurance.
- You might want to add a GPS tracker to the rack. One customer discovered that Elevation Labs TagVault AirTag holders fit PERFECTLY on the Mach2 and Add-On and they’re difficult to remove and open.


Specs and Fitment Questions
UPDATED JANUARY 2025
We love to hear from our customers! If you want help on how to accomplish something specific, have a tip to help your fellow Quik Rack users, or have an idea to improve upon our products please feel free to fill out our Contact Form or email Support@QuikrStuff.com
UPDATED MAY 2026
Keep your rack clean and in good working order by simply using water and soap, nothing more. All metals corrode no matter what treatment they have, so the more you keep them clean, the better they will operate and last.
It works just fine to spray the rack off at the car wash, however we don’t recommend taking it through an automatic car wash.
Read this for step-by-step instructions.
Road salts are very corrosive, so you must be proactive with your rack to keep it in good condition.
NOTE: Do NOT use any greasy lubricants as they attract dirt and prevent the rack from working properly. They also mess with the friction that is necessary to keep the rack arms tight.
UPDATED MAY 2026
One of the innovative features of the Quik Rack Mach2 is the captive safety pin at the hitch (shown with the red knob in the photo below).
The captive safety pin serves as a fail safe if the rack were to become loosened and start slipping out of the receiver. The rack will only become loose if it isn’t tightened properly with the blue lever, locked, and periodically checked.
The captive safety pin was designed because, for whatever reason, there is no standard when it comes to hitch receivers and their hitch pin holes. We cannot rely on you being able to use a standard hitch pin so the captive safety pin solves this issue for most vehicles.
The captive safety pin does NOT need to reach or sit in the hole in your receiver; it just needs to sit behind the flange (lip) of the receiver. If it does reach and sit in the hole, that’s okay, but don’t worry if it doesn’t.
The captive safety pin can be removed entirely (though we don’t recommend it) and it can easily be switched to the opposite side. This is necessary with some vehicles due to space restraints and electrical connections in the area of the receiver. Once removed, you can use a standard hitch pin bolt with cotter pin or lock.
However, it is not possible to use a standard hitch pin with the 1.25″ hitch or the 1.25″ with the 2″ adapter installed. The reason is because there is no hole going through the adapter. In other words, you can only do this with the 2″ hitch model.
Also, the hole in the hitch insert will not align with the hole in the receiver on all vehicles. Please see the dimensions FAQ to measure the location of the hole and compare it to that of the hole in your receiver.
UPDATED MAY 2026
Some squeaking is normal. Usually there is no need to think that there is an issue with the rack. Do NOT use any lubricant as it will collect dirt and prevent the necessary friction to keep the rack arm locked in place. When operating the rack arm, squeaking can be minimized by lifting the red lever parallel with the silver bar as shown below. Also, be sure to periodically wash your rack with soap and water (you can spray it at the car wash) to keep it functioning correctly.
UPDATED MAY 2026
The red easy-access pivot trigger is front and center on the rack and each Add-On. This makes it easy to reach and use. This feature allows you to pivot the rack into four different positions:
- vertical storage position
- 45-degree
- horizontal standard carry position
- hatch access position.
The pivot trigger may feel too tight and too hard to move. It is intentionally made this way. It helps to jiggle the rack back and forth and up and down to get it to release or reseat.
After moving the rack between positions, ensure the red pivot trigger is flush with the two cross bars and not sticking out further than them (this is true for the vertical position and for standard carry position). Again, you can jiggle the rack around to help get the red pivot trigger to drop into its home position. Run your hand or thumb over the pivot trigger after you tilt your rack to check that it is flush with the two cross bars.
When the red pivot trigger is in its home position, the release bar (circled in yellow below) is reseated and safe to travel with. When you are hauling bikes, the release bar should not be left as it is seen in the illustration below.
See section 4.0 – Usage in the manual – HERE
UPDATED MAY 2026
You might notice that the tire arms on your rack look crooked or possibly even bent.
If the spool is slightly slanted, the arm may appear to “bend” and look crooked. Loosen and retighten the tire spools so that they are aligned/evenly positioned on the tire arm. Do this by loosening the gold handle.
Also, you might have to turn the carriage bolt a 1/4 turn either way to make sure the gold lever is tight and against the bar as shown in the picture.
Please watch this video for a visual explanation and solution.
Here is another video that talks about crooked tire arms.
UPDATED MAY 2026
The Mach2 is approved for general off-road use.
Know that going fast over big bumps is like quadrupling the amount of weight you have on the rack (i.e., slow down and don’t intentionally bounce the rack).
Use common sense. Drive slowly and carefully in all off-road situations. If you are driving too fast and hit a big bump that causes damage to your rack or vehicle, it will not be covered under warranty. If you are using the rack on demanding 4×4 terrain and drop off a ledge and bash the rack, this is not covered by warranty.
UPDATED MAY 2026
Our products are not compatible with other companies’ bike racks.
That being said, many customers have ordered the License Plate Kit and used it with other racks.
We cannot provide guidance on fit nor guarantee the full and safe function of our product when it is used in conjunction with third-party accessories, not limited to, but including: hitch extensions, reducers, adapters, swing away pivots, hitch adaptors, bike covers, etc. Any damages that result from the installation and/or use of products and/or parts on your QuikrStuff rack that are not unmodified QuikrStuff parts are not covered by our warranty.
UPDATED MAY 2026
- The Quik Rack Mach2 locks tightly at the hitch, and each add-on component, including the ramp, locks to the one before it. So unless someone has your key–or a saw to cut through the hitch–your QuikrStuff is staying right where it is. It’s unlikely that someone will saw a rack off because without a hitch the rack is nearly impossible to use or resell. If a thief calls us to get parts, we’ll be checking to ensure they are the original or current owner of the rack.
- Many customers check directly with us before buying a rack from a previous owner. They’ll confirm the serial number with us and, if everything checks out, we update our records to reflect the new owner.
- Park strategically–up against a wall, fence, pole, or tree–to make it hard for anyone to access the rack. Also park in well-lit, visible areas to deter attempted theft.
- You can remove and store the rack in your vehicle while you’re out riding. It might seem like a hassle, but the Quik Rack Mach2 is lightweight, folds, and installs quickly without tools.
- With many vehicles, it is possible to use a standard locking hitch pin with the Quik Rack Mach2. You could also add a cable lock.
- Each component–such as the add-on and the ramp–locks to the one before it, so no part of the rack can be easily stolen.
- Be sure your rack is covered by your vehicle or homeowner’s insurance.
- You might want to add a GPS tracker to the rack. One customer discovered that Elevation Labs TagVault AirTag holders fit PERFECTLY on the Mach2 and Add-On and they’re difficult to remove and open.
Features
UPDATED JANUARY 2025
We love to hear from our customers! If you want help on how to accomplish something specific, have a tip to help your fellow Quik Rack users, or have an idea to improve upon our products please feel free to fill out our Contact Form or email Support@QuikrStuff.com
UPDATED MAY 2026
Keep your rack clean and in good working order by simply using water and soap, nothing more. All metals corrode no matter what treatment they have, so the more you keep them clean, the better they will operate and last.
It works just fine to spray the rack off at the car wash, however we don’t recommend taking it through an automatic car wash.
Read this for step-by-step instructions.
Road salts are very corrosive, so you must be proactive with your rack to keep it in good condition.
NOTE: Do NOT use any greasy lubricants as they attract dirt and prevent the rack from working properly. They also mess with the friction that is necessary to keep the rack arms tight.
UPDATED MAY 2026
One of the innovative features of the Quik Rack Mach2 is the captive safety pin at the hitch (shown with the red knob in the photo below).
The captive safety pin serves as a fail safe if the rack were to become loosened and start slipping out of the receiver. The rack will only become loose if it isn’t tightened properly with the blue lever, locked, and periodically checked.
The captive safety pin was designed because, for whatever reason, there is no standard when it comes to hitch receivers and their hitch pin holes. We cannot rely on you being able to use a standard hitch pin so the captive safety pin solves this issue for most vehicles.
The captive safety pin does NOT need to reach or sit in the hole in your receiver; it just needs to sit behind the flange (lip) of the receiver. If it does reach and sit in the hole, that’s okay, but don’t worry if it doesn’t.
The captive safety pin can be removed entirely (though we don’t recommend it) and it can easily be switched to the opposite side. This is necessary with some vehicles due to space restraints and electrical connections in the area of the receiver. Once removed, you can use a standard hitch pin bolt with cotter pin or lock.
However, it is not possible to use a standard hitch pin with the 1.25″ hitch or the 1.25″ with the 2″ adapter installed. The reason is because there is no hole going through the adapter. In other words, you can only do this with the 2″ hitch model.
Also, the hole in the hitch insert will not align with the hole in the receiver on all vehicles. Please see the dimensions FAQ to measure the location of the hole and compare it to that of the hole in your receiver.
UPDATED MAY 2026
Some squeaking is normal. Usually there is no need to think that there is an issue with the rack. Do NOT use any lubricant as it will collect dirt and prevent the necessary friction to keep the rack arm locked in place. When operating the rack arm, squeaking can be minimized by lifting the red lever parallel with the silver bar as shown below. Also, be sure to periodically wash your rack with soap and water (you can spray it at the car wash) to keep it functioning correctly.
UPDATED MAY 2026
The red easy-access pivot trigger is front and center on the rack and each Add-On. This makes it easy to reach and use. This feature allows you to pivot the rack into four different positions:
- vertical storage position
- 45-degree
- horizontal standard carry position
- hatch access position.
The pivot trigger may feel too tight and too hard to move. It is intentionally made this way. It helps to jiggle the rack back and forth and up and down to get it to release or reseat.
After moving the rack between positions, ensure the red pivot trigger is flush with the two cross bars and not sticking out further than them (this is true for the vertical position and for standard carry position). Again, you can jiggle the rack around to help get the red pivot trigger to drop into its home position. Run your hand or thumb over the pivot trigger after you tilt your rack to check that it is flush with the two cross bars.
When the red pivot trigger is in its home position, the release bar (circled in yellow below) is reseated and safe to travel with. When you are hauling bikes, the release bar should not be left as it is seen in the illustration below.
See section 4.0 – Usage in the manual – HERE
UPDATED MAY 2026
You might notice that the tire arms on your rack look crooked or possibly even bent.
If the spool is slightly slanted, the arm may appear to “bend” and look crooked. Loosen and retighten the tire spools so that they are aligned/evenly positioned on the tire arm. Do this by loosening the gold handle.
Also, you might have to turn the carriage bolt a 1/4 turn either way to make sure the gold lever is tight and against the bar as shown in the picture.
Please watch this video for a visual explanation and solution.
Here is another video that talks about crooked tire arms.
UPDATED MAY 2026
The Mach2 is approved for general off-road use.
Know that going fast over big bumps is like quadrupling the amount of weight you have on the rack (i.e., slow down and don’t intentionally bounce the rack).
Use common sense. Drive slowly and carefully in all off-road situations. If you are driving too fast and hit a big bump that causes damage to your rack or vehicle, it will not be covered under warranty. If you are using the rack on demanding 4×4 terrain and drop off a ledge and bash the rack, this is not covered by warranty.
UPDATED MAY 2026
Our products are not compatible with other companies’ bike racks.
That being said, many customers have ordered the License Plate Kit and used it with other racks.
We cannot provide guidance on fit nor guarantee the full and safe function of our product when it is used in conjunction with third-party accessories, not limited to, but including: hitch extensions, reducers, adapters, swing away pivots, hitch adaptors, bike covers, etc. Any damages that result from the installation and/or use of products and/or parts on your QuikrStuff rack that are not unmodified QuikrStuff parts are not covered by our warranty.
UPDATED MAY 2026
- The Quik Rack Mach2 locks tightly at the hitch, and each add-on component, including the ramp, locks to the one before it. So unless someone has your key–or a saw to cut through the hitch–your QuikrStuff is staying right where it is. It’s unlikely that someone will saw a rack off because without a hitch the rack is nearly impossible to use or resell. If a thief calls us to get parts, we’ll be checking to ensure they are the original or current owner of the rack.
- Many customers check directly with us before buying a rack from a previous owner. They’ll confirm the serial number with us and, if everything checks out, we update our records to reflect the new owner.
- Park strategically–up against a wall, fence, pole, or tree–to make it hard for anyone to access the rack. Also park in well-lit, visible areas to deter attempted theft.
- You can remove and store the rack in your vehicle while you’re out riding. It might seem like a hassle, but the Quik Rack Mach2 is lightweight, folds, and installs quickly without tools.
- With many vehicles, it is possible to use a standard locking hitch pin with the Quik Rack Mach2. You could also add a cable lock.
- Each component–such as the add-on and the ramp–locks to the one before it, so no part of the rack can be easily stolen.
- Be sure your rack is covered by your vehicle or homeowner’s insurance.
- You might want to add a GPS tracker to the rack. One customer discovered that Elevation Labs TagVault AirTag holders fit PERFECTLY on the Mach2 and Add-On and they’re difficult to remove and open.
General Quik-Rack Questions
UPDATED JANUARY 2025
We love to hear from our customers! If you want help on how to accomplish something specific, have a tip to help your fellow Quik Rack users, or have an idea to improve upon our products please feel free to fill out our Contact Form or email Support@QuikrStuff.com
UPDATED MAY 2026
Keep your rack clean and in good working order by simply using water and soap, nothing more. All metals corrode no matter what treatment they have, so the more you keep them clean, the better they will operate and last.
It works just fine to spray the rack off at the car wash, however we don’t recommend taking it through an automatic car wash.
Read this for step-by-step instructions.
Road salts are very corrosive, so you must be proactive with your rack to keep it in good condition.
NOTE: Do NOT use any greasy lubricants as they attract dirt and prevent the rack from working properly. They also mess with the friction that is necessary to keep the rack arms tight.
UPDATED MAY 2026
One of the innovative features of the Quik Rack Mach2 is the captive safety pin at the hitch (shown with the red knob in the photo below).
The captive safety pin serves as a fail safe if the rack were to become loosened and start slipping out of the receiver. The rack will only become loose if it isn’t tightened properly with the blue lever, locked, and periodically checked.
The captive safety pin was designed because, for whatever reason, there is no standard when it comes to hitch receivers and their hitch pin holes. We cannot rely on you being able to use a standard hitch pin so the captive safety pin solves this issue for most vehicles.
The captive safety pin does NOT need to reach or sit in the hole in your receiver; it just needs to sit behind the flange (lip) of the receiver. If it does reach and sit in the hole, that’s okay, but don’t worry if it doesn’t.
The captive safety pin can be removed entirely (though we don’t recommend it) and it can easily be switched to the opposite side. This is necessary with some vehicles due to space restraints and electrical connections in the area of the receiver. Once removed, you can use a standard hitch pin bolt with cotter pin or lock.
However, it is not possible to use a standard hitch pin with the 1.25″ hitch or the 1.25″ with the 2″ adapter installed. The reason is because there is no hole going through the adapter. In other words, you can only do this with the 2″ hitch model.
Also, the hole in the hitch insert will not align with the hole in the receiver on all vehicles. Please see the dimensions FAQ to measure the location of the hole and compare it to that of the hole in your receiver.
UPDATED MAY 2026
Some squeaking is normal. Usually there is no need to think that there is an issue with the rack. Do NOT use any lubricant as it will collect dirt and prevent the necessary friction to keep the rack arm locked in place. When operating the rack arm, squeaking can be minimized by lifting the red lever parallel with the silver bar as shown below. Also, be sure to periodically wash your rack with soap and water (you can spray it at the car wash) to keep it functioning correctly.
UPDATED MAY 2026
The red easy-access pivot trigger is front and center on the rack and each Add-On. This makes it easy to reach and use. This feature allows you to pivot the rack into four different positions:
- vertical storage position
- 45-degree
- horizontal standard carry position
- hatch access position.
The pivot trigger may feel too tight and too hard to move. It is intentionally made this way. It helps to jiggle the rack back and forth and up and down to get it to release or reseat.
After moving the rack between positions, ensure the red pivot trigger is flush with the two cross bars and not sticking out further than them (this is true for the vertical position and for standard carry position). Again, you can jiggle the rack around to help get the red pivot trigger to drop into its home position. Run your hand or thumb over the pivot trigger after you tilt your rack to check that it is flush with the two cross bars.
When the red pivot trigger is in its home position, the release bar (circled in yellow below) is reseated and safe to travel with. When you are hauling bikes, the release bar should not be left as it is seen in the illustration below.
See section 4.0 – Usage in the manual – HERE
UPDATED MAY 2026
You might notice that the tire arms on your rack look crooked or possibly even bent.
If the spool is slightly slanted, the arm may appear to “bend” and look crooked. Loosen and retighten the tire spools so that they are aligned/evenly positioned on the tire arm. Do this by loosening the gold handle.
Also, you might have to turn the carriage bolt a 1/4 turn either way to make sure the gold lever is tight and against the bar as shown in the picture.
Please watch this video for a visual explanation and solution.
Here is another video that talks about crooked tire arms.
UPDATED MAY 2026
The Mach2 is approved for general off-road use.
Know that going fast over big bumps is like quadrupling the amount of weight you have on the rack (i.e., slow down and don’t intentionally bounce the rack).
Use common sense. Drive slowly and carefully in all off-road situations. If you are driving too fast and hit a big bump that causes damage to your rack or vehicle, it will not be covered under warranty. If you are using the rack on demanding 4×4 terrain and drop off a ledge and bash the rack, this is not covered by warranty.
UPDATED MAY 2026
Our products are not compatible with other companies’ bike racks.
That being said, many customers have ordered the License Plate Kit and used it with other racks.
We cannot provide guidance on fit nor guarantee the full and safe function of our product when it is used in conjunction with third-party accessories, not limited to, but including: hitch extensions, reducers, adapters, swing away pivots, hitch adaptors, bike covers, etc. Any damages that result from the installation and/or use of products and/or parts on your QuikrStuff rack that are not unmodified QuikrStuff parts are not covered by our warranty.
UPDATED MAY 2026
- The Quik Rack Mach2 locks tightly at the hitch, and each add-on component, including the ramp, locks to the one before it. So unless someone has your key–or a saw to cut through the hitch–your QuikrStuff is staying right where it is. It’s unlikely that someone will saw a rack off because without a hitch the rack is nearly impossible to use or resell. If a thief calls us to get parts, we’ll be checking to ensure they are the original or current owner of the rack.
- Many customers check directly with us before buying a rack from a previous owner. They’ll confirm the serial number with us and, if everything checks out, we update our records to reflect the new owner.
- Park strategically–up against a wall, fence, pole, or tree–to make it hard for anyone to access the rack. Also park in well-lit, visible areas to deter attempted theft.
- You can remove and store the rack in your vehicle while you’re out riding. It might seem like a hassle, but the Quik Rack Mach2 is lightweight, folds, and installs quickly without tools.
- With many vehicles, it is possible to use a standard locking hitch pin with the Quik Rack Mach2. You could also add a cable lock.
- Each component–such as the add-on and the ramp–locks to the one before it, so no part of the rack can be easily stolen.
- Be sure your rack is covered by your vehicle or homeowner’s insurance.
- You might want to add a GPS tracker to the rack. One customer discovered that Elevation Labs TagVault AirTag holders fit PERFECTLY on the Mach2 and Add-On and they’re difficult to remove and open.
Usage and Troubleshooting
UPDATED JANUARY 2025
We love to hear from our customers! If you want help on how to accomplish something specific, have a tip to help your fellow Quik Rack users, or have an idea to improve upon our products please feel free to fill out our Contact Form or email Support@QuikrStuff.com
UPDATED MAY 2026
Keep your rack clean and in good working order by simply using water and soap, nothing more. All metals corrode no matter what treatment they have, so the more you keep them clean, the better they will operate and last.
It works just fine to spray the rack off at the car wash, however we don’t recommend taking it through an automatic car wash.
Read this for step-by-step instructions.
Road salts are very corrosive, so you must be proactive with your rack to keep it in good condition.
NOTE: Do NOT use any greasy lubricants as they attract dirt and prevent the rack from working properly. They also mess with the friction that is necessary to keep the rack arms tight.
UPDATED MAY 2026
One of the innovative features of the Quik Rack Mach2 is the captive safety pin at the hitch (shown with the red knob in the photo below).
The captive safety pin serves as a fail safe if the rack were to become loosened and start slipping out of the receiver. The rack will only become loose if it isn’t tightened properly with the blue lever, locked, and periodically checked.
The captive safety pin was designed because, for whatever reason, there is no standard when it comes to hitch receivers and their hitch pin holes. We cannot rely on you being able to use a standard hitch pin so the captive safety pin solves this issue for most vehicles.
The captive safety pin does NOT need to reach or sit in the hole in your receiver; it just needs to sit behind the flange (lip) of the receiver. If it does reach and sit in the hole, that’s okay, but don’t worry if it doesn’t.
The captive safety pin can be removed entirely (though we don’t recommend it) and it can easily be switched to the opposite side. This is necessary with some vehicles due to space restraints and electrical connections in the area of the receiver. Once removed, you can use a standard hitch pin bolt with cotter pin or lock.
However, it is not possible to use a standard hitch pin with the 1.25″ hitch or the 1.25″ with the 2″ adapter installed. The reason is because there is no hole going through the adapter. In other words, you can only do this with the 2″ hitch model.
Also, the hole in the hitch insert will not align with the hole in the receiver on all vehicles. Please see the dimensions FAQ to measure the location of the hole and compare it to that of the hole in your receiver.
UPDATED MAY 2026
Some squeaking is normal. Usually there is no need to think that there is an issue with the rack. Do NOT use any lubricant as it will collect dirt and prevent the necessary friction to keep the rack arm locked in place. When operating the rack arm, squeaking can be minimized by lifting the red lever parallel with the silver bar as shown below. Also, be sure to periodically wash your rack with soap and water (you can spray it at the car wash) to keep it functioning correctly.
UPDATED MAY 2026
The red easy-access pivot trigger is front and center on the rack and each Add-On. This makes it easy to reach and use. This feature allows you to pivot the rack into four different positions:
- vertical storage position
- 45-degree
- horizontal standard carry position
- hatch access position.
The pivot trigger may feel too tight and too hard to move. It is intentionally made this way. It helps to jiggle the rack back and forth and up and down to get it to release or reseat.
After moving the rack between positions, ensure the red pivot trigger is flush with the two cross bars and not sticking out further than them (this is true for the vertical position and for standard carry position). Again, you can jiggle the rack around to help get the red pivot trigger to drop into its home position. Run your hand or thumb over the pivot trigger after you tilt your rack to check that it is flush with the two cross bars.
When the red pivot trigger is in its home position, the release bar (circled in yellow below) is reseated and safe to travel with. When you are hauling bikes, the release bar should not be left as it is seen in the illustration below.
See section 4.0 – Usage in the manual – HERE
UPDATED MAY 2026
You might notice that the tire arms on your rack look crooked or possibly even bent.
If the spool is slightly slanted, the arm may appear to “bend” and look crooked. Loosen and retighten the tire spools so that they are aligned/evenly positioned on the tire arm. Do this by loosening the gold handle.
Also, you might have to turn the carriage bolt a 1/4 turn either way to make sure the gold lever is tight and against the bar as shown in the picture.
Please watch this video for a visual explanation and solution.
Here is another video that talks about crooked tire arms.
UPDATED MAY 2026
The Mach2 is approved for general off-road use.
Know that going fast over big bumps is like quadrupling the amount of weight you have on the rack (i.e., slow down and don’t intentionally bounce the rack).
Use common sense. Drive slowly and carefully in all off-road situations. If you are driving too fast and hit a big bump that causes damage to your rack or vehicle, it will not be covered under warranty. If you are using the rack on demanding 4×4 terrain and drop off a ledge and bash the rack, this is not covered by warranty.
UPDATED MAY 2026
Our products are not compatible with other companies’ bike racks.
That being said, many customers have ordered the License Plate Kit and used it with other racks.
We cannot provide guidance on fit nor guarantee the full and safe function of our product when it is used in conjunction with third-party accessories, not limited to, but including: hitch extensions, reducers, adapters, swing away pivots, hitch adaptors, bike covers, etc. Any damages that result from the installation and/or use of products and/or parts on your QuikrStuff rack that are not unmodified QuikrStuff parts are not covered by our warranty.
UPDATED MAY 2026
- The Quik Rack Mach2 locks tightly at the hitch, and each add-on component, including the ramp, locks to the one before it. So unless someone has your key–or a saw to cut through the hitch–your QuikrStuff is staying right where it is. It’s unlikely that someone will saw a rack off because without a hitch the rack is nearly impossible to use or resell. If a thief calls us to get parts, we’ll be checking to ensure they are the original or current owner of the rack.
- Many customers check directly with us before buying a rack from a previous owner. They’ll confirm the serial number with us and, if everything checks out, we update our records to reflect the new owner.
- Park strategically–up against a wall, fence, pole, or tree–to make it hard for anyone to access the rack. Also park in well-lit, visible areas to deter attempted theft.
- You can remove and store the rack in your vehicle while you’re out riding. It might seem like a hassle, but the Quik Rack Mach2 is lightweight, folds, and installs quickly without tools.
- With many vehicles, it is possible to use a standard locking hitch pin with the Quik Rack Mach2. You could also add a cable lock.
- Each component–such as the add-on and the ramp–locks to the one before it, so no part of the rack can be easily stolen.
- Be sure your rack is covered by your vehicle or homeowner’s insurance.
- You might want to add a GPS tracker to the rack. One customer discovered that Elevation Labs TagVault AirTag holders fit PERFECTLY on the Mach2 and Add-On and they’re difficult to remove and open.
Archives
UPDATED JANUARY 2025
We love to hear from our customers! If you want help on how to accomplish something specific, have a tip to help your fellow Quik Rack users, or have an idea to improve upon our products please feel free to fill out our Contact Form or email Support@QuikrStuff.com
UPDATED MAY 2026
Keep your rack clean and in good working order by simply using water and soap, nothing more. All metals corrode no matter what treatment they have, so the more you keep them clean, the better they will operate and last.
It works just fine to spray the rack off at the car wash, however we don’t recommend taking it through an automatic car wash.
Read this for step-by-step instructions.
Road salts are very corrosive, so you must be proactive with your rack to keep it in good condition.
NOTE: Do NOT use any greasy lubricants as they attract dirt and prevent the rack from working properly. They also mess with the friction that is necessary to keep the rack arms tight.
UPDATED MAY 2026
One of the innovative features of the Quik Rack Mach2 is the captive safety pin at the hitch (shown with the red knob in the photo below).
The captive safety pin serves as a fail safe if the rack were to become loosened and start slipping out of the receiver. The rack will only become loose if it isn’t tightened properly with the blue lever, locked, and periodically checked.
The captive safety pin was designed because, for whatever reason, there is no standard when it comes to hitch receivers and their hitch pin holes. We cannot rely on you being able to use a standard hitch pin so the captive safety pin solves this issue for most vehicles.
The captive safety pin does NOT need to reach or sit in the hole in your receiver; it just needs to sit behind the flange (lip) of the receiver. If it does reach and sit in the hole, that’s okay, but don’t worry if it doesn’t.
The captive safety pin can be removed entirely (though we don’t recommend it) and it can easily be switched to the opposite side. This is necessary with some vehicles due to space restraints and electrical connections in the area of the receiver. Once removed, you can use a standard hitch pin bolt with cotter pin or lock.
However, it is not possible to use a standard hitch pin with the 1.25″ hitch or the 1.25″ with the 2″ adapter installed. The reason is because there is no hole going through the adapter. In other words, you can only do this with the 2″ hitch model.
Also, the hole in the hitch insert will not align with the hole in the receiver on all vehicles. Please see the dimensions FAQ to measure the location of the hole and compare it to that of the hole in your receiver.
UPDATED MAY 2026
Some squeaking is normal. Usually there is no need to think that there is an issue with the rack. Do NOT use any lubricant as it will collect dirt and prevent the necessary friction to keep the rack arm locked in place. When operating the rack arm, squeaking can be minimized by lifting the red lever parallel with the silver bar as shown below. Also, be sure to periodically wash your rack with soap and water (you can spray it at the car wash) to keep it functioning correctly.
UPDATED MAY 2026
The red easy-access pivot trigger is front and center on the rack and each Add-On. This makes it easy to reach and use. This feature allows you to pivot the rack into four different positions:
- vertical storage position
- 45-degree
- horizontal standard carry position
- hatch access position.
The pivot trigger may feel too tight and too hard to move. It is intentionally made this way. It helps to jiggle the rack back and forth and up and down to get it to release or reseat.
After moving the rack between positions, ensure the red pivot trigger is flush with the two cross bars and not sticking out further than them (this is true for the vertical position and for standard carry position). Again, you can jiggle the rack around to help get the red pivot trigger to drop into its home position. Run your hand or thumb over the pivot trigger after you tilt your rack to check that it is flush with the two cross bars.
When the red pivot trigger is in its home position, the release bar (circled in yellow below) is reseated and safe to travel with. When you are hauling bikes, the release bar should not be left as it is seen in the illustration below.
See section 4.0 – Usage in the manual – HERE
UPDATED MAY 2026
You might notice that the tire arms on your rack look crooked or possibly even bent.
If the spool is slightly slanted, the arm may appear to “bend” and look crooked. Loosen and retighten the tire spools so that they are aligned/evenly positioned on the tire arm. Do this by loosening the gold handle.
Also, you might have to turn the carriage bolt a 1/4 turn either way to make sure the gold lever is tight and against the bar as shown in the picture.
Please watch this video for a visual explanation and solution.
Here is another video that talks about crooked tire arms.
UPDATED MAY 2026
The Mach2 is approved for general off-road use.
Know that going fast over big bumps is like quadrupling the amount of weight you have on the rack (i.e., slow down and don’t intentionally bounce the rack).
Use common sense. Drive slowly and carefully in all off-road situations. If you are driving too fast and hit a big bump that causes damage to your rack or vehicle, it will not be covered under warranty. If you are using the rack on demanding 4×4 terrain and drop off a ledge and bash the rack, this is not covered by warranty.
UPDATED MAY 2026
Our products are not compatible with other companies’ bike racks.
That being said, many customers have ordered the License Plate Kit and used it with other racks.
We cannot provide guidance on fit nor guarantee the full and safe function of our product when it is used in conjunction with third-party accessories, not limited to, but including: hitch extensions, reducers, adapters, swing away pivots, hitch adaptors, bike covers, etc. Any damages that result from the installation and/or use of products and/or parts on your QuikrStuff rack that are not unmodified QuikrStuff parts are not covered by our warranty.
UPDATED MAY 2026
- The Quik Rack Mach2 locks tightly at the hitch, and each add-on component, including the ramp, locks to the one before it. So unless someone has your key–or a saw to cut through the hitch–your QuikrStuff is staying right where it is. It’s unlikely that someone will saw a rack off because without a hitch the rack is nearly impossible to use or resell. If a thief calls us to get parts, we’ll be checking to ensure they are the original or current owner of the rack.
- Many customers check directly with us before buying a rack from a previous owner. They’ll confirm the serial number with us and, if everything checks out, we update our records to reflect the new owner.
- Park strategically–up against a wall, fence, pole, or tree–to make it hard for anyone to access the rack. Also park in well-lit, visible areas to deter attempted theft.
- You can remove and store the rack in your vehicle while you’re out riding. It might seem like a hassle, but the Quik Rack Mach2 is lightweight, folds, and installs quickly without tools.
- With many vehicles, it is possible to use a standard locking hitch pin with the Quik Rack Mach2. You could also add a cable lock.
- Each component–such as the add-on and the ramp–locks to the one before it, so no part of the rack can be easily stolen.
- Be sure your rack is covered by your vehicle or homeowner’s insurance.
- You might want to add a GPS tracker to the rack. One customer discovered that Elevation Labs TagVault AirTag holders fit PERFECTLY on the Mach2 and Add-On and they’re difficult to remove and open.
Current Patents
Quik Rack Mach2 founder/designer Cal M. Phillips owns these 14 patents covering the new Quik Rack Mach2 design:
Canada Patent 2956005: Carrier for a two-wheeled vehicle
U.S. Patent 9902222: Captive pin apparatus for retention of a drawbar in a trailer hitch receiver
U.S. Patent 9956922: Carrier for a two-wheeled vehicle
U.S. Patent 10005329: Captive pin apparatus for retention of a drawbar in a trailer hitch receiver (continuation in part)
U.S. Patent 10011237: Bike carrier pivot mechanism division patent
U.S. Patent 10059276: Carrier for a two-wheeled vehicle
U.S. Patent 10065568: Bike carrier tray assembly with automatic tray position lock
U.S. Patent 10071695: Sliding pawl on a ratchet bar
U.S. Patent 10086769: Bike carrier tray assembly with automatic tray position lock
U.S. Patent 10099525: Trailer hitch draw-bar tightening mechanism
U.S. Patent 10106100: Secure latch for coupled assemblies
U.S. Patent 10124740: Bike carrier with automatic tray position lock
U.S. Patent 10150424: Adjustable retention arm for a bike carrier
U.S. Patent 10167887: Beam joining apparatus with bolt and threaded wedge
Also:
U.S. Patent 5833074: Fast-loading, protective bicycle rack (Patent for the original Quik-Rack) **Now expired**
U.S. Patent 6620081: Exercise stand and centrifugal resistance unit for a bicycle. **Notice of infringement filed**
Cal Phillips has 19 other patents that cover bicycle-related products.