
FAQ/Patents
For Quikr self-help, please scroll and expand (+) questions to find your answer, and/or search the page for your question using the CTRL + F keys (PC) or Command (⌘) + F keys on a Apple Mac.
Current Shipping and Payment Questions
UPDATED SEPTEMBER 2023
Buying a new bike rack is like welcoming a new family member. Let’s make sure the Mach2 “fits” into your family!
- Weights:
Mach2 2″ & 1.25″ – 30.7 lbs (Shipping is 36.2 lbs and box outside dimensions are 31″x19″x9″ – inside dimensions are 29.5″x18″x8″) - Add-on – 22.7 lbs (Shipping is 27.9 lbs and outside dimensions are 31″x19″x9″ – inside dimensions are 29.5″x18″x8″)
- Ramp – 13lbs – Shipping is 14 lbs and box outside dimensions 60”x8”x8”
- Maximum tire width – 4.77 inches (5.05 tire is the maximum we have seen and it works – see this FAQ – Maximum Tire width
NOTE: We do NOT give opinions of fitment, as there are variables of changes in model spec, OEM & aftermarket hitches and adapters, and way too many cars to keep up a database. We give YOU the tools you should need to measure and make a determination yourself. If you can’t find the answer you need, contact us!
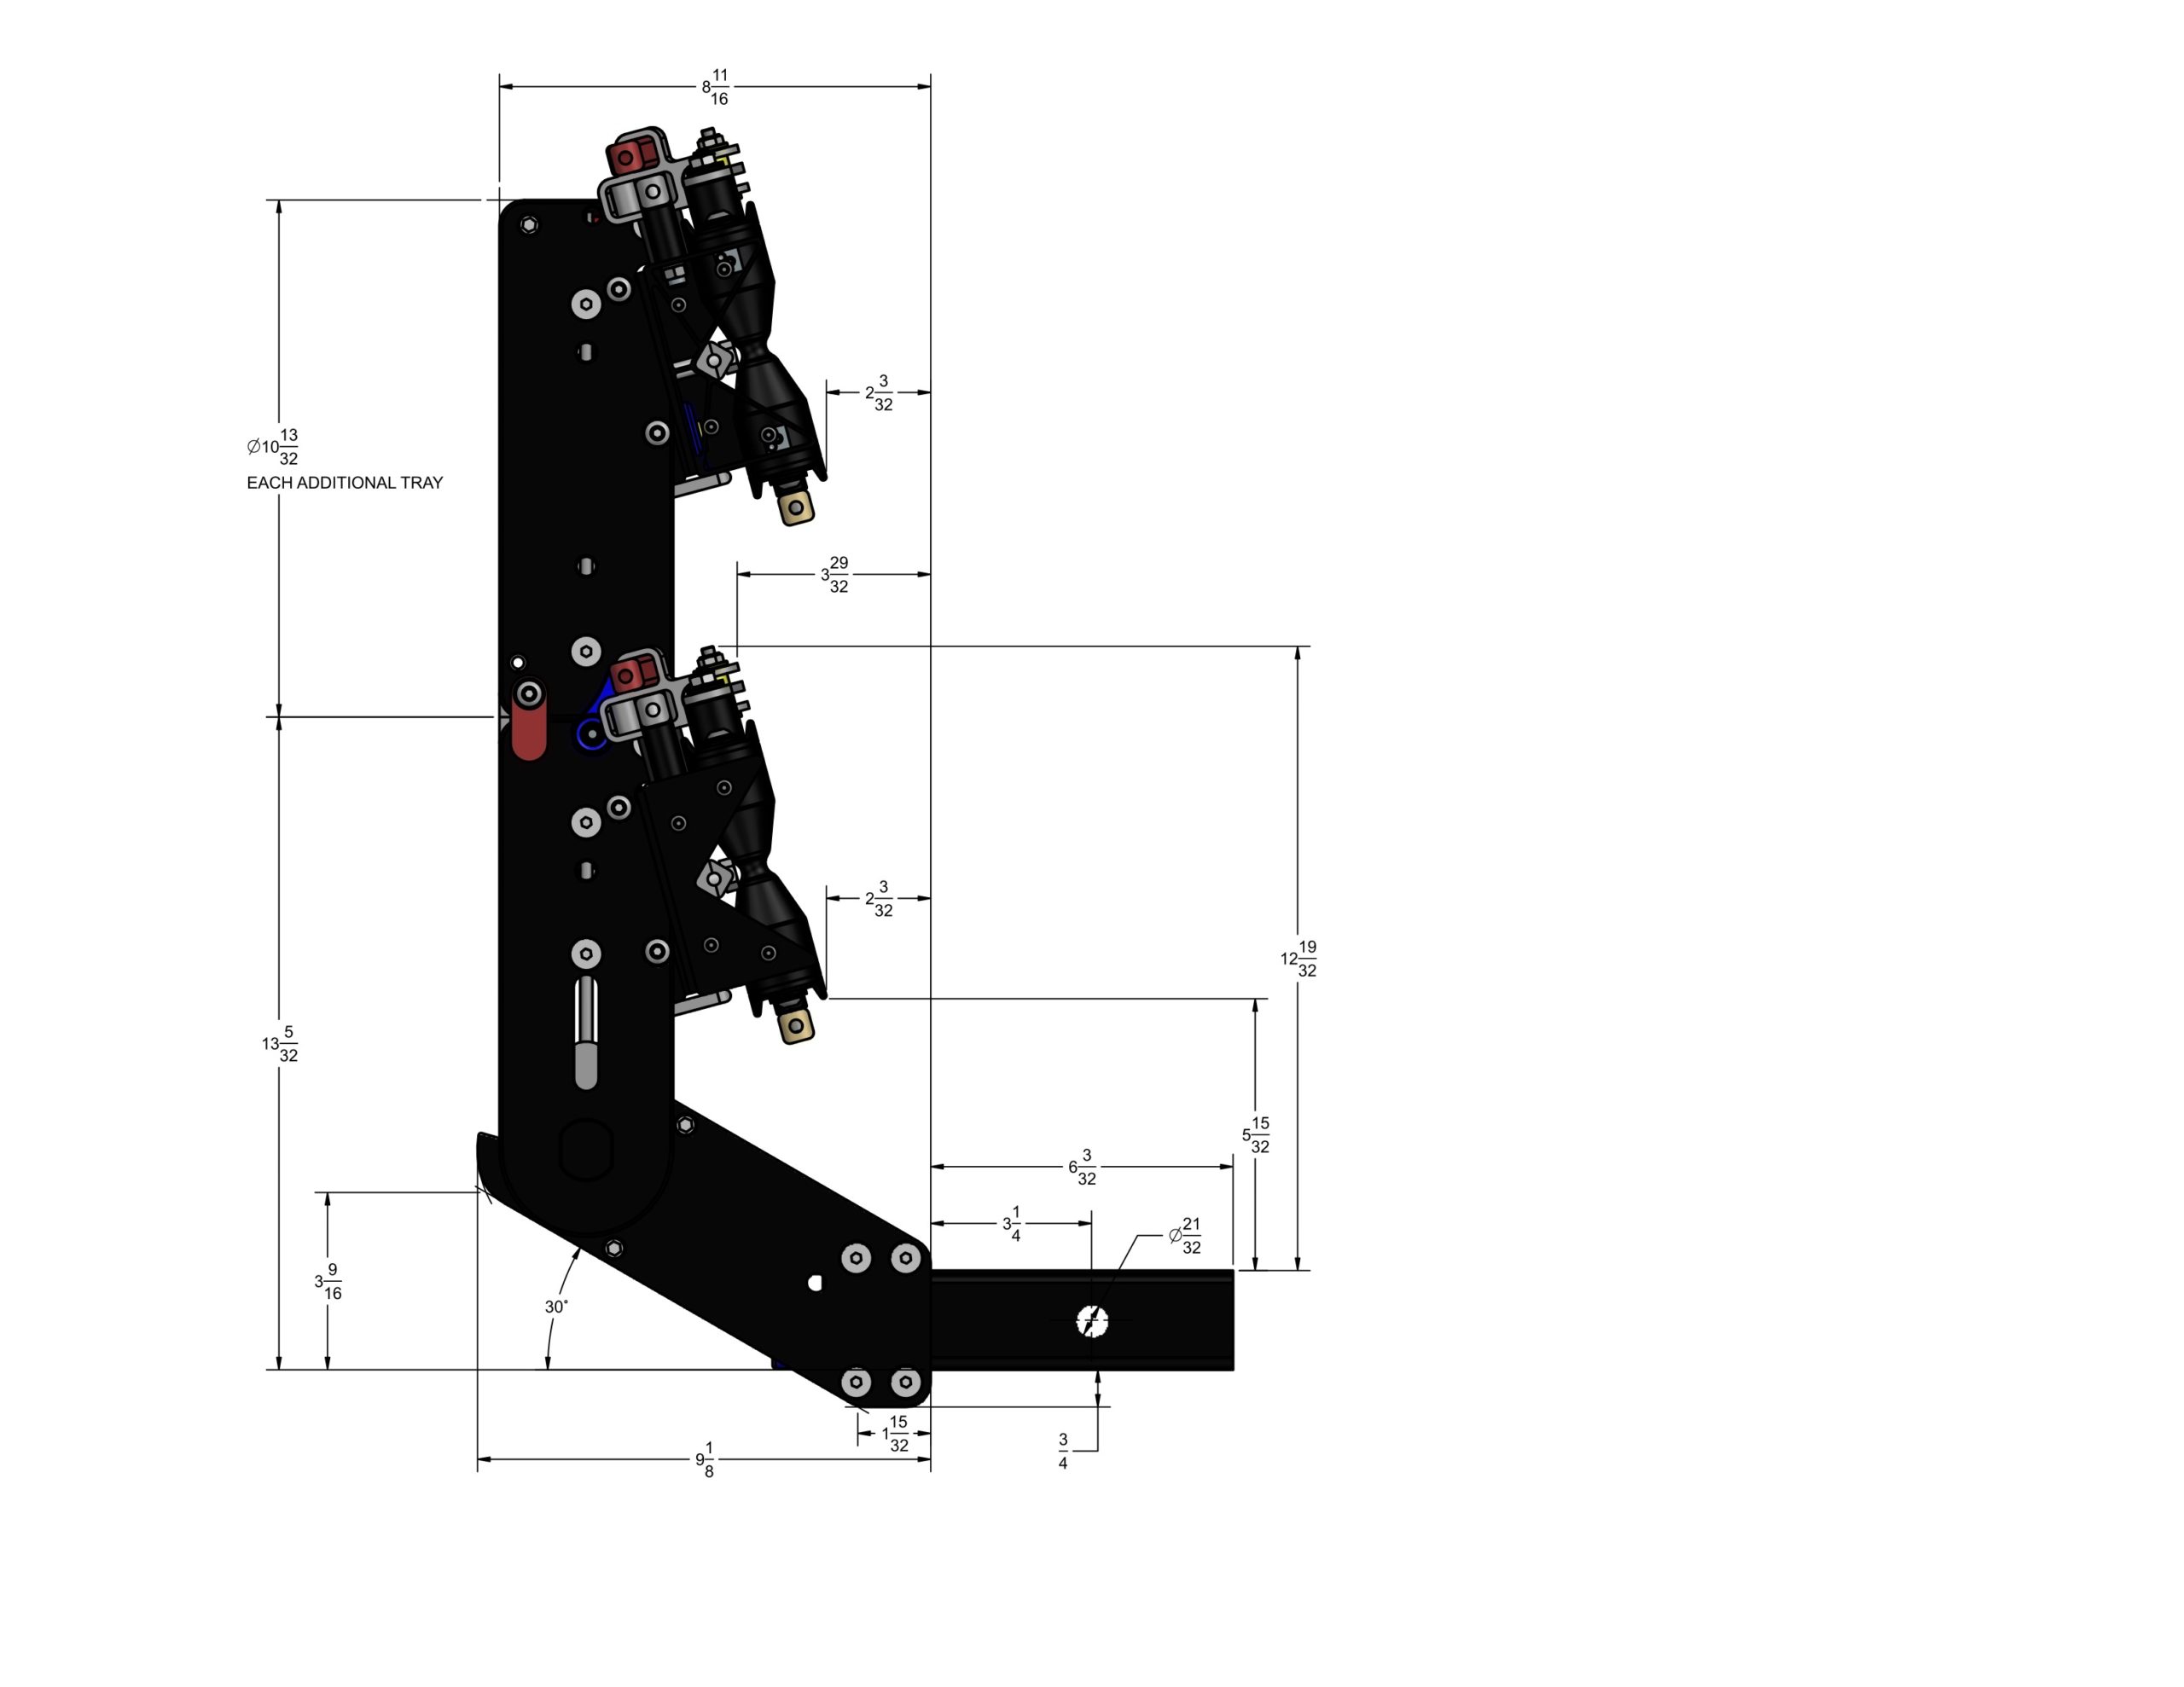
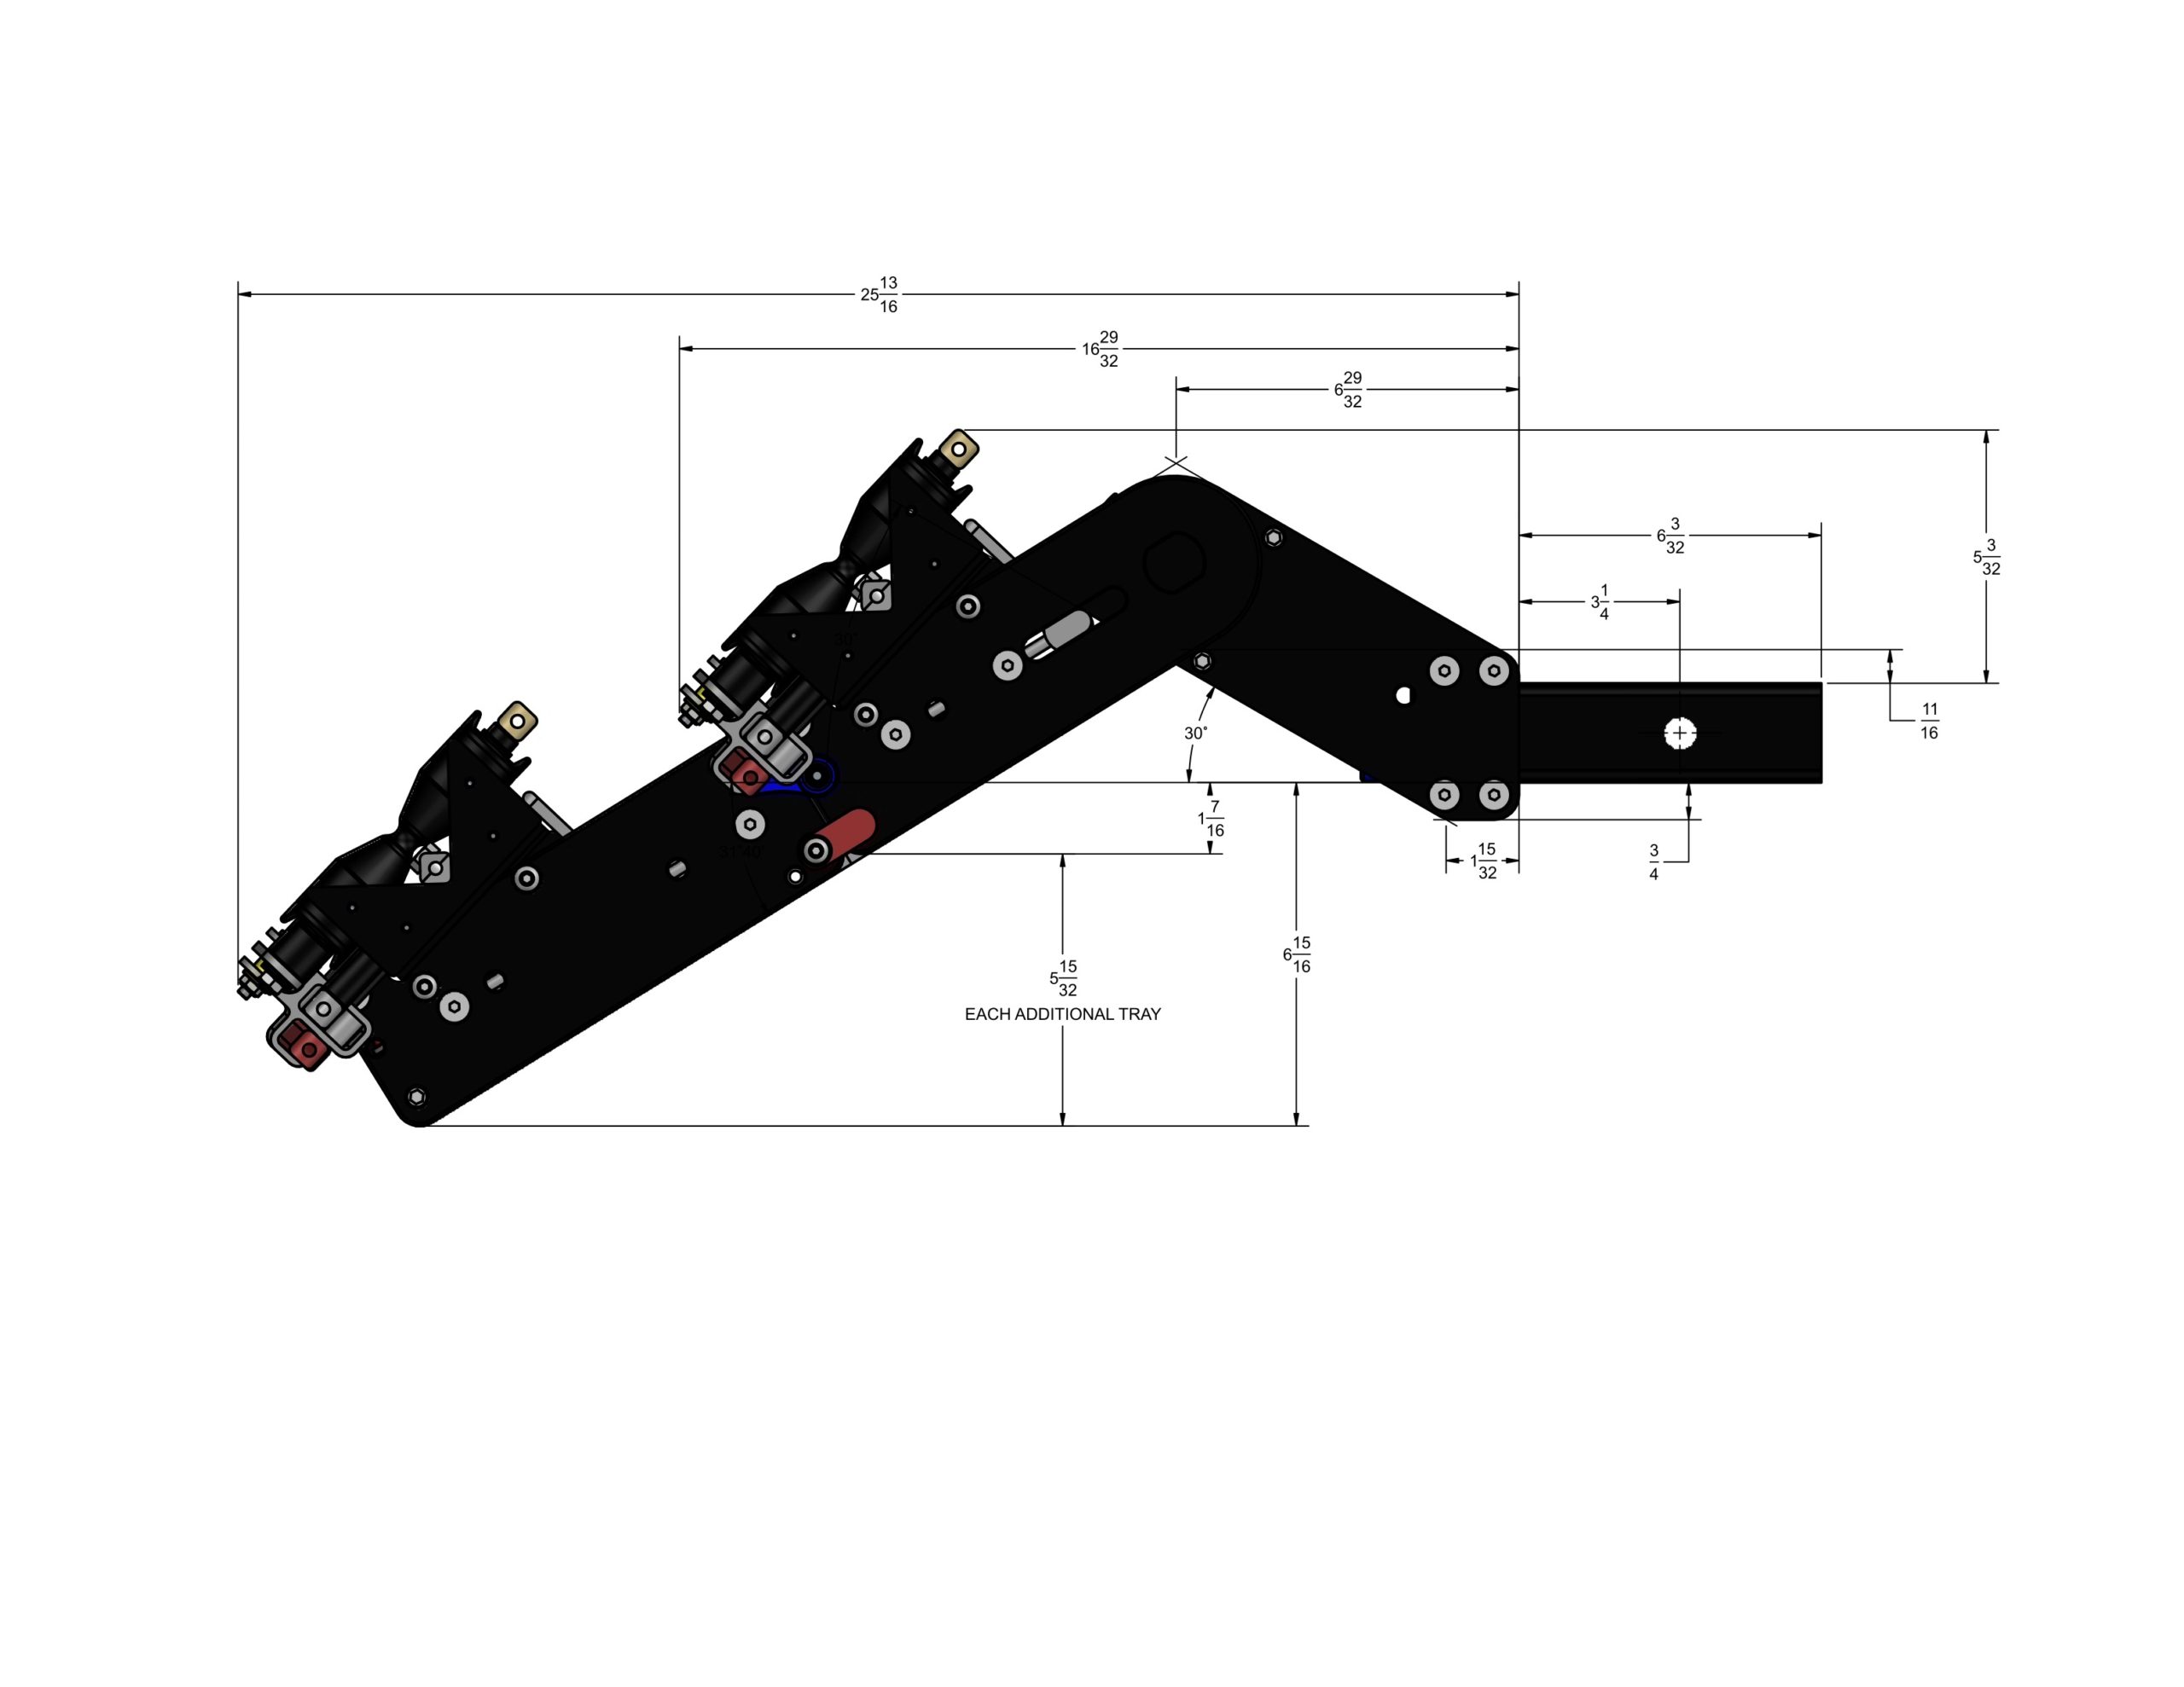
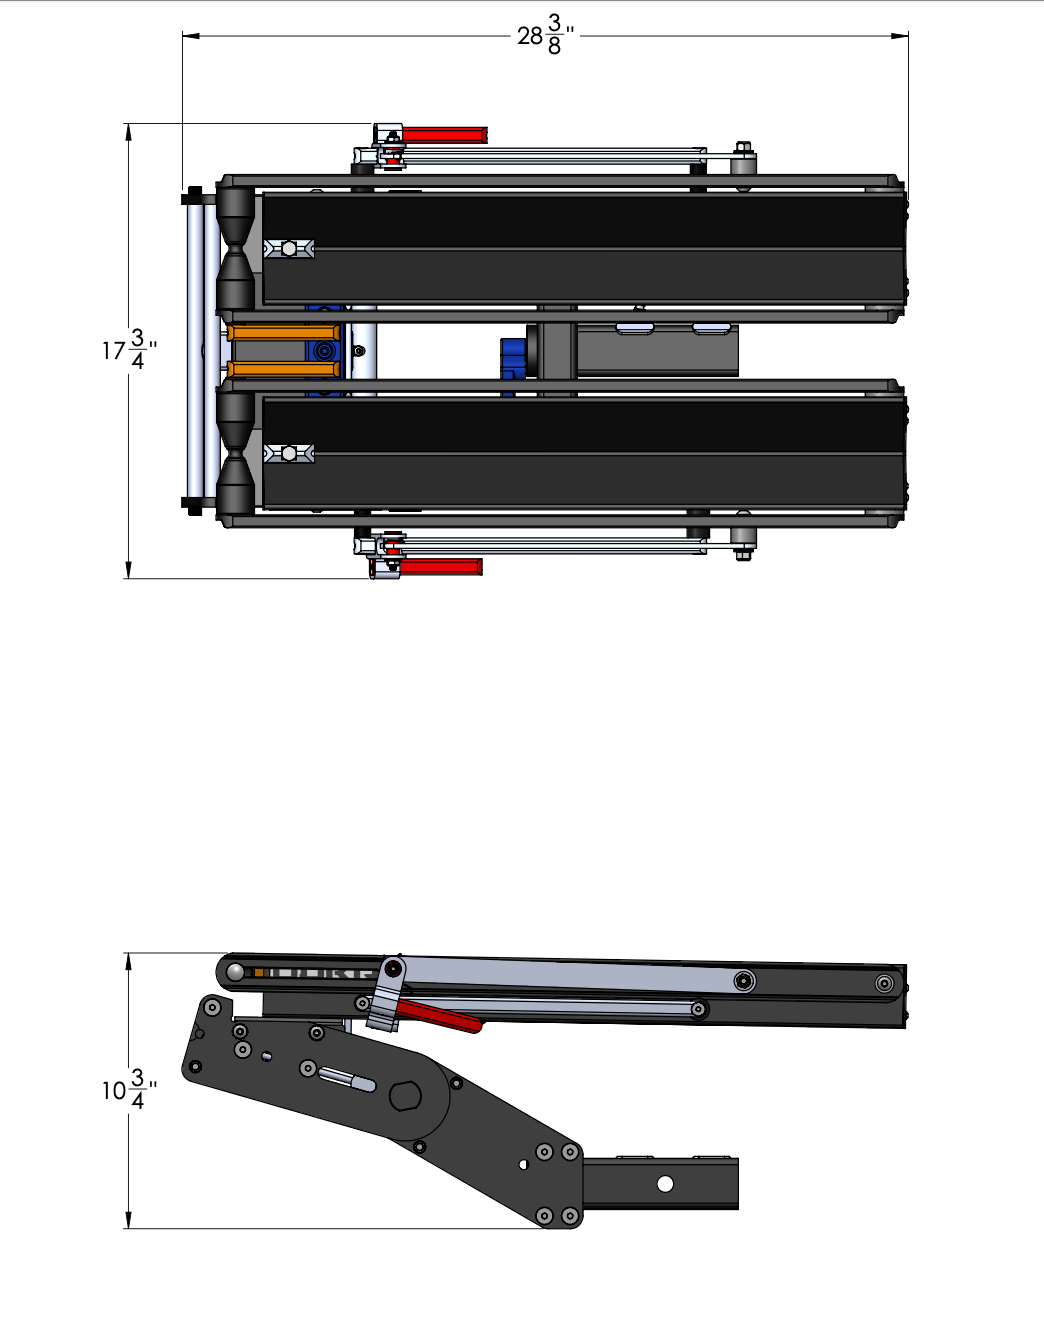
In the tilted down mode (see the image/specs below),
- The first Add-On is 1 7/16″ below the hitch,
- The second Add-On is 5 15/32″ below that for for a total of 6 15/16″ below the hitch.
- The third and fourth Add-On are each an additional 5 15/32″ below the Add-on above it.
1.25″ Version Hitch Insert (below).
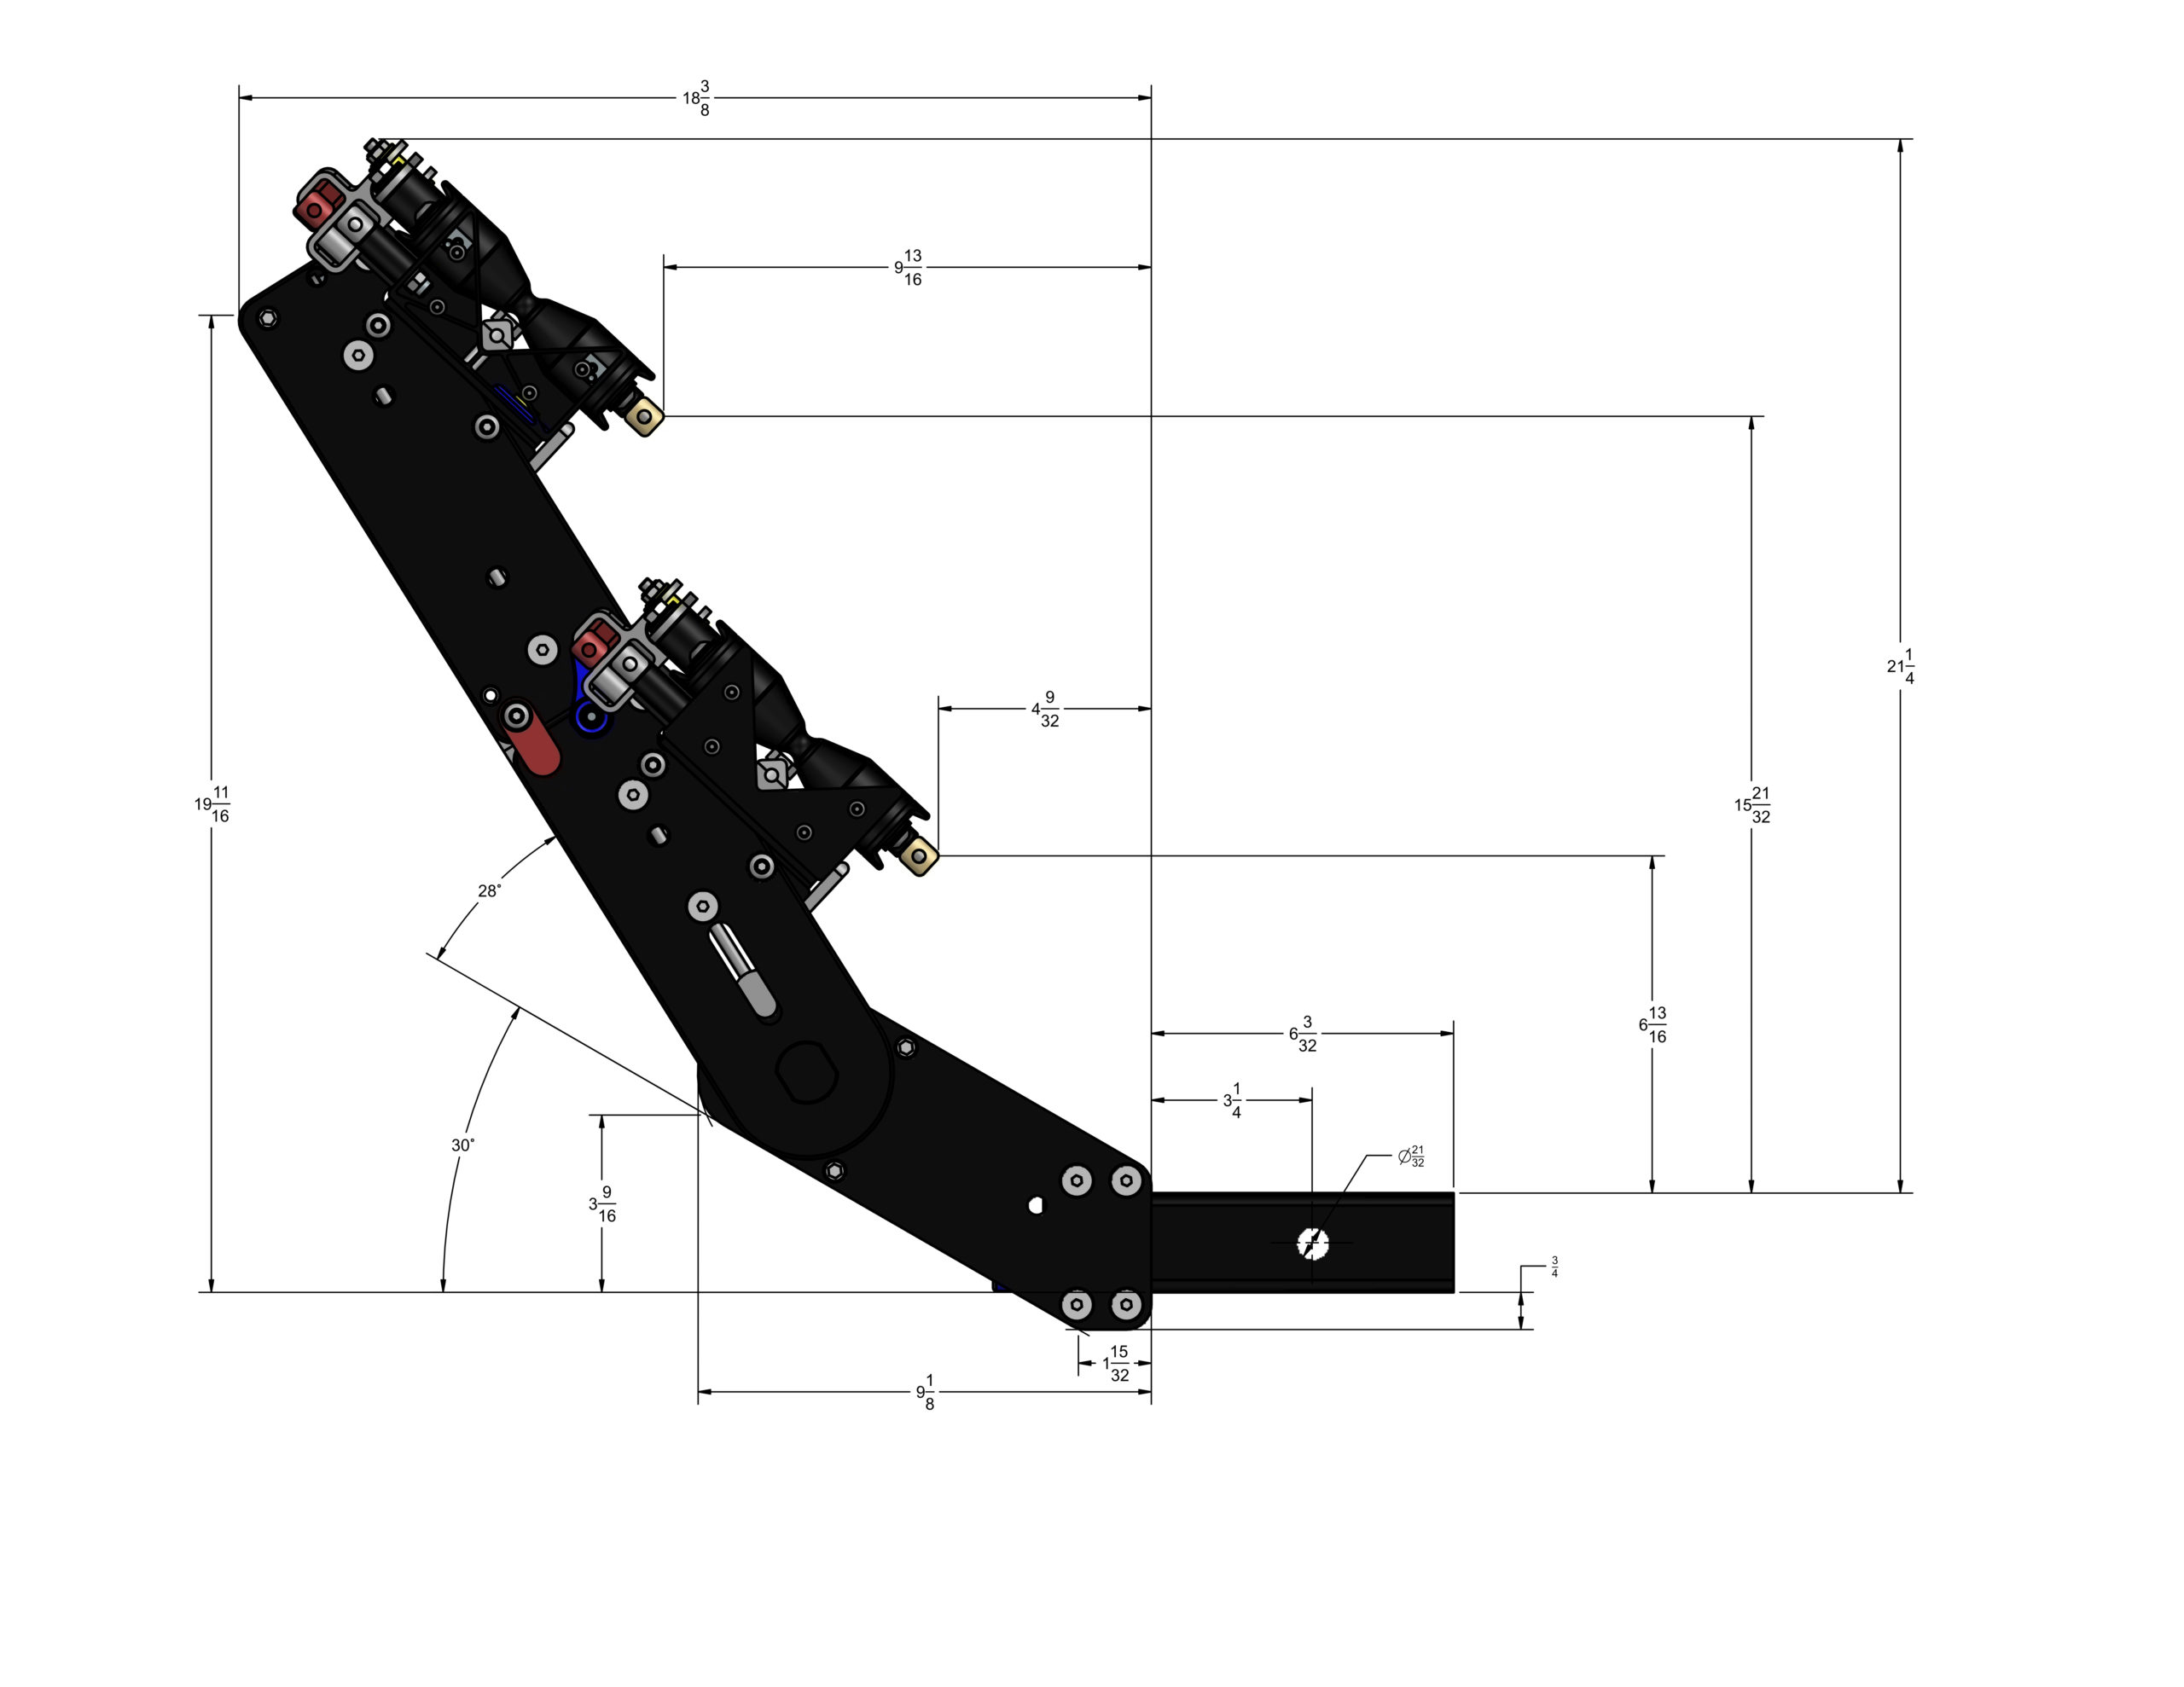
Folded Dimensions:
UPDATED SEPTEMBER 2023
These are conservative numbers made to protect your investment in your bikes. Please check your tongue weight capacity for your vehicle/hitch as OEM will not be the same as an aftermarket hitch.
These numbers do NOT take into consideration hitch adapters or extenders that could put more leverage, and therefore stress, on the hitch/crossbar that would lower these capacities even more.
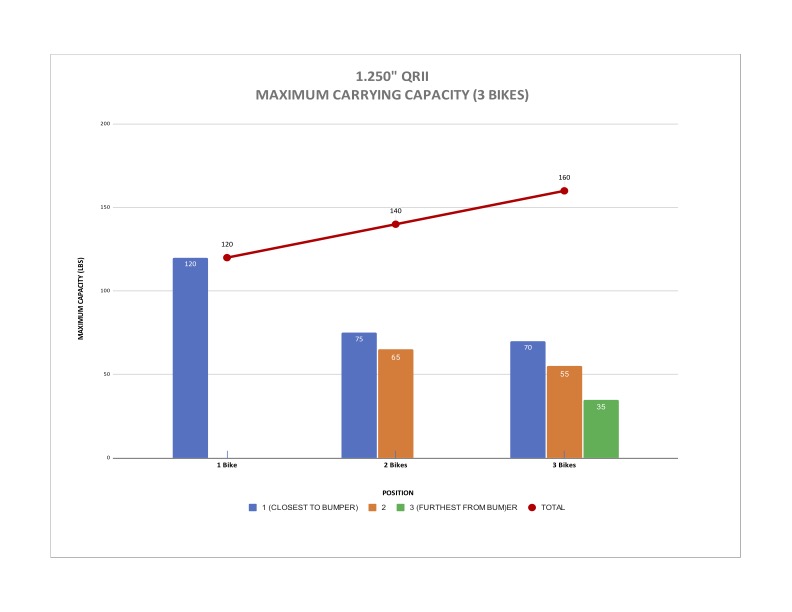
1.25″ Mach2
1 bike – 120 lbs
2 bikes – 140 lbs
3 bikes – 160 lbs
2″ Mach2
1 bike – 120 lbs
2 bikes – 240 lbs
3 bikes – 300 lbs
4 bikes – 185 lbs
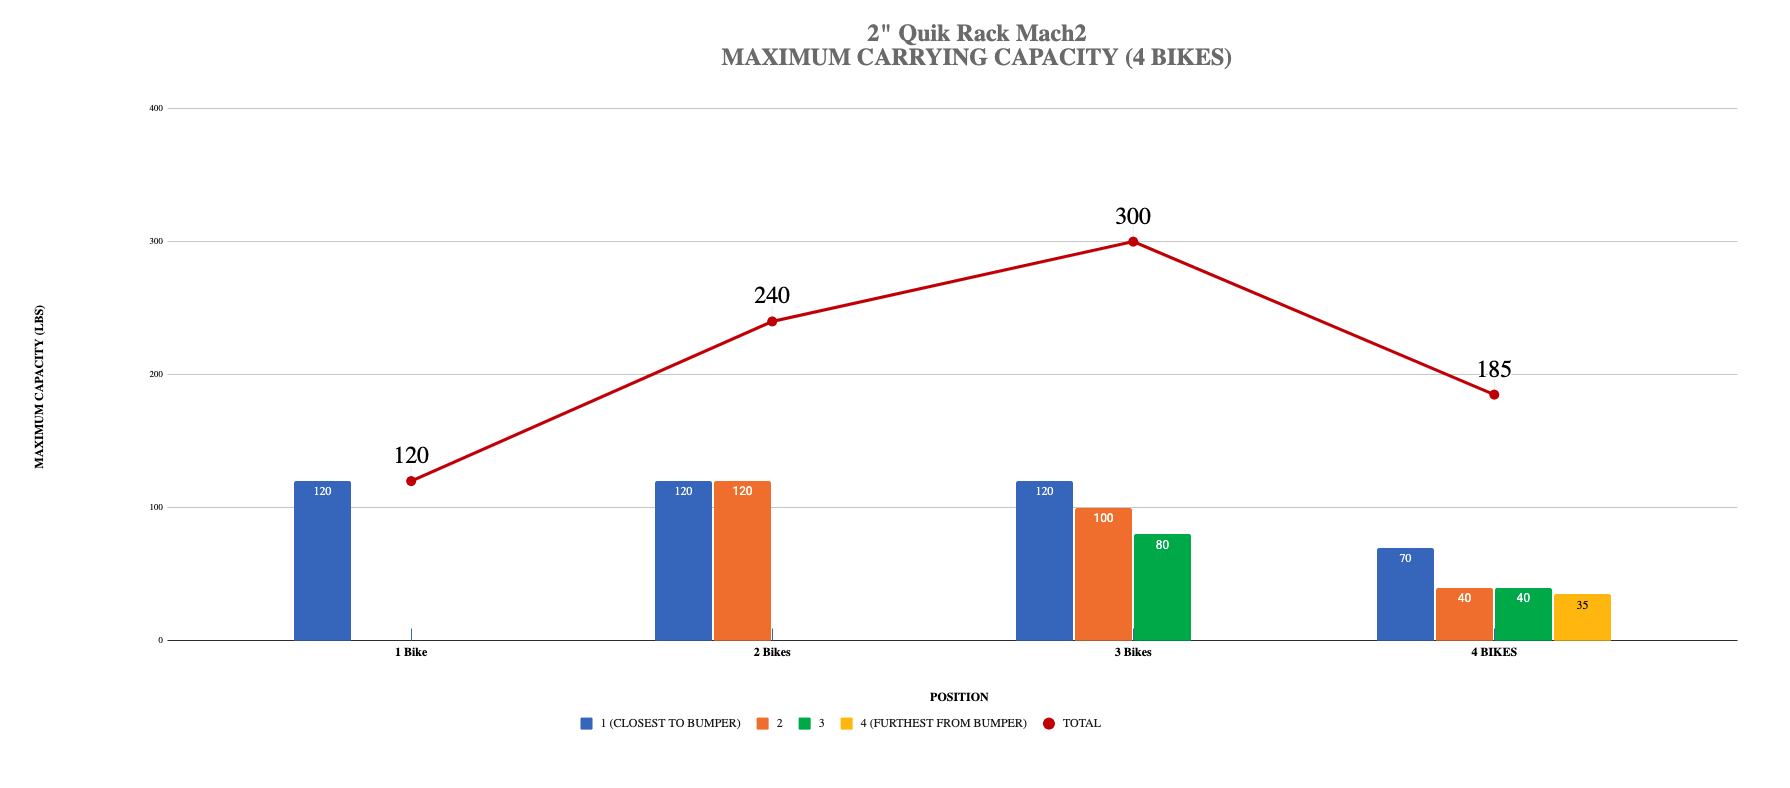
Even though the 1.25″ rack can hold 160 pounds total and the 2″ rack can carry 300 pounds total, each bike rack tray and its components have a weight limit that cannot be exceeded. Doing so could cause the rack to fail.
Click here for a written explanation as to how much weight is possible per bike tray: Mach2 Load Capacity Explanation
UPDATED SEPTEMBER 2023
The base Mach2 hitch rack mount weighs approximately 30.7 lbs and each Add-on weighs 22.7 lbs.
UPDATED SEPTEMBER 2023
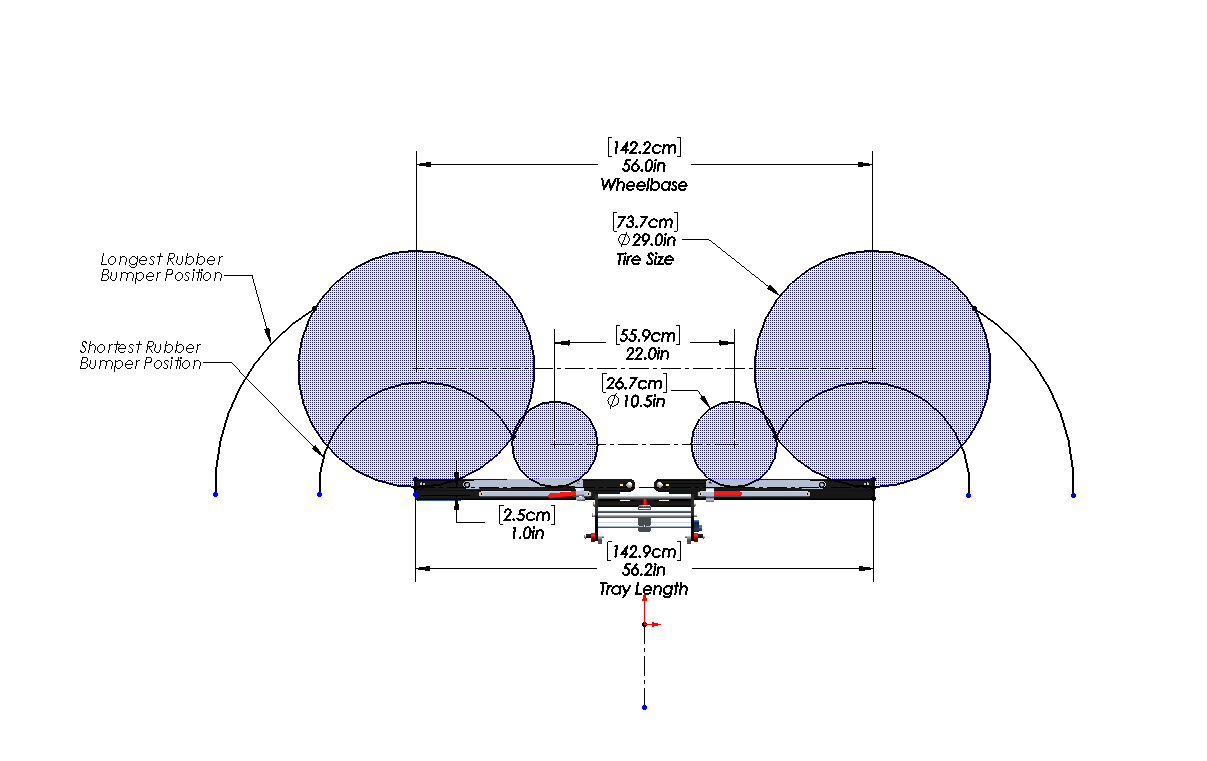
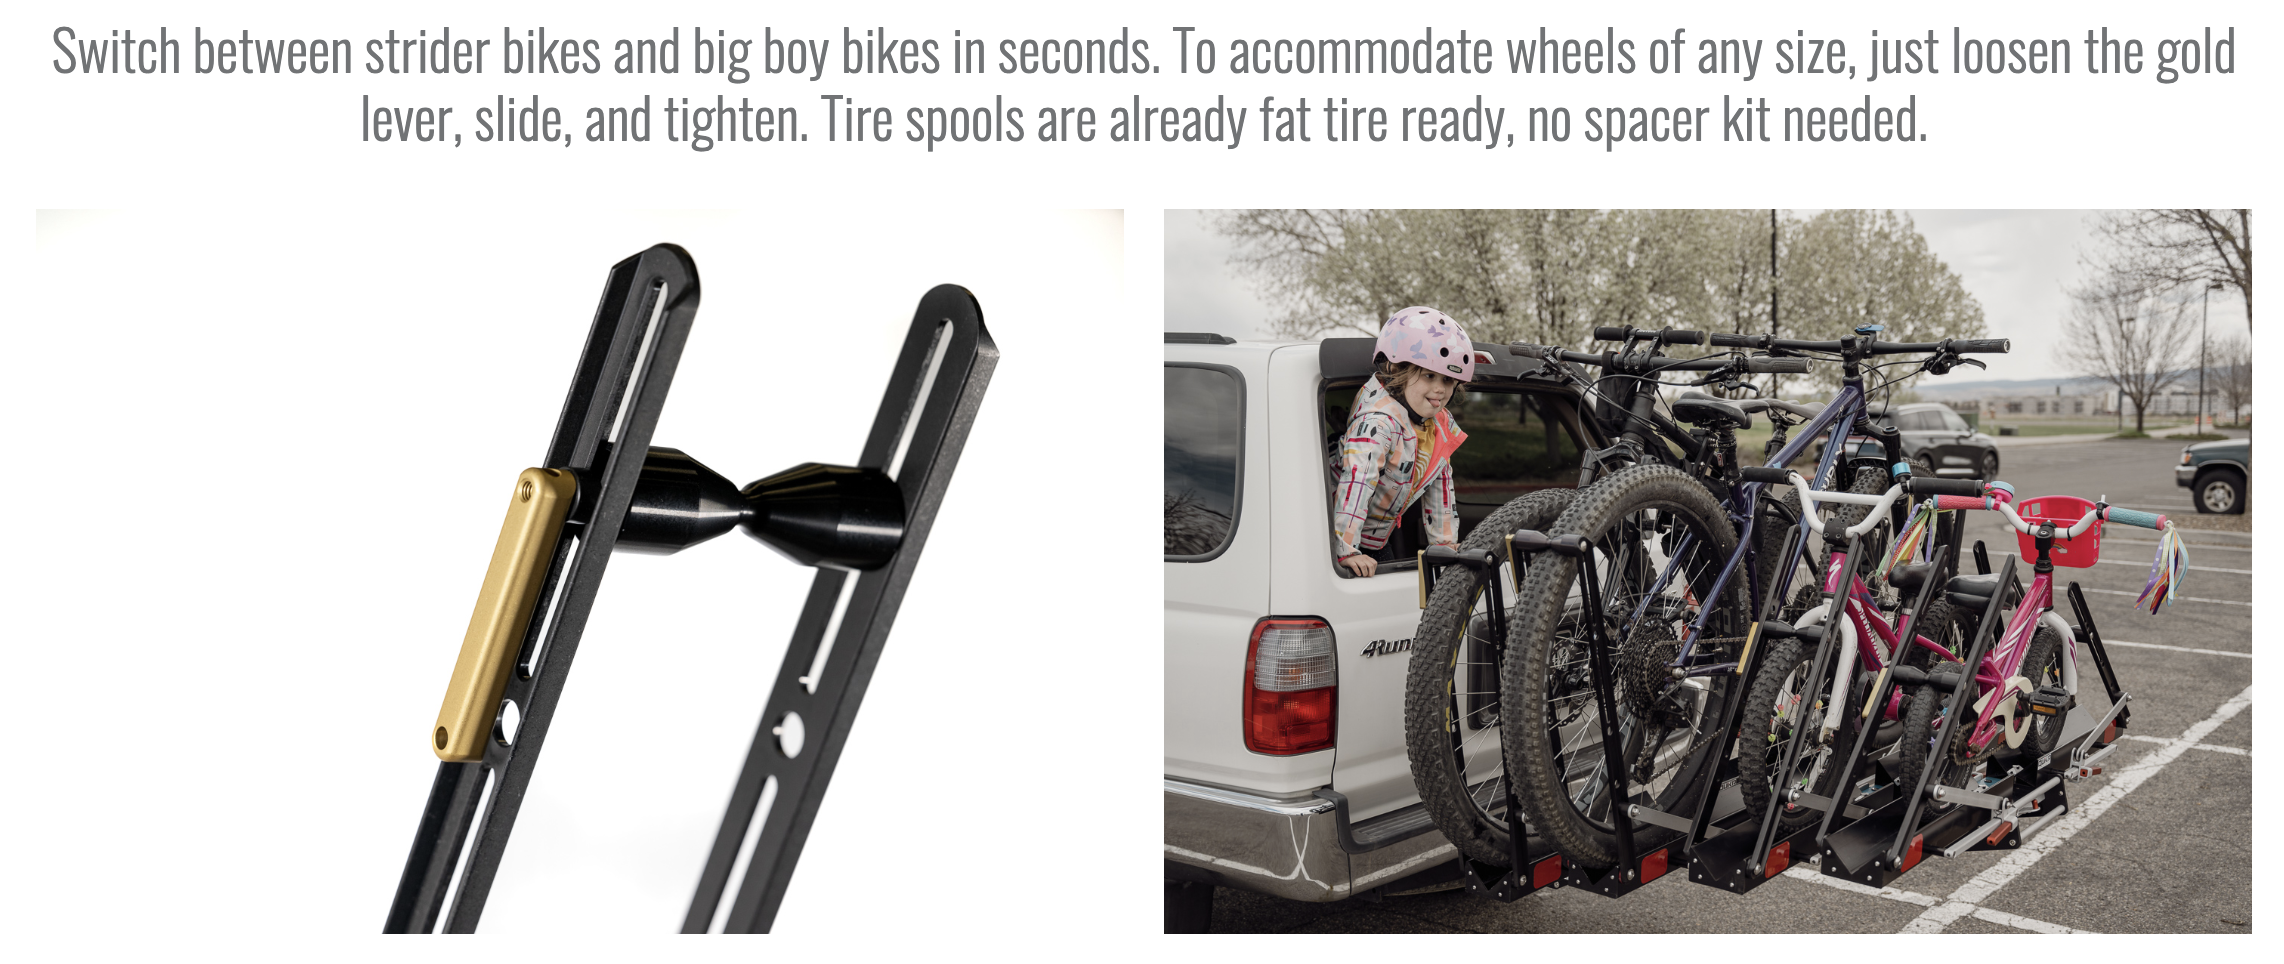
The bike rack can be used with a wheelbase of 56″ with wheel sizes from 12″ to 29″, and up to a 5″ wide tire with no adapters needed. See the no-tools tire size adjustment in action:


Here is an image of the bike size range dimensions.

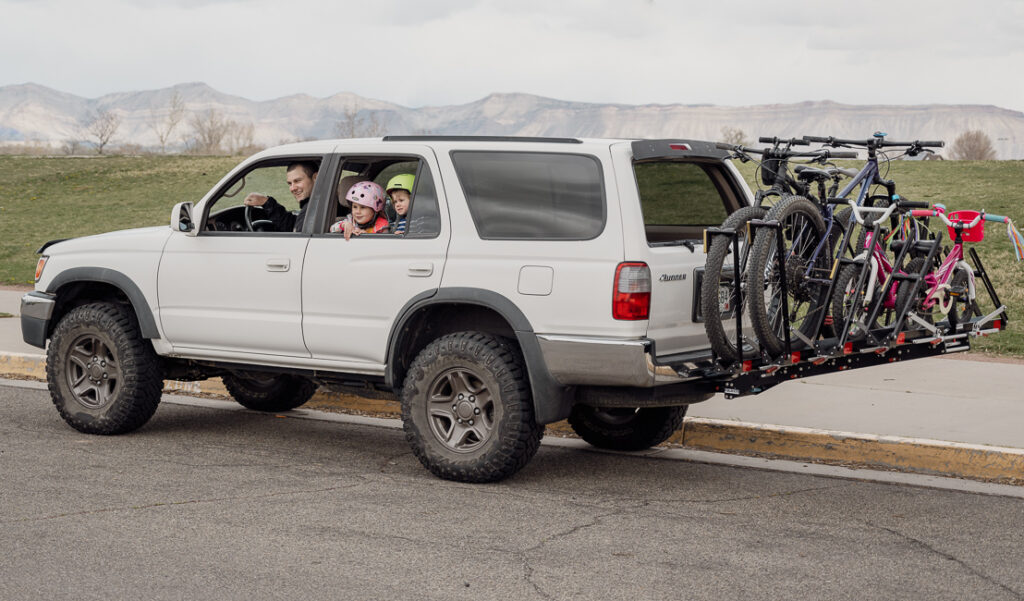
Quik Rack Mach2 with Add-Ons: Loaded for vacation
UPDATED SEPTEMBER 2023
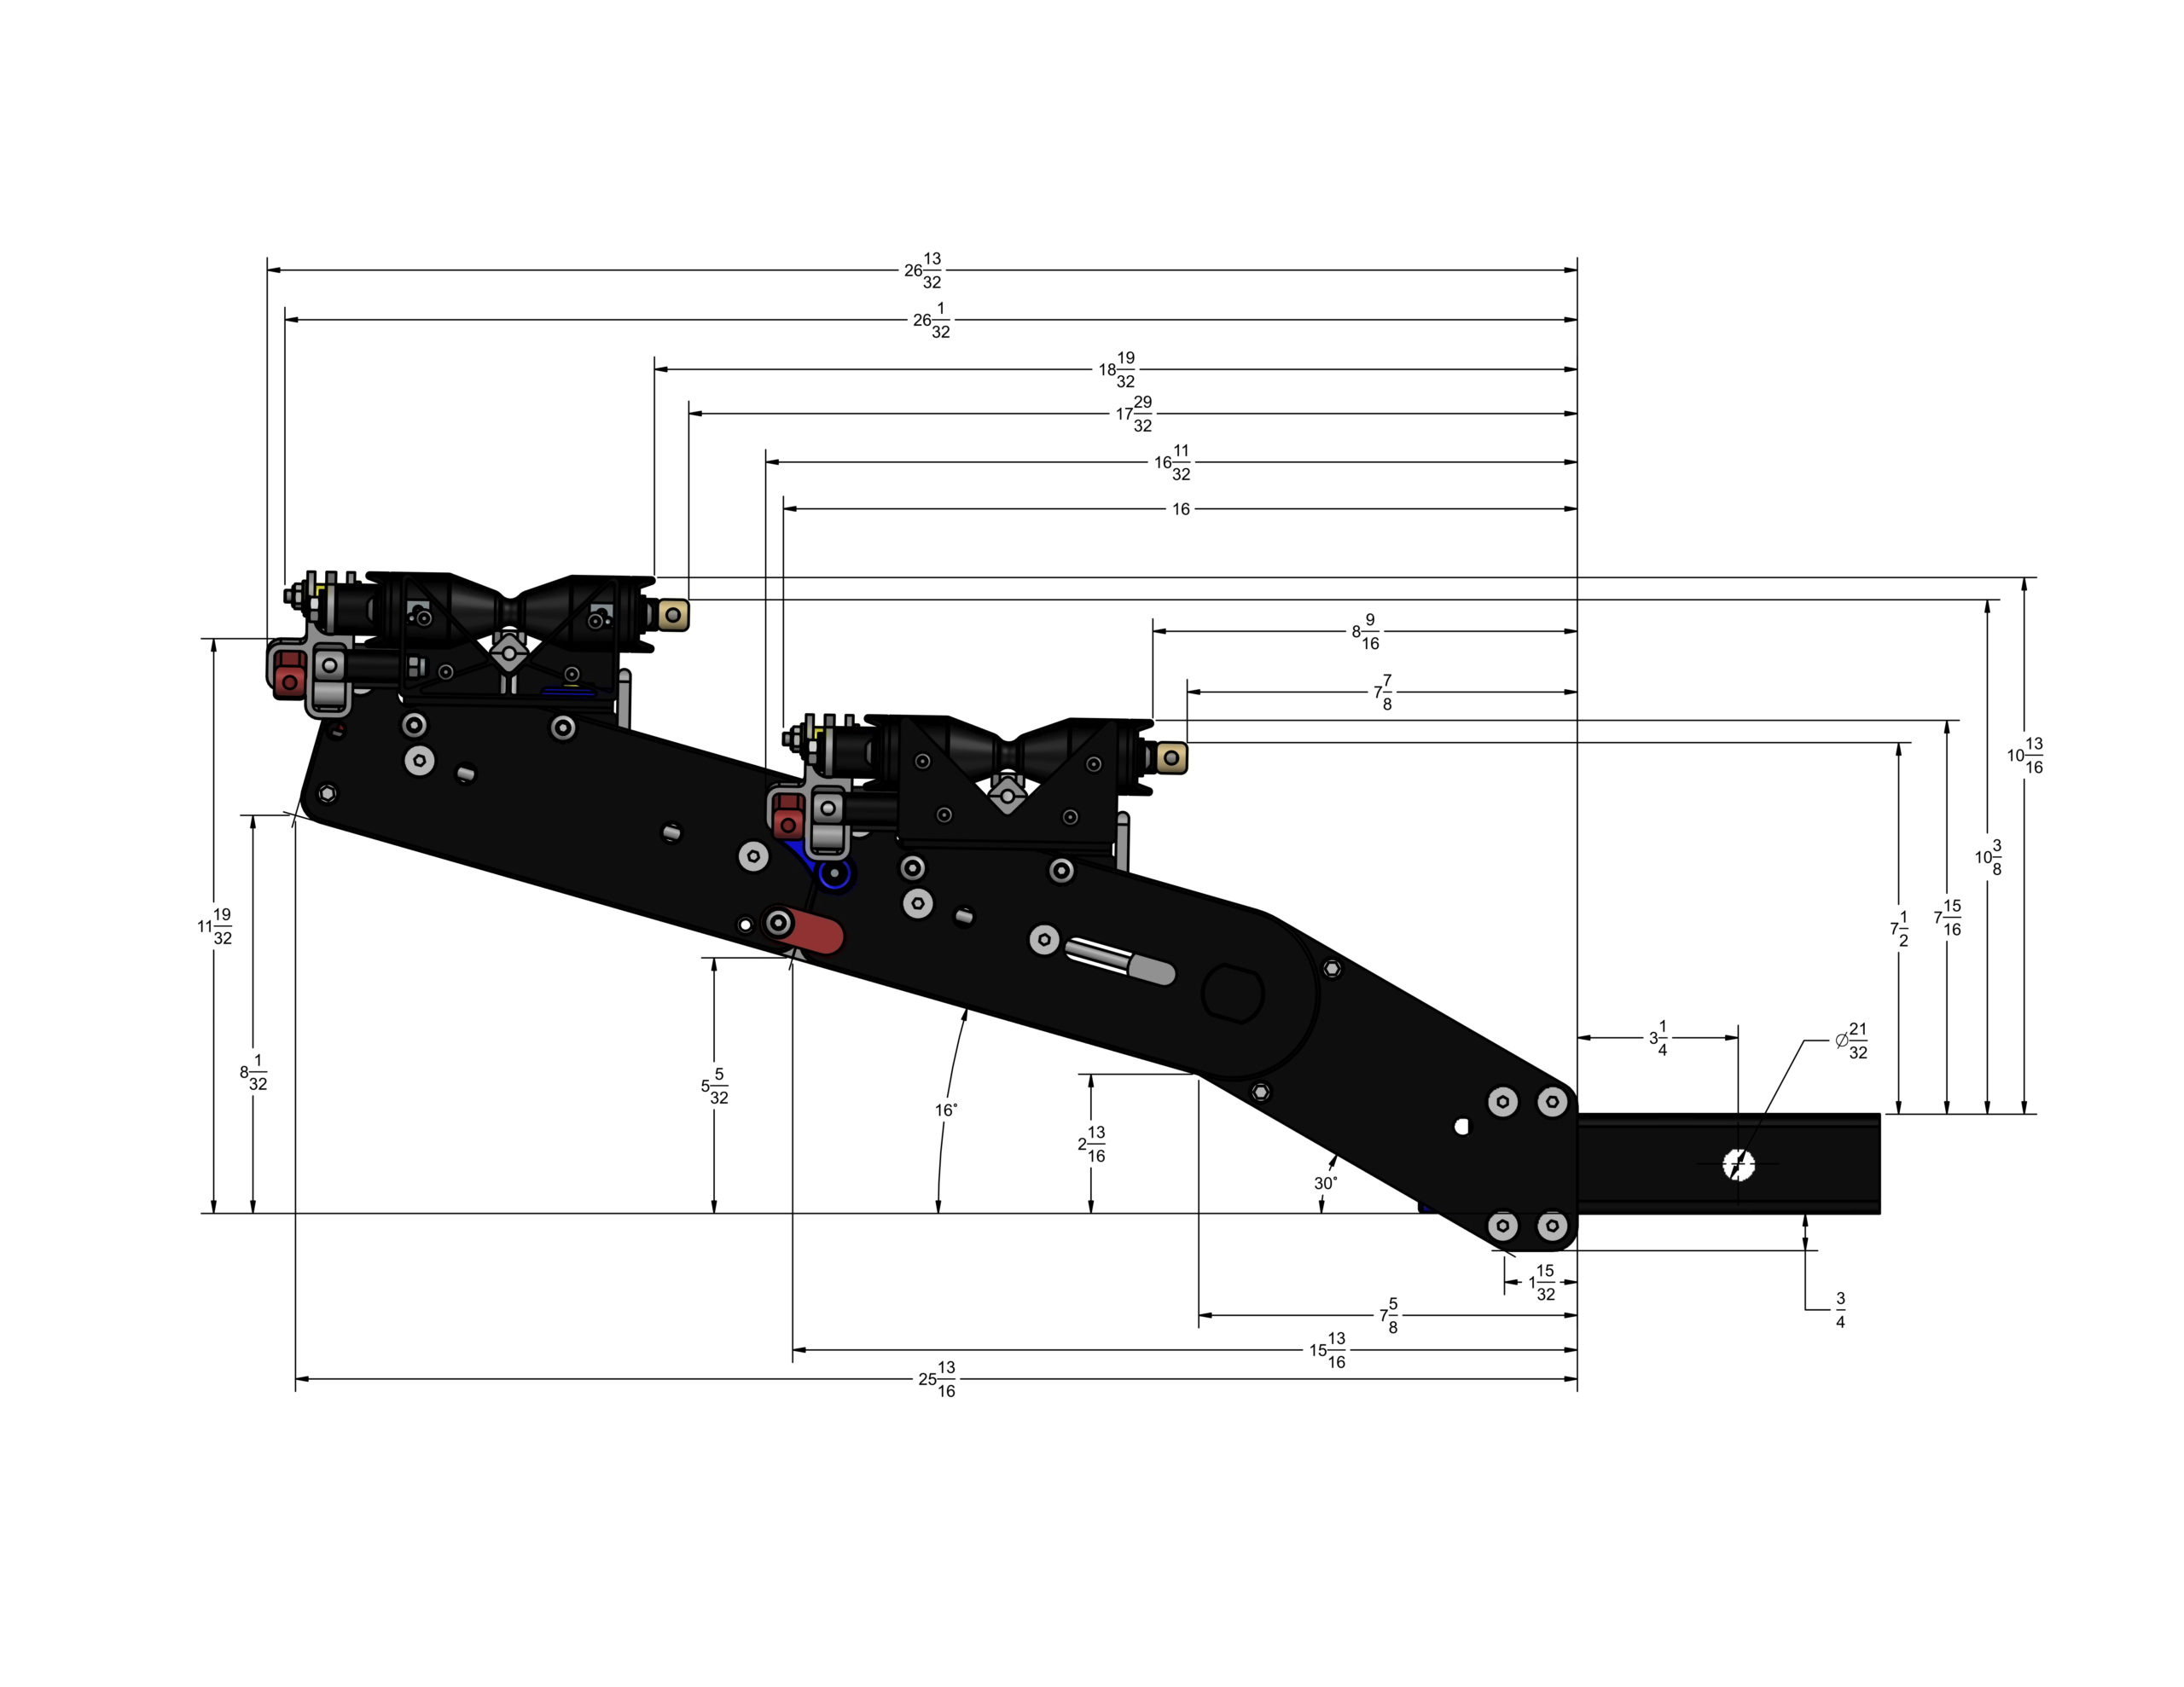
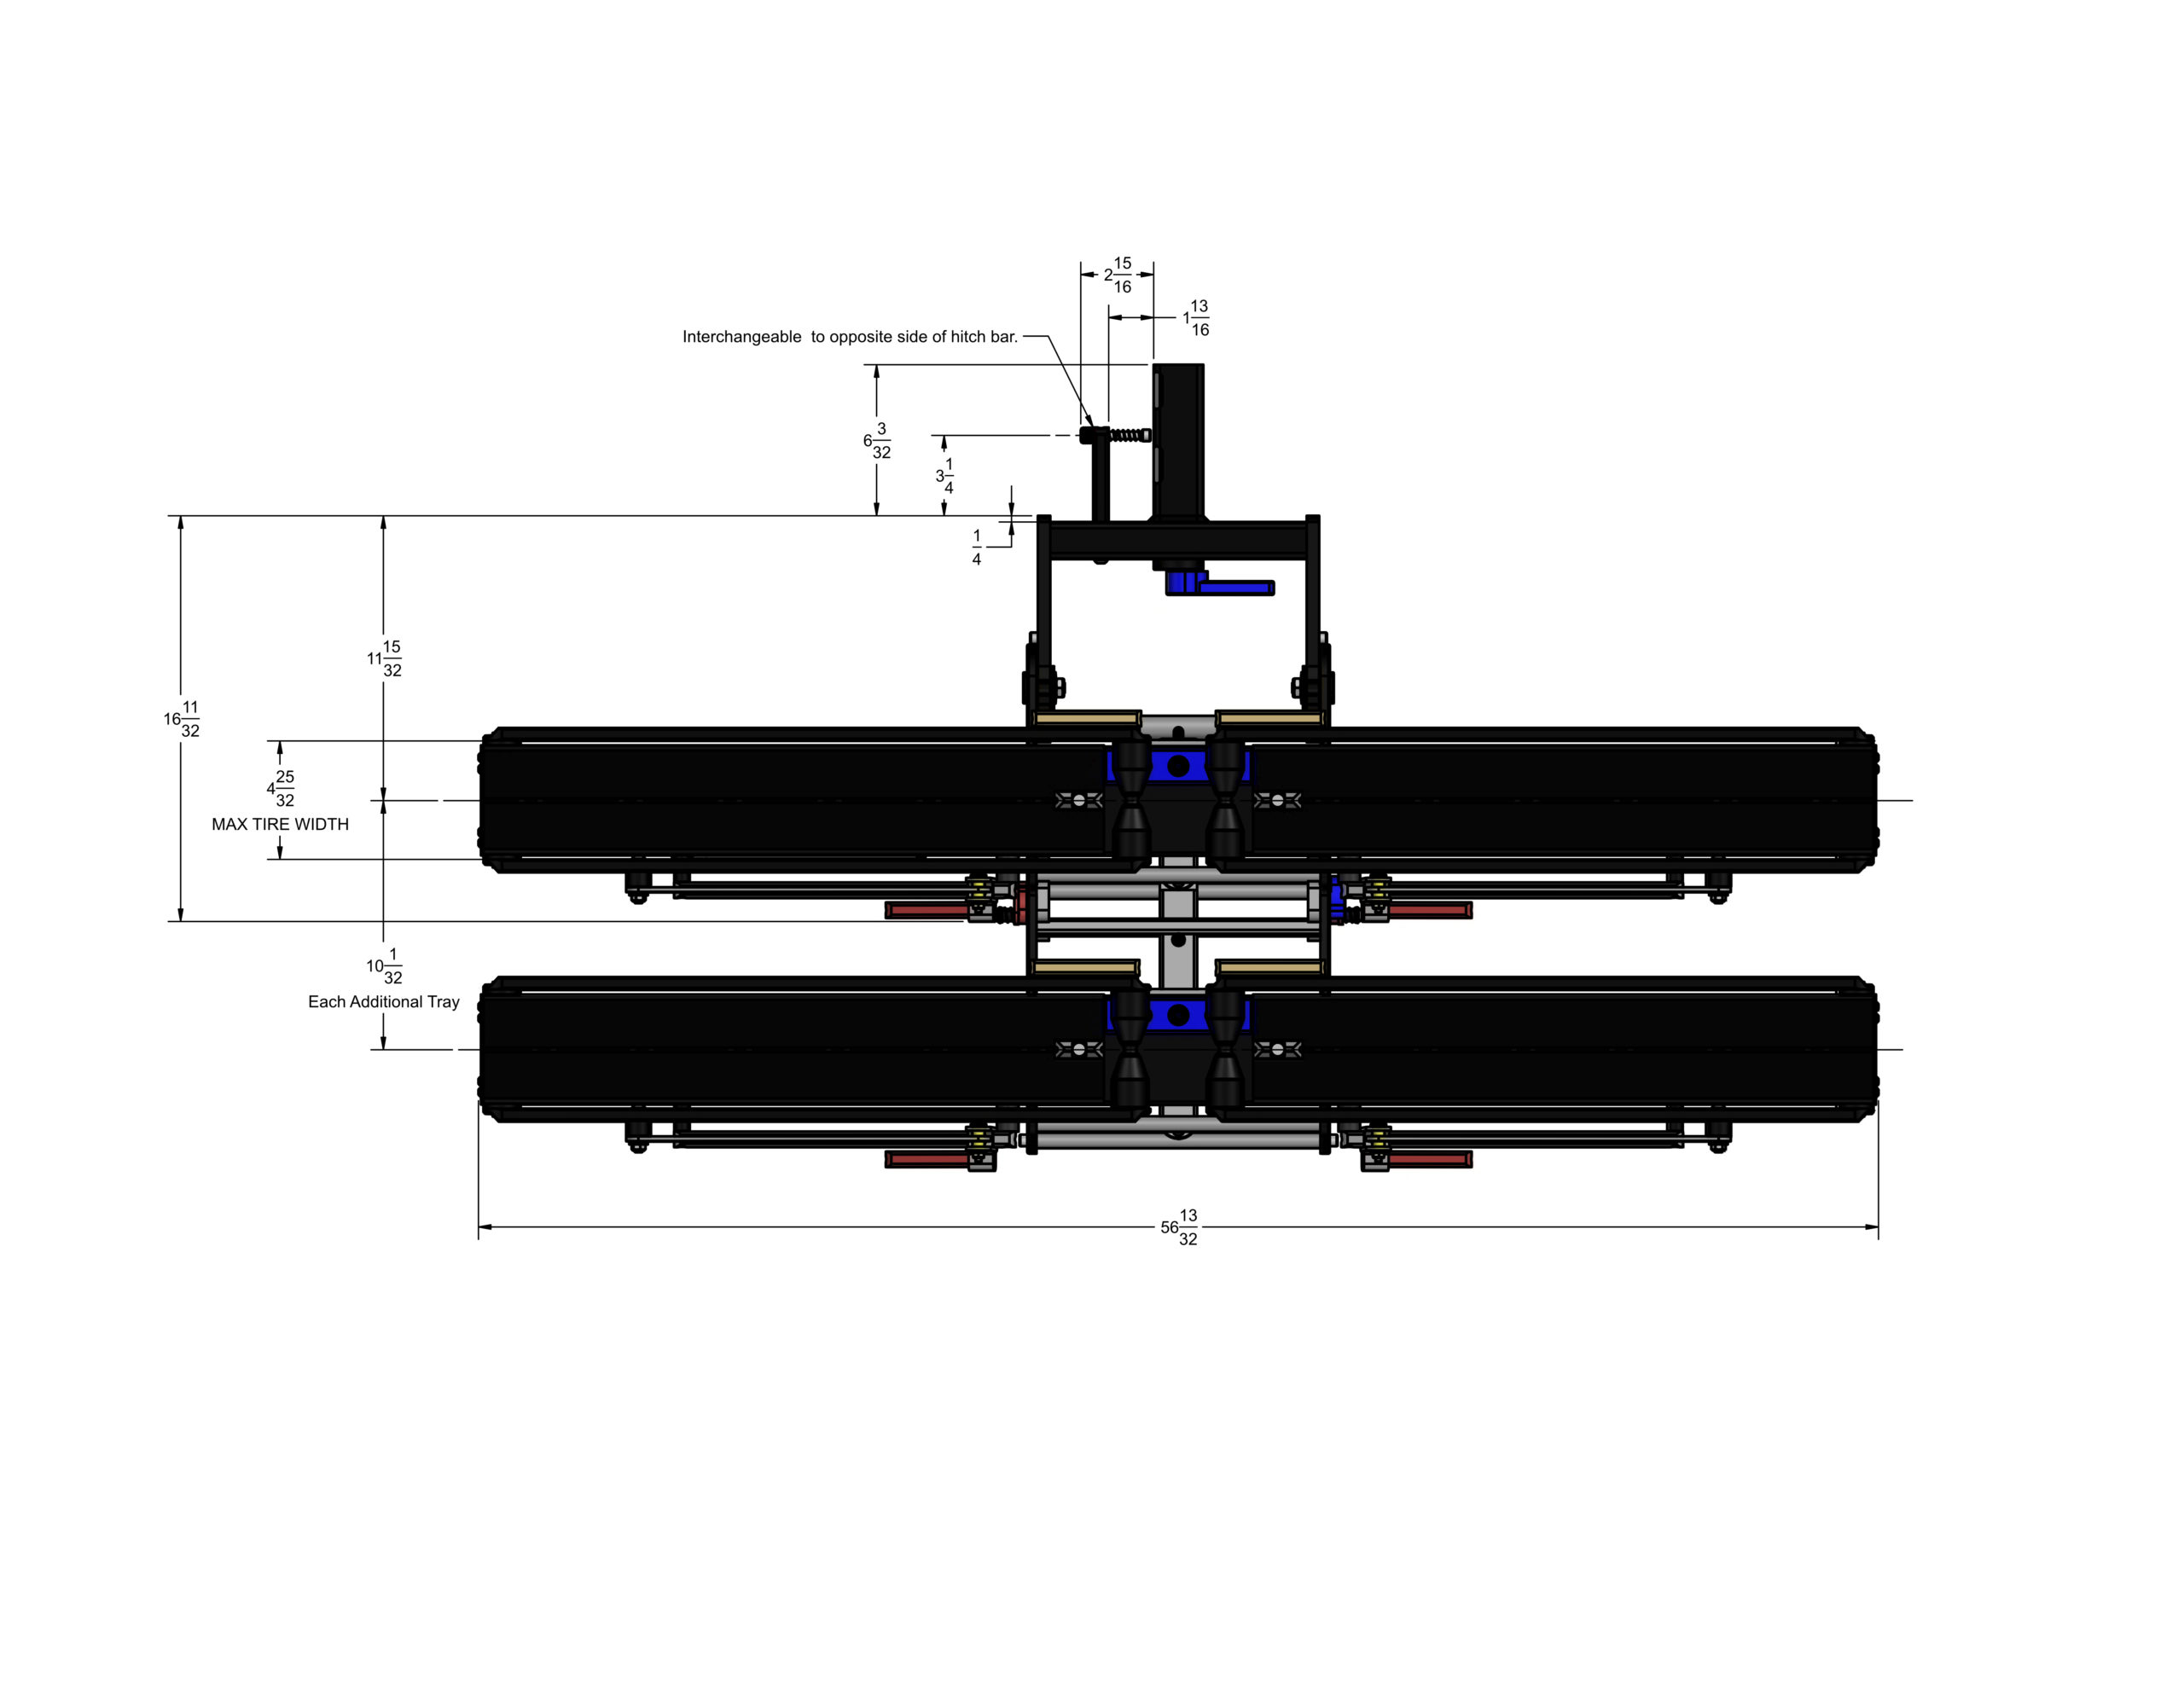
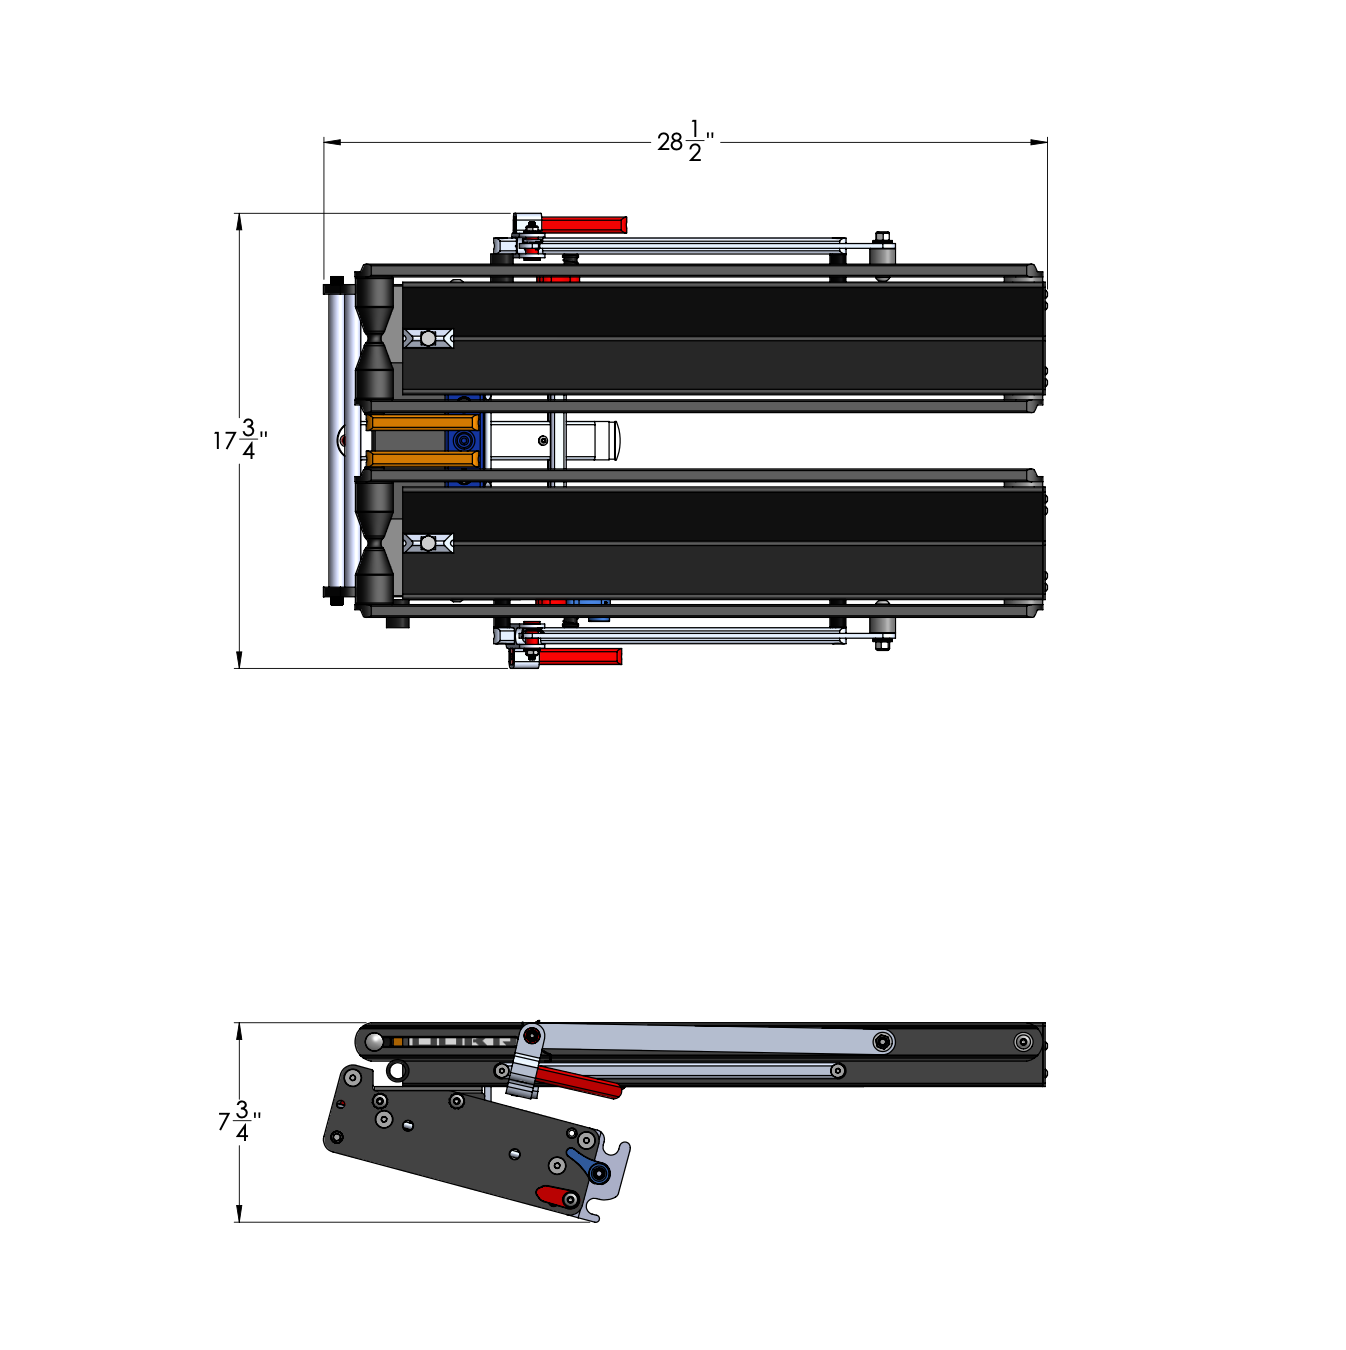
10.04 inches is the distance between one tray groove and the next. See full dimensions below.
Printable Mach2 CAD drawing from the top – PDF
UPDATED SEPTEMBER 2023
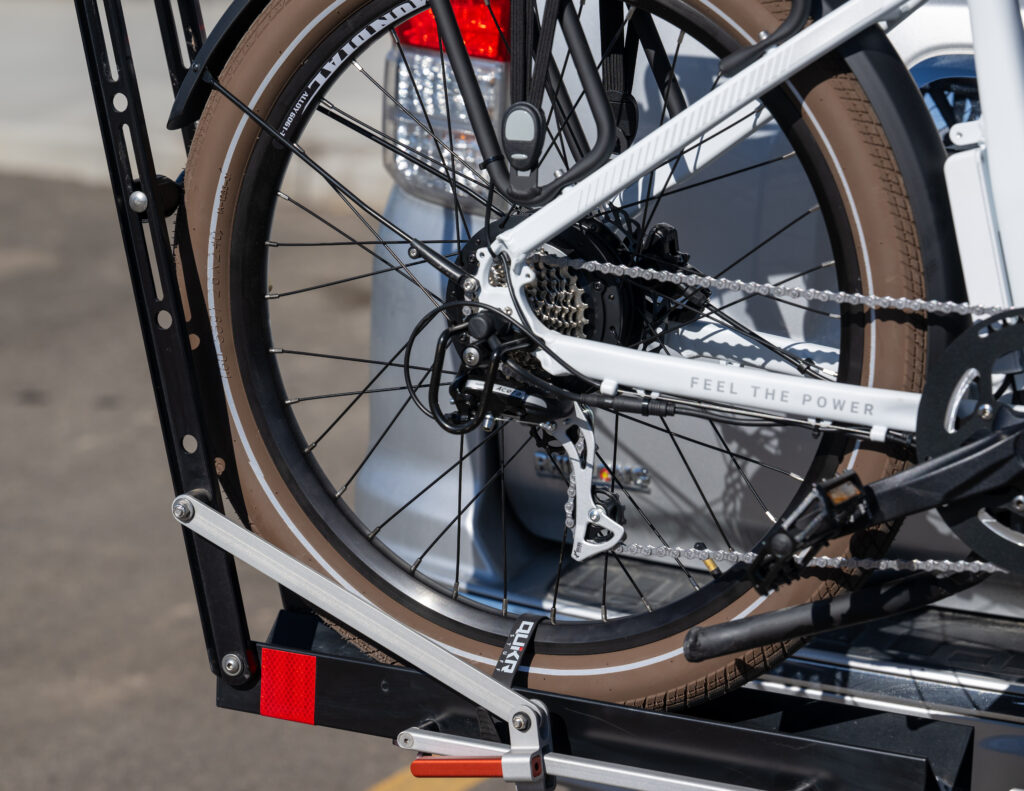
The rack can accommodate skinny road bike tires as well as tires as wide as 5” with no adapters needed. The distance is 4.77″ between the arms, but dare we say, tires are not really accurate in their dimensions?

Quik Rack Mach2: 5″ tire
The Mach2 fits the Vee Snow Shoe 2XL, which is 5.05″ wide. (stated by the manufacturer)

UPDATED SEPTEMBER 2023
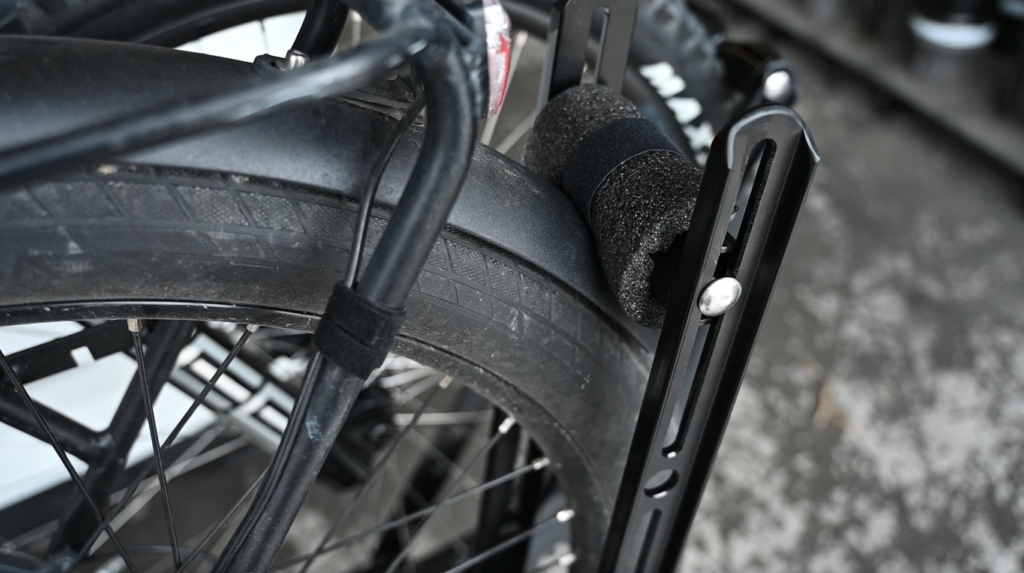

We have also seen customers place additional pipe insulation or a cut section of a pool noodle between the tire and the fender. This will help maintain the shape of the fender and prevent it from rubbing against the tire.
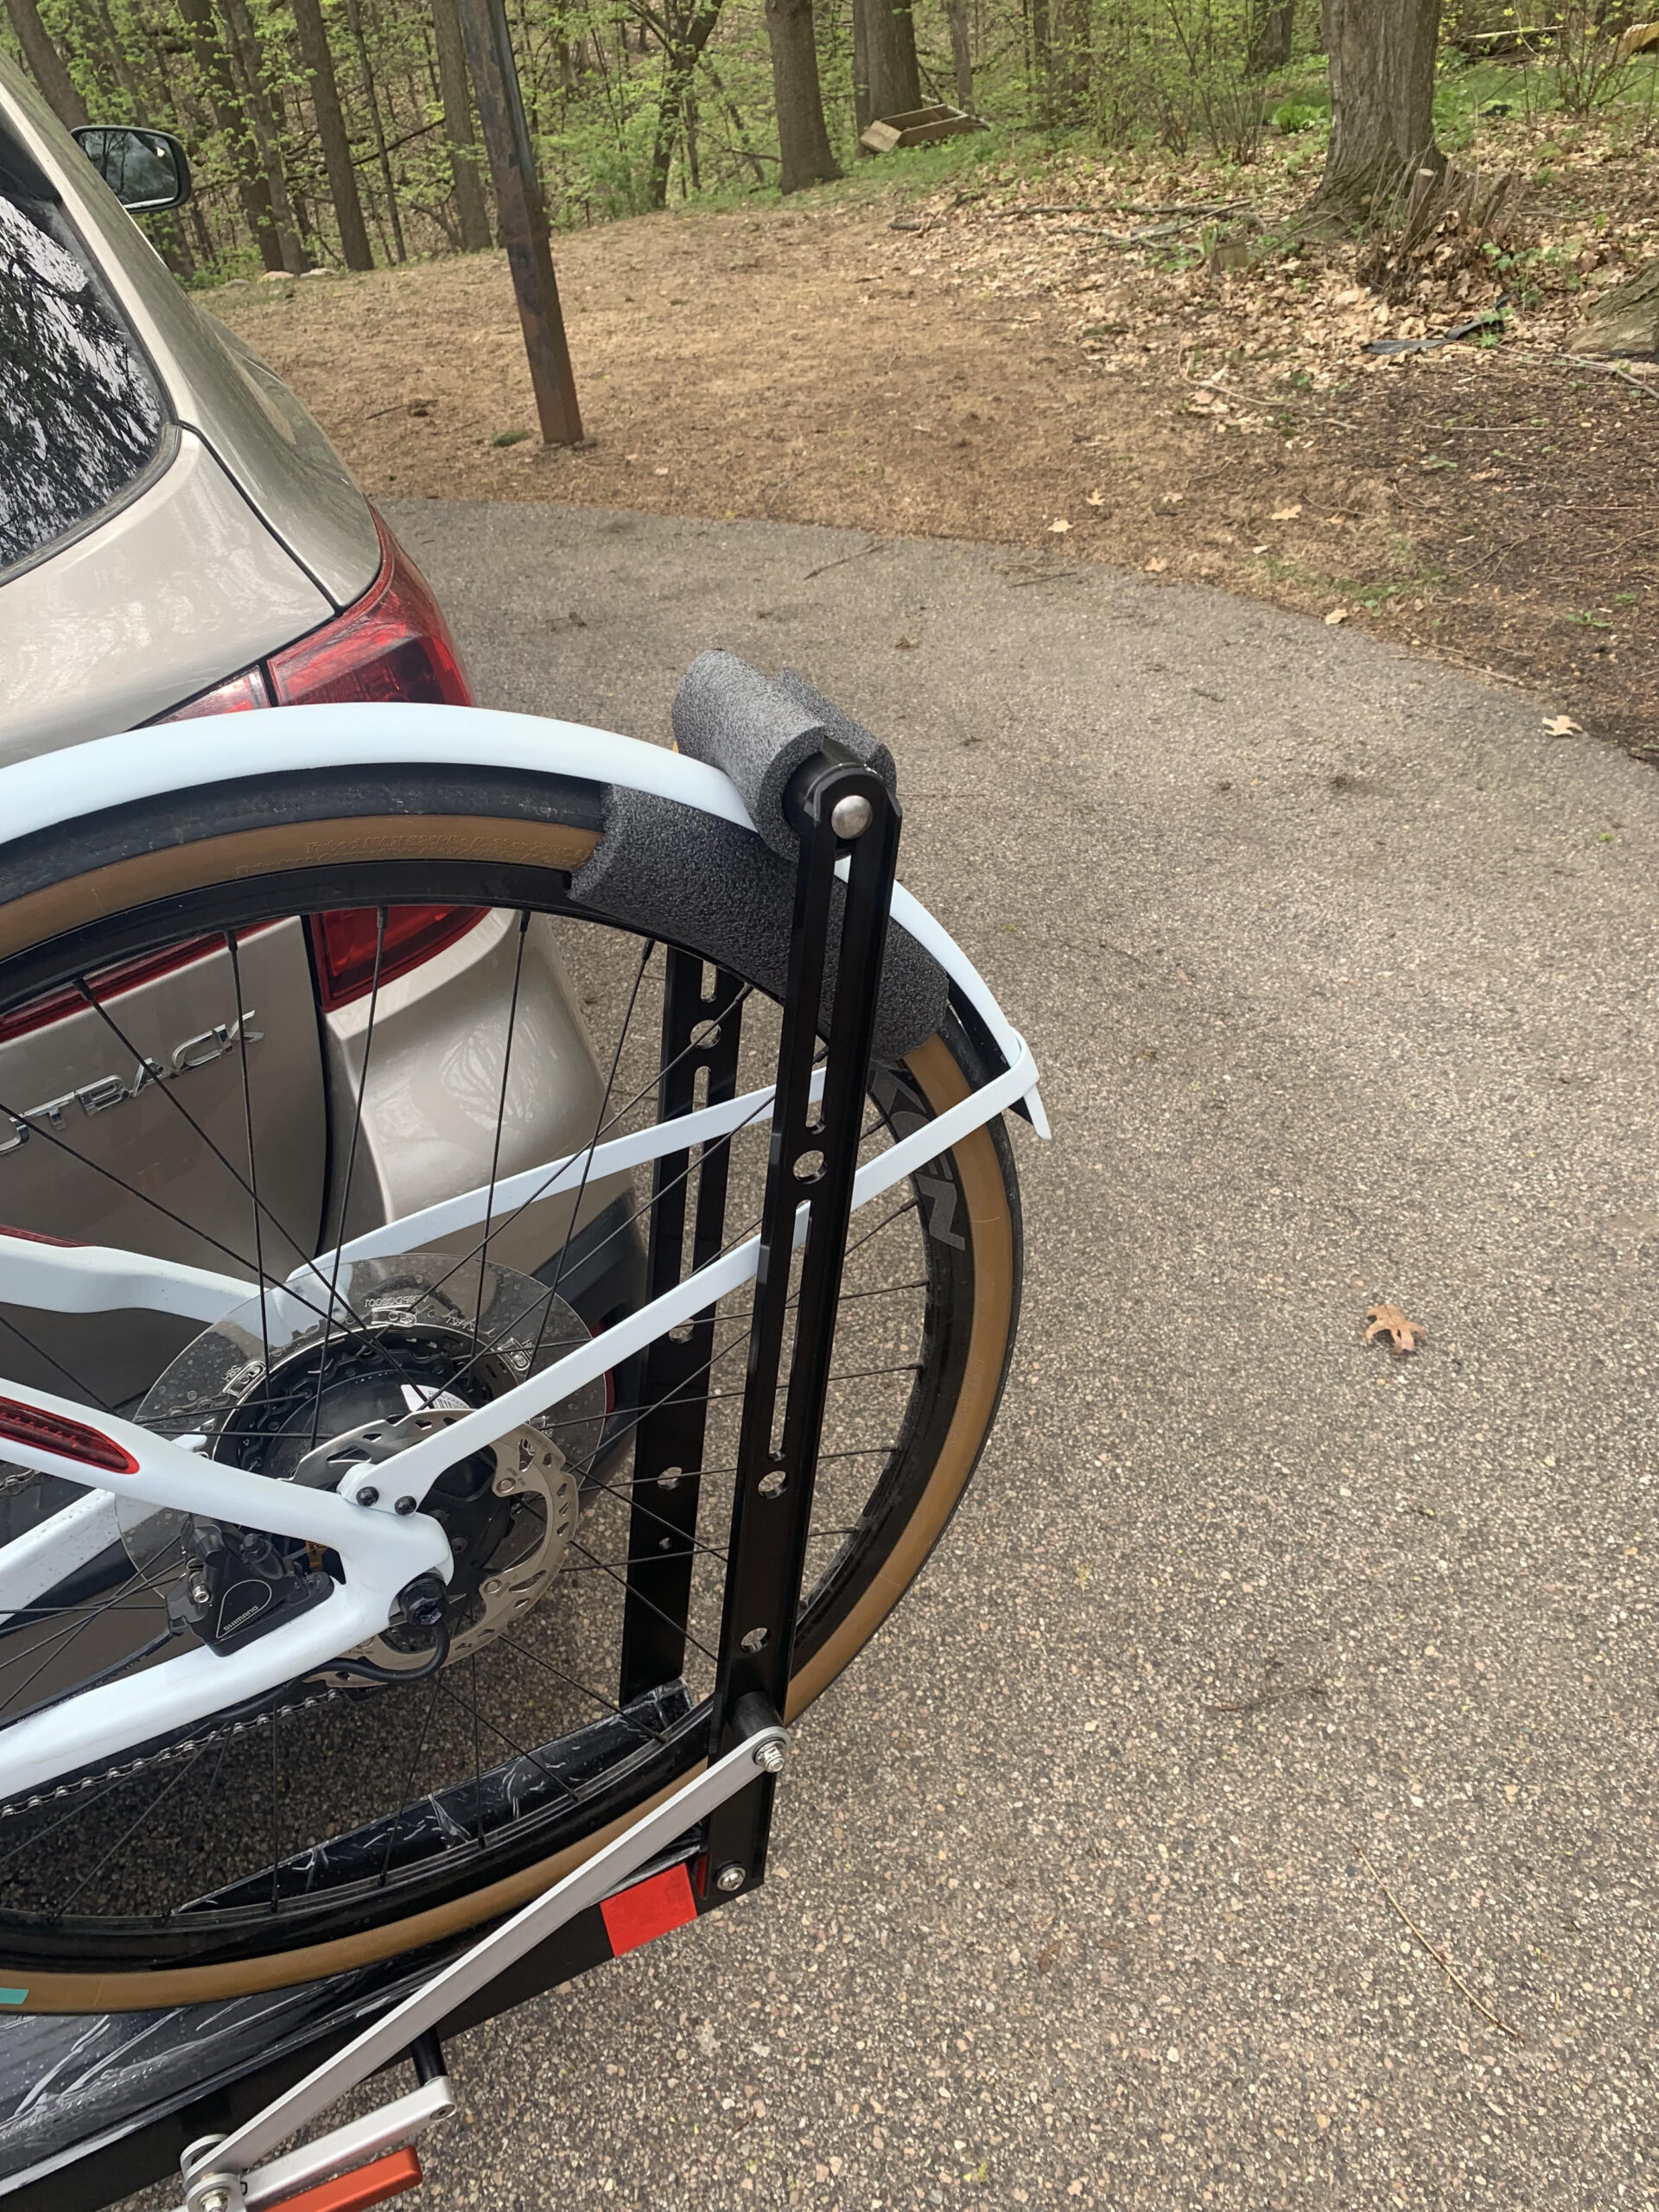
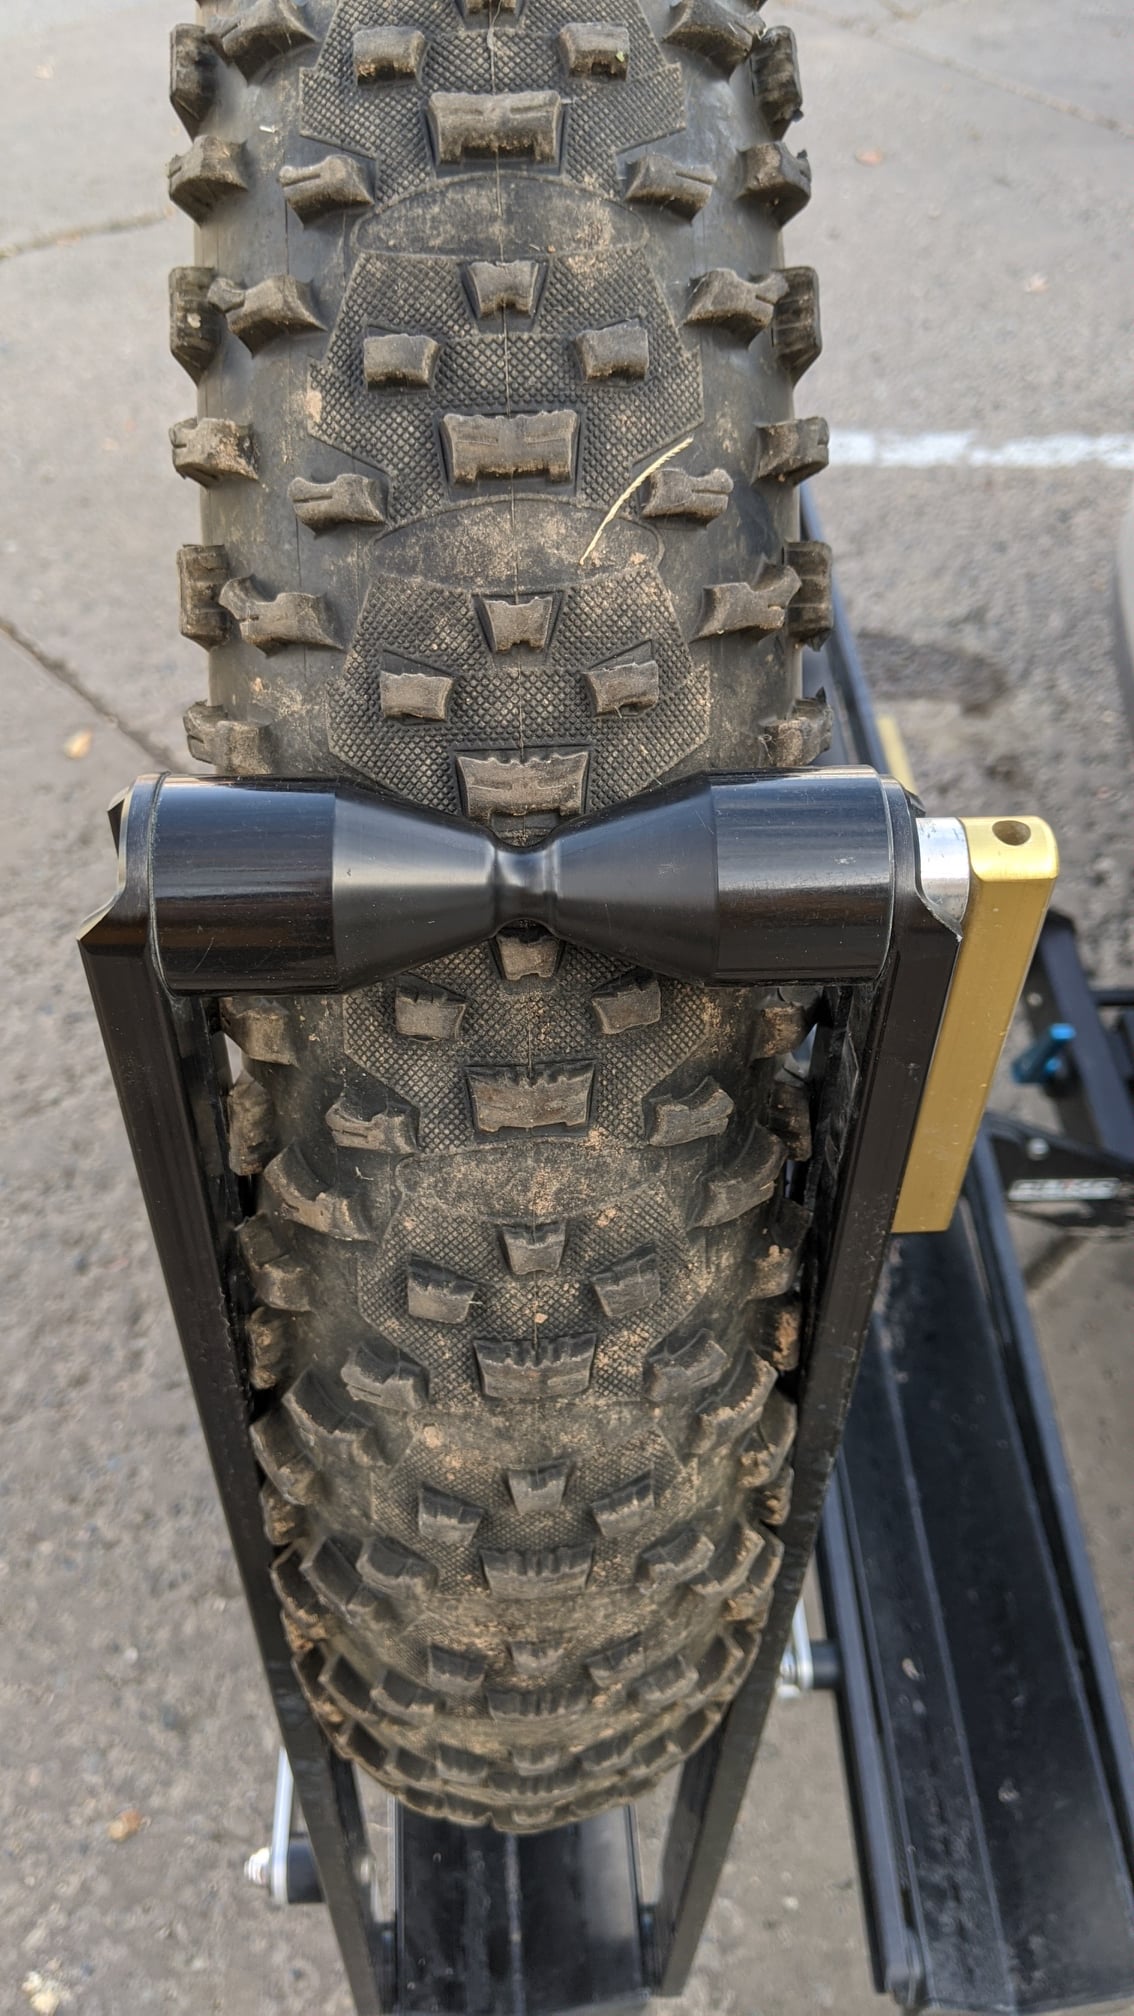
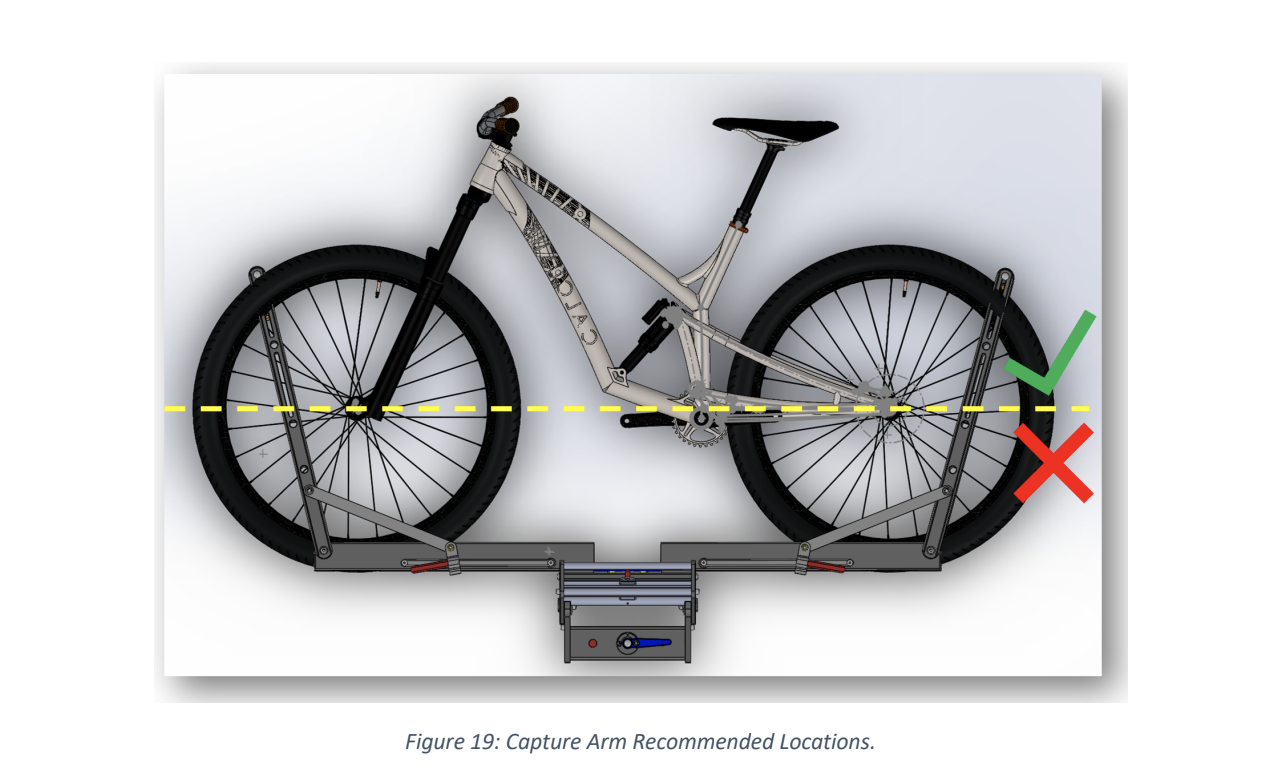
It is possible (and easy) to lower the tire spool along the arm. Doing so changes the contact point on the tire and often results in it sitting lower than or tucked under the fender. Lowering the tire spool will change the angle of the arm, so be sure to check that it is still around the optimal 45 degrees.
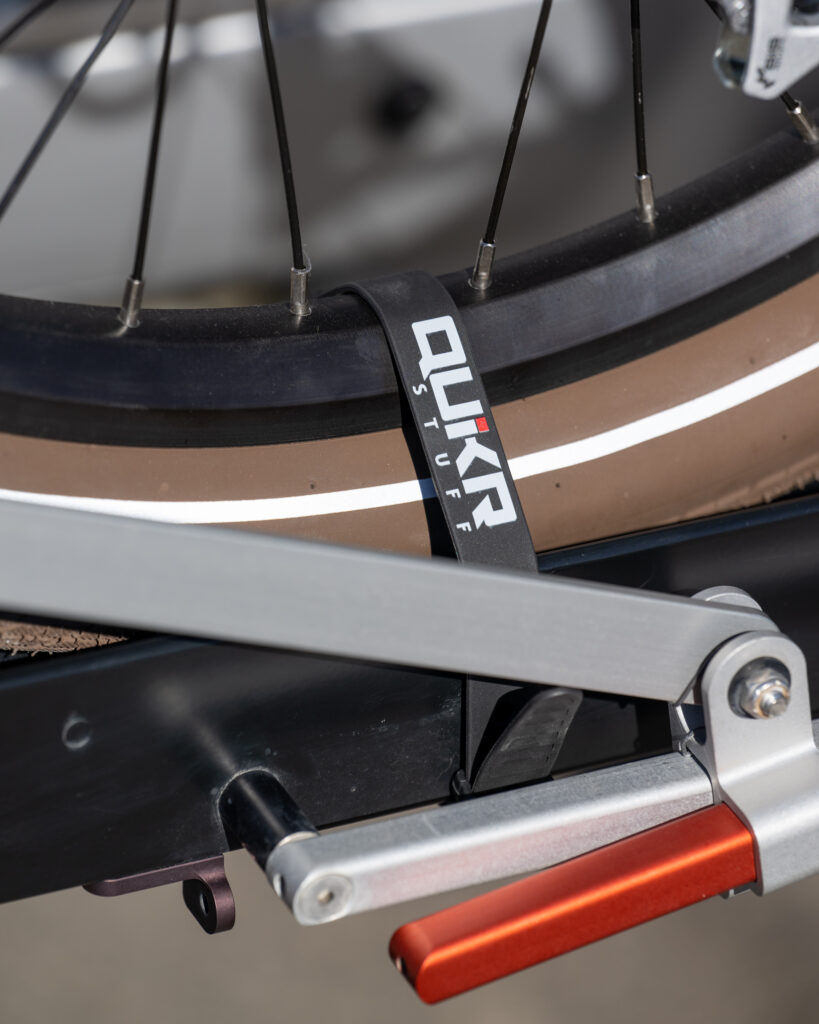
Additionally, we recommend using the Wheel Strap accessory as another contact point. These are helpful for bikes with fenders that hang below the optimal 45 degrees


UPDATED SEPTEMBER 2023
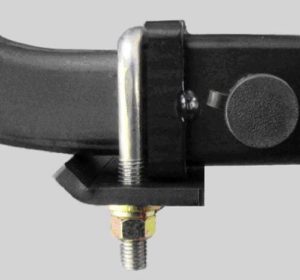
Yes, you can remove the captive safety pin with one screw and use a standard hitch pin bolt with cotter pin or lock.
However, this is not possible with the 1.25″ hitch or the 1.25″ with the 2″ adapter installed. The reason is because there is no hole going through the adapter. In other words, you can only do this with the 2″ hitch model.
UPDATED SEPTEMBER 2023
Customers sometimes purchase a 1.25″ rack when they have a 2″ receiver on their vehicle. The reason for doing this is so they can use the rack with other cars, some of which may have a 1.25″ receiver. We manufacture a spacer to add to the 1.25″ male piece that pops on and off. This adapter is included with every Mach2 1.25″ purchase. See photos and keep reading.
(top picture – Adapter off for use in a 1.25″ hitch receiver)
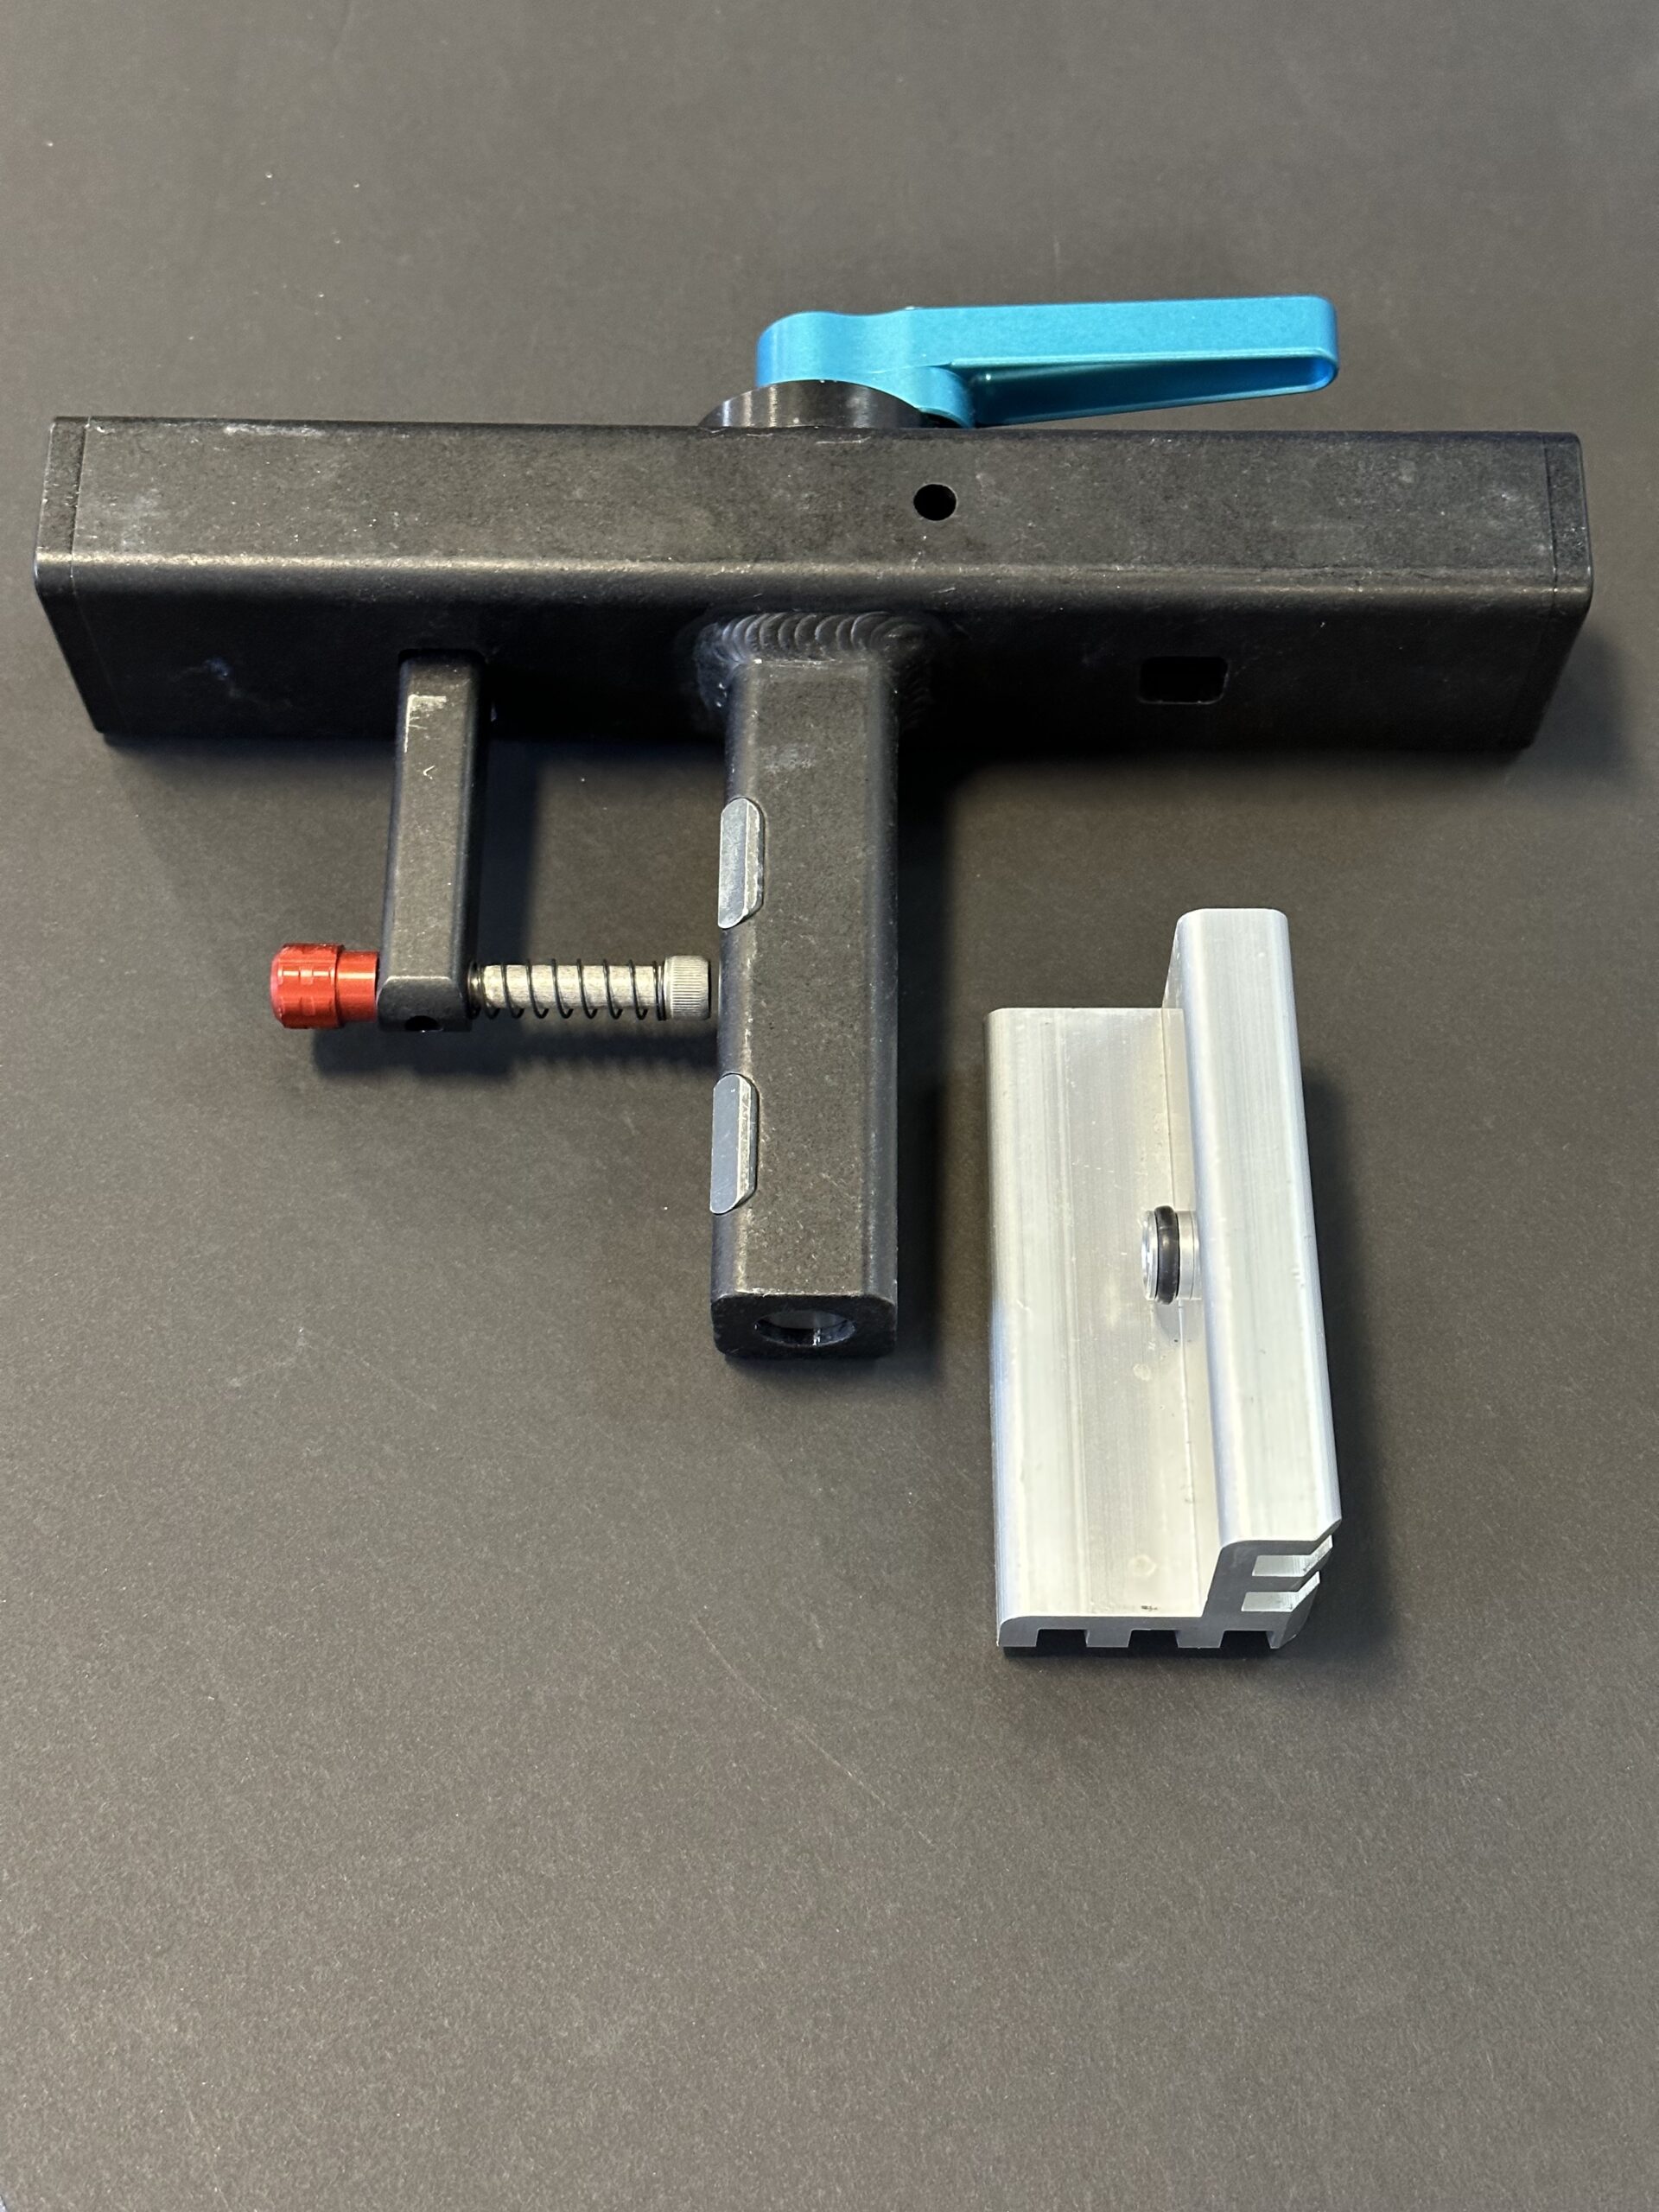
1.25 Hitch with Adapter off
Adapter on for use in a 2″ hitch receiver. You then insert the male with adapter into the 2″ hitch receiver and tighten it down.
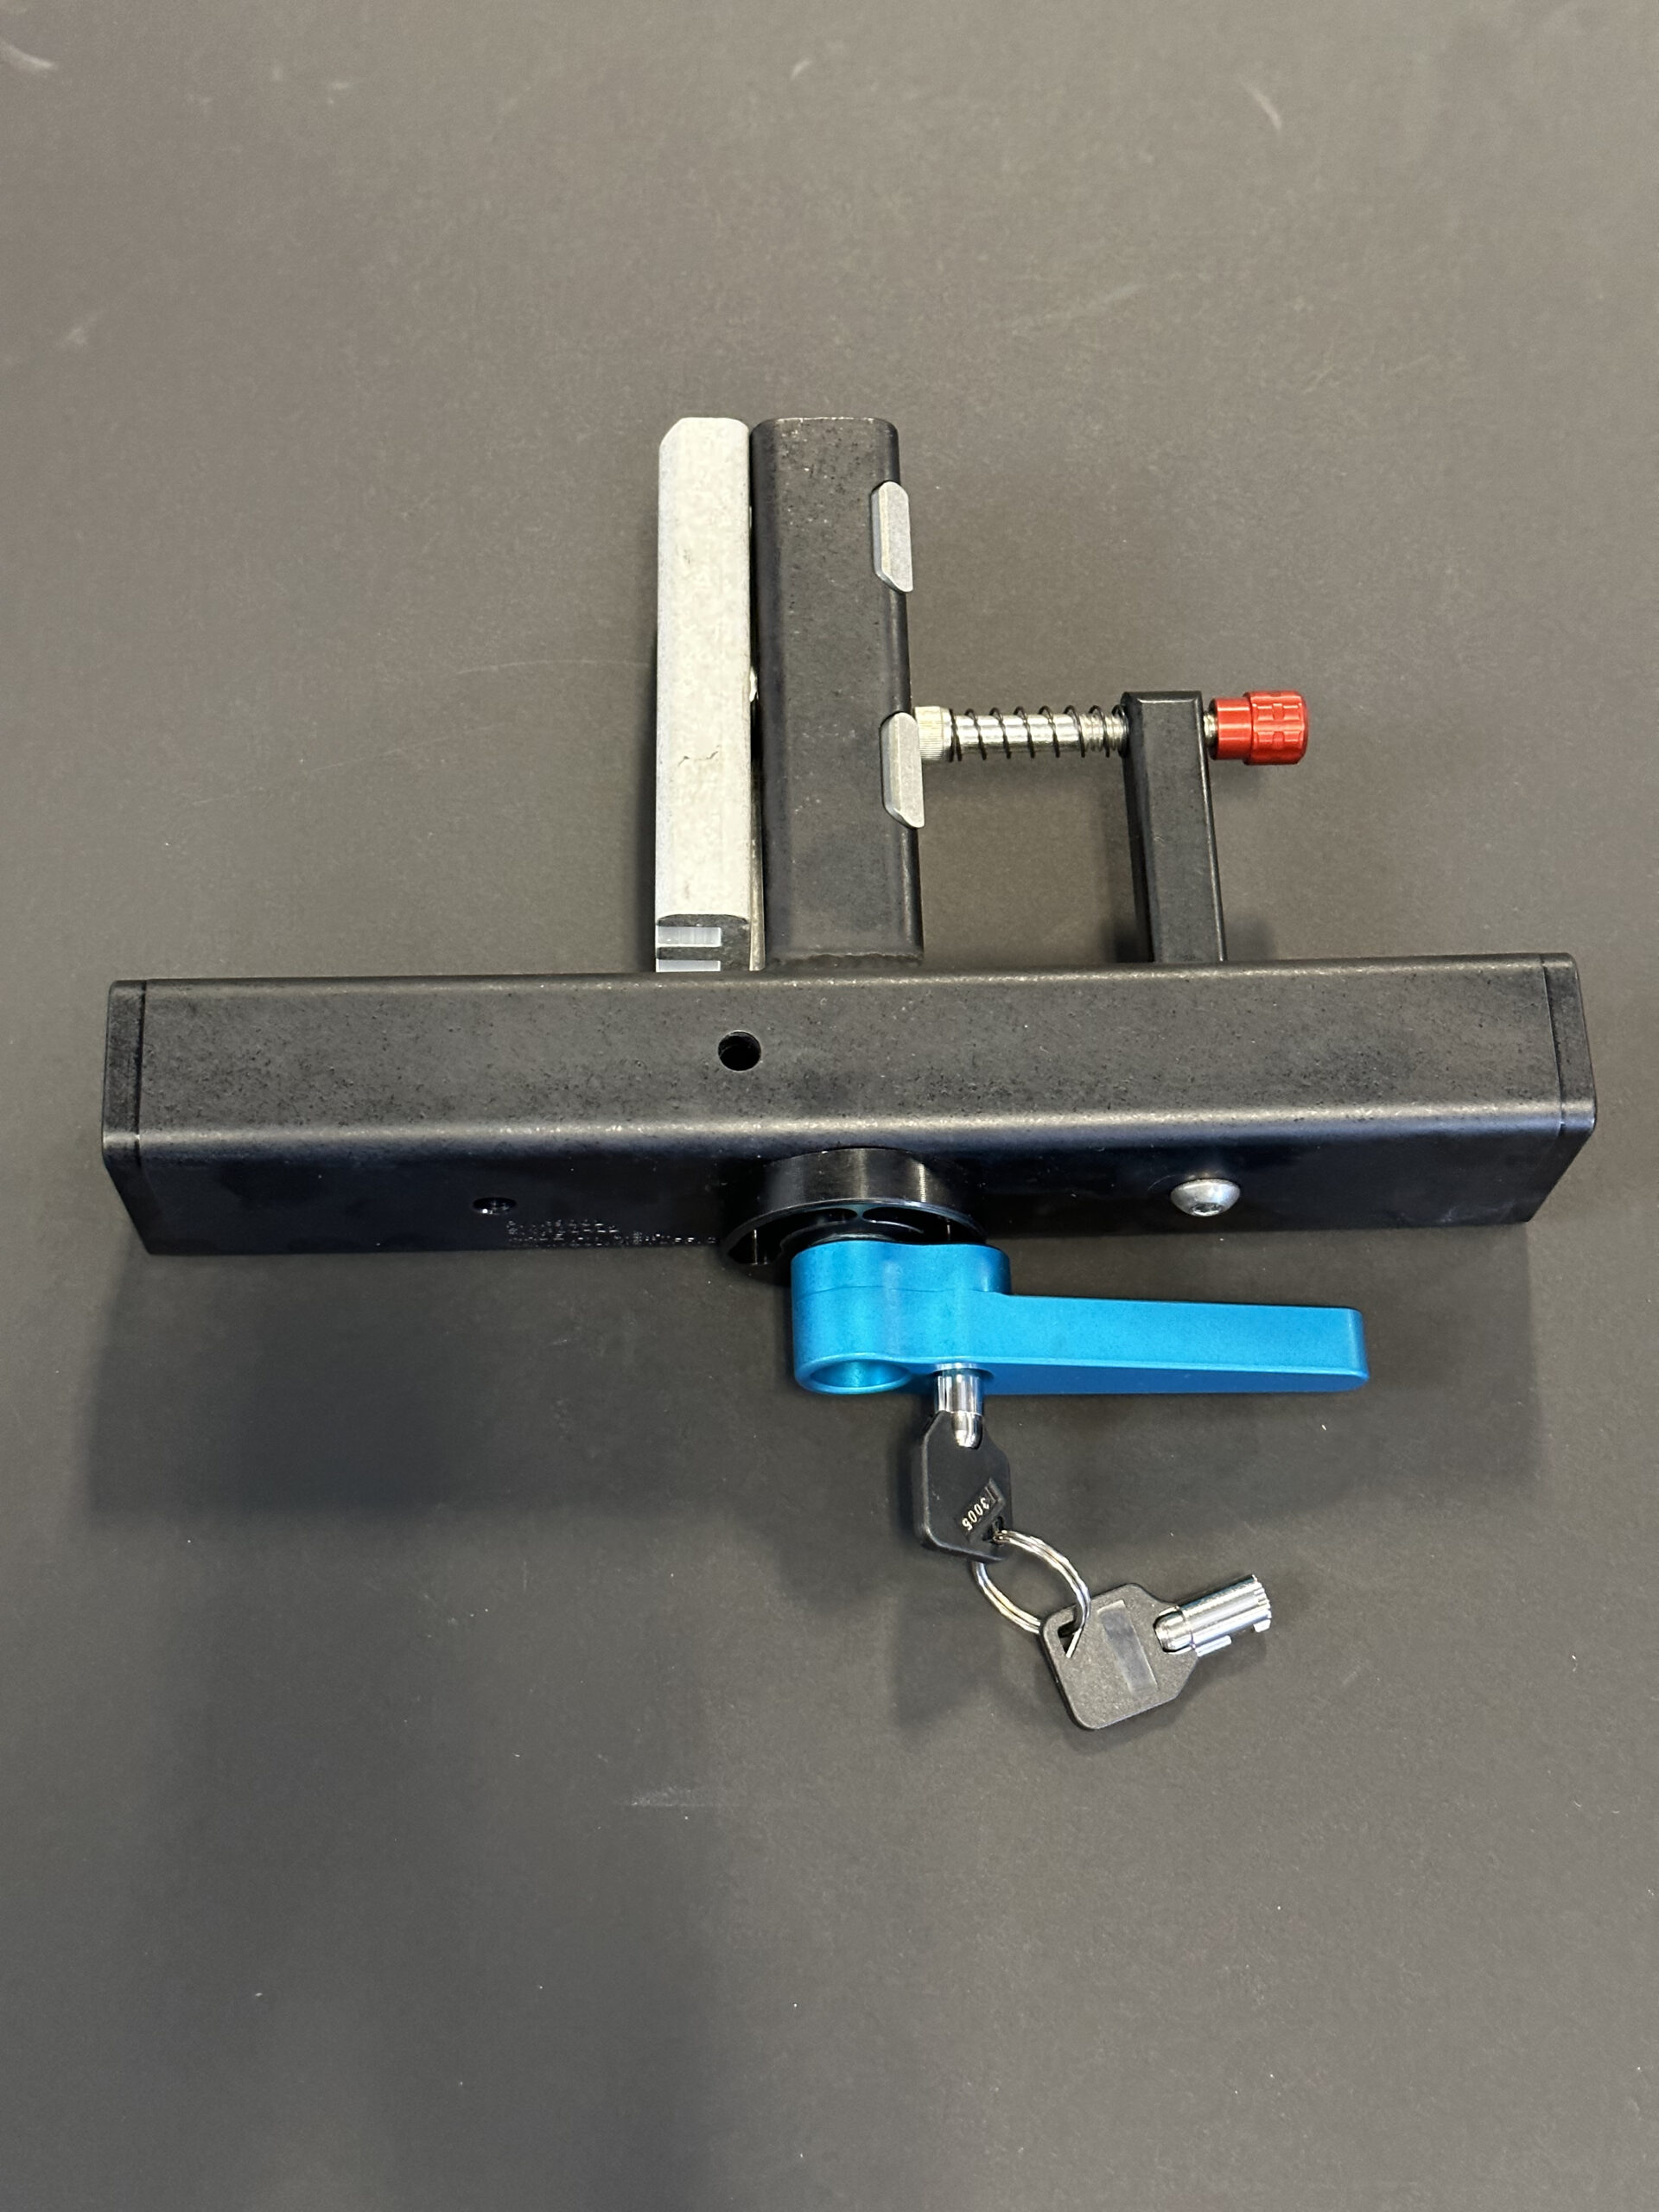
1.25″ Hitch Assembly for QuikrStuff Mach2
You might find this video helpful –> How to Use Hitch Adapter

There are other adapters on the market and they can be purchased separately. The CEO himself has a third-party hitch adapter/extender on his Subaru, converting his 1.25″ receiver to a 2″ hitch. Because of the extra play it created, he had the adapter welded into his 1.25″ receiver, alleviating the extra movement but also making his receiver permanently a 2″ receiver. If you use the QuikrStuff adapter that comes with your 1.25″ rack, you will not experience any extra play.
NOTE: We do not warranty any rack setup that uses an adapter other than the one QuikrStuff manufactures and includes with your 1.25″ rack purchase.
UPDATED SEPTEMBER 2023
You may use a hitch extender with your rack. We do not currently manufacture or sell a hitch extender. You can find these at etrailer.com or from other companies.
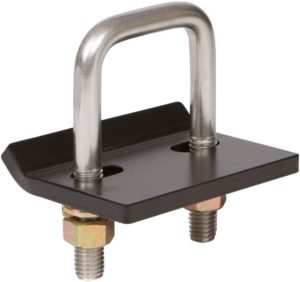
Often times using an extension can introduce more play and noise into the whole system. You can try an anti-rattle stabilizer (shown in photo below) to alleviate these issues. No, we do not sell these either. Another option is welding the extender into your receiver, but this does make it a permanent feature.
Be sure to consider the number and weight of the bikes you are hauling and realize that the limits will be reduced when an extension is used. Refer to the class rating and tongue weight of your vehicle’s hitch receiver. Typically, your tongue weight will be reduced by 50% when using an extension.
1.25″ Mach2
1 bike – 120 lbs
2 bikes – 140 lbs
3 bikes – 160 lbs
2″ Mach2
1 bike – 120 lbs
2 bikes – 240 lbs
3 bikes – 300 lbs
4 bikes – 185 lbs
NOTE: We do not warranty any rack setup that is using a hitch extender because they are not our products.


UPDATED SEPTEMBER 2023
We do not. We recommend a third party adapter. But we are thinking of creating one ourselves. 🙂
UPDATED SEPTEMBER 2023
Yes! It clears by about an inch without a hitch extender. But it was only on one 2019 model, so you must check it yourself.
See this post by one of our testers – https://www.facebook.com/matt.brenner.75/posts/10158448921359329
UPDATED SEPTEMBER 2023
Easy!
Remove it with one screw and use your own lock or hitch pin. Watch our demo to learn more about the adaptability of the redesigned hitch:

UPDATED SEPTEMBER 2023
The Mach2 hitch design uses two aluminum pads instead of one steel ball, which was what was used with the inventor’s previous bike rack. This is a huge improvement! The pads are stronger, smoother, and more stable, and the old steel ball version could deform the hitch over time.
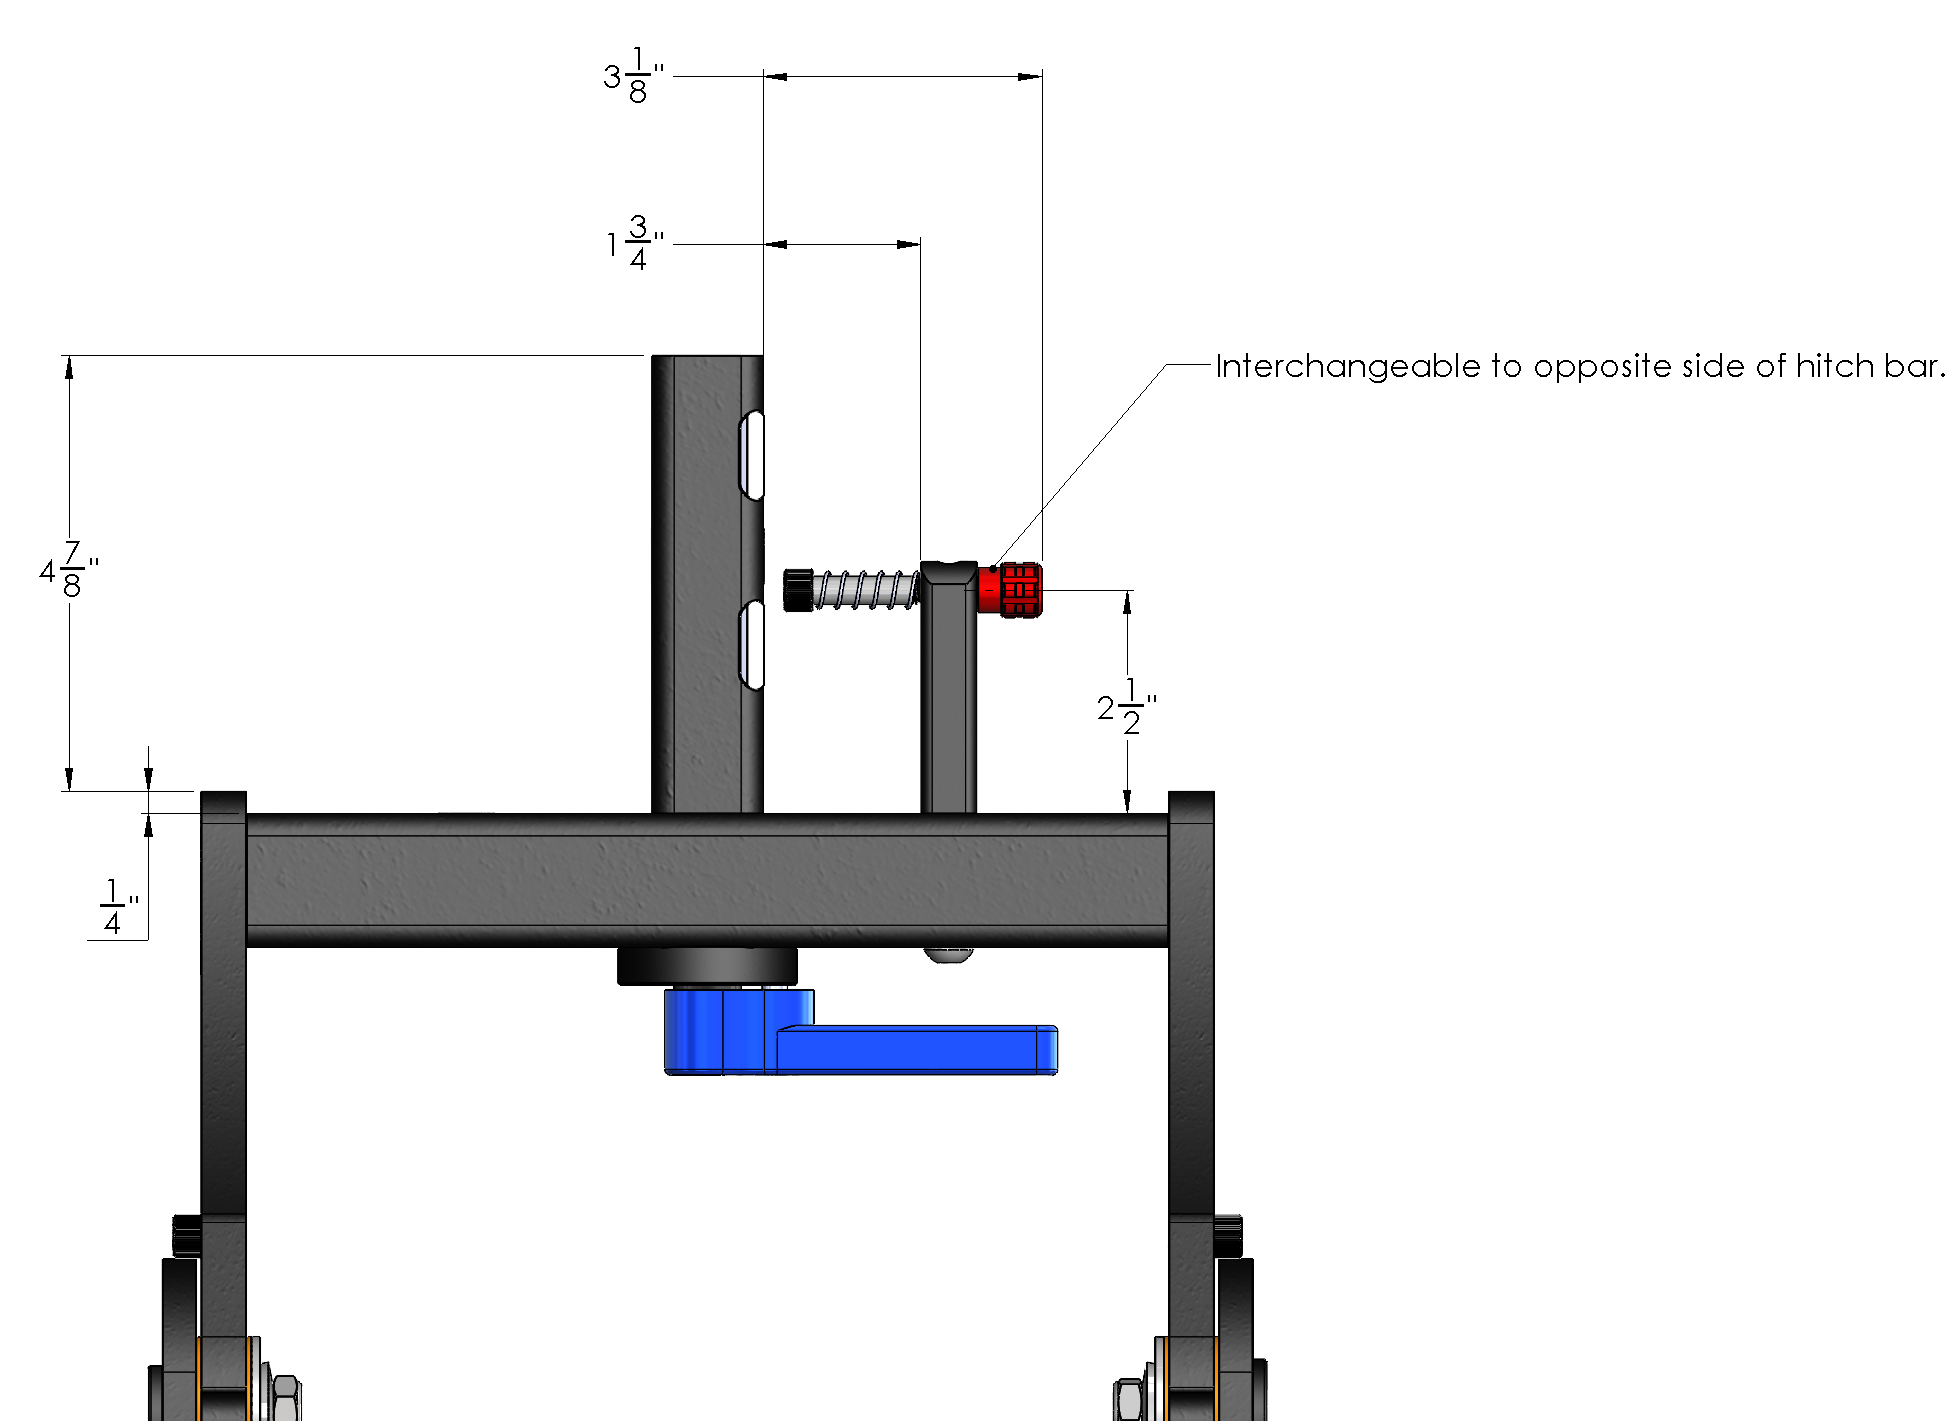
Our rack also comes with a Captive Safety Pin for additional peace of mind. The Captive Safety Pin does not go through a hole in your receiver; rather, it sits just behind the flange on your receiver. A regular locking pin can be used, if so desired. And the Captive Safety Pin can be removed with one screw for vehicles that don’t have clearance for it.
Watch it in action:
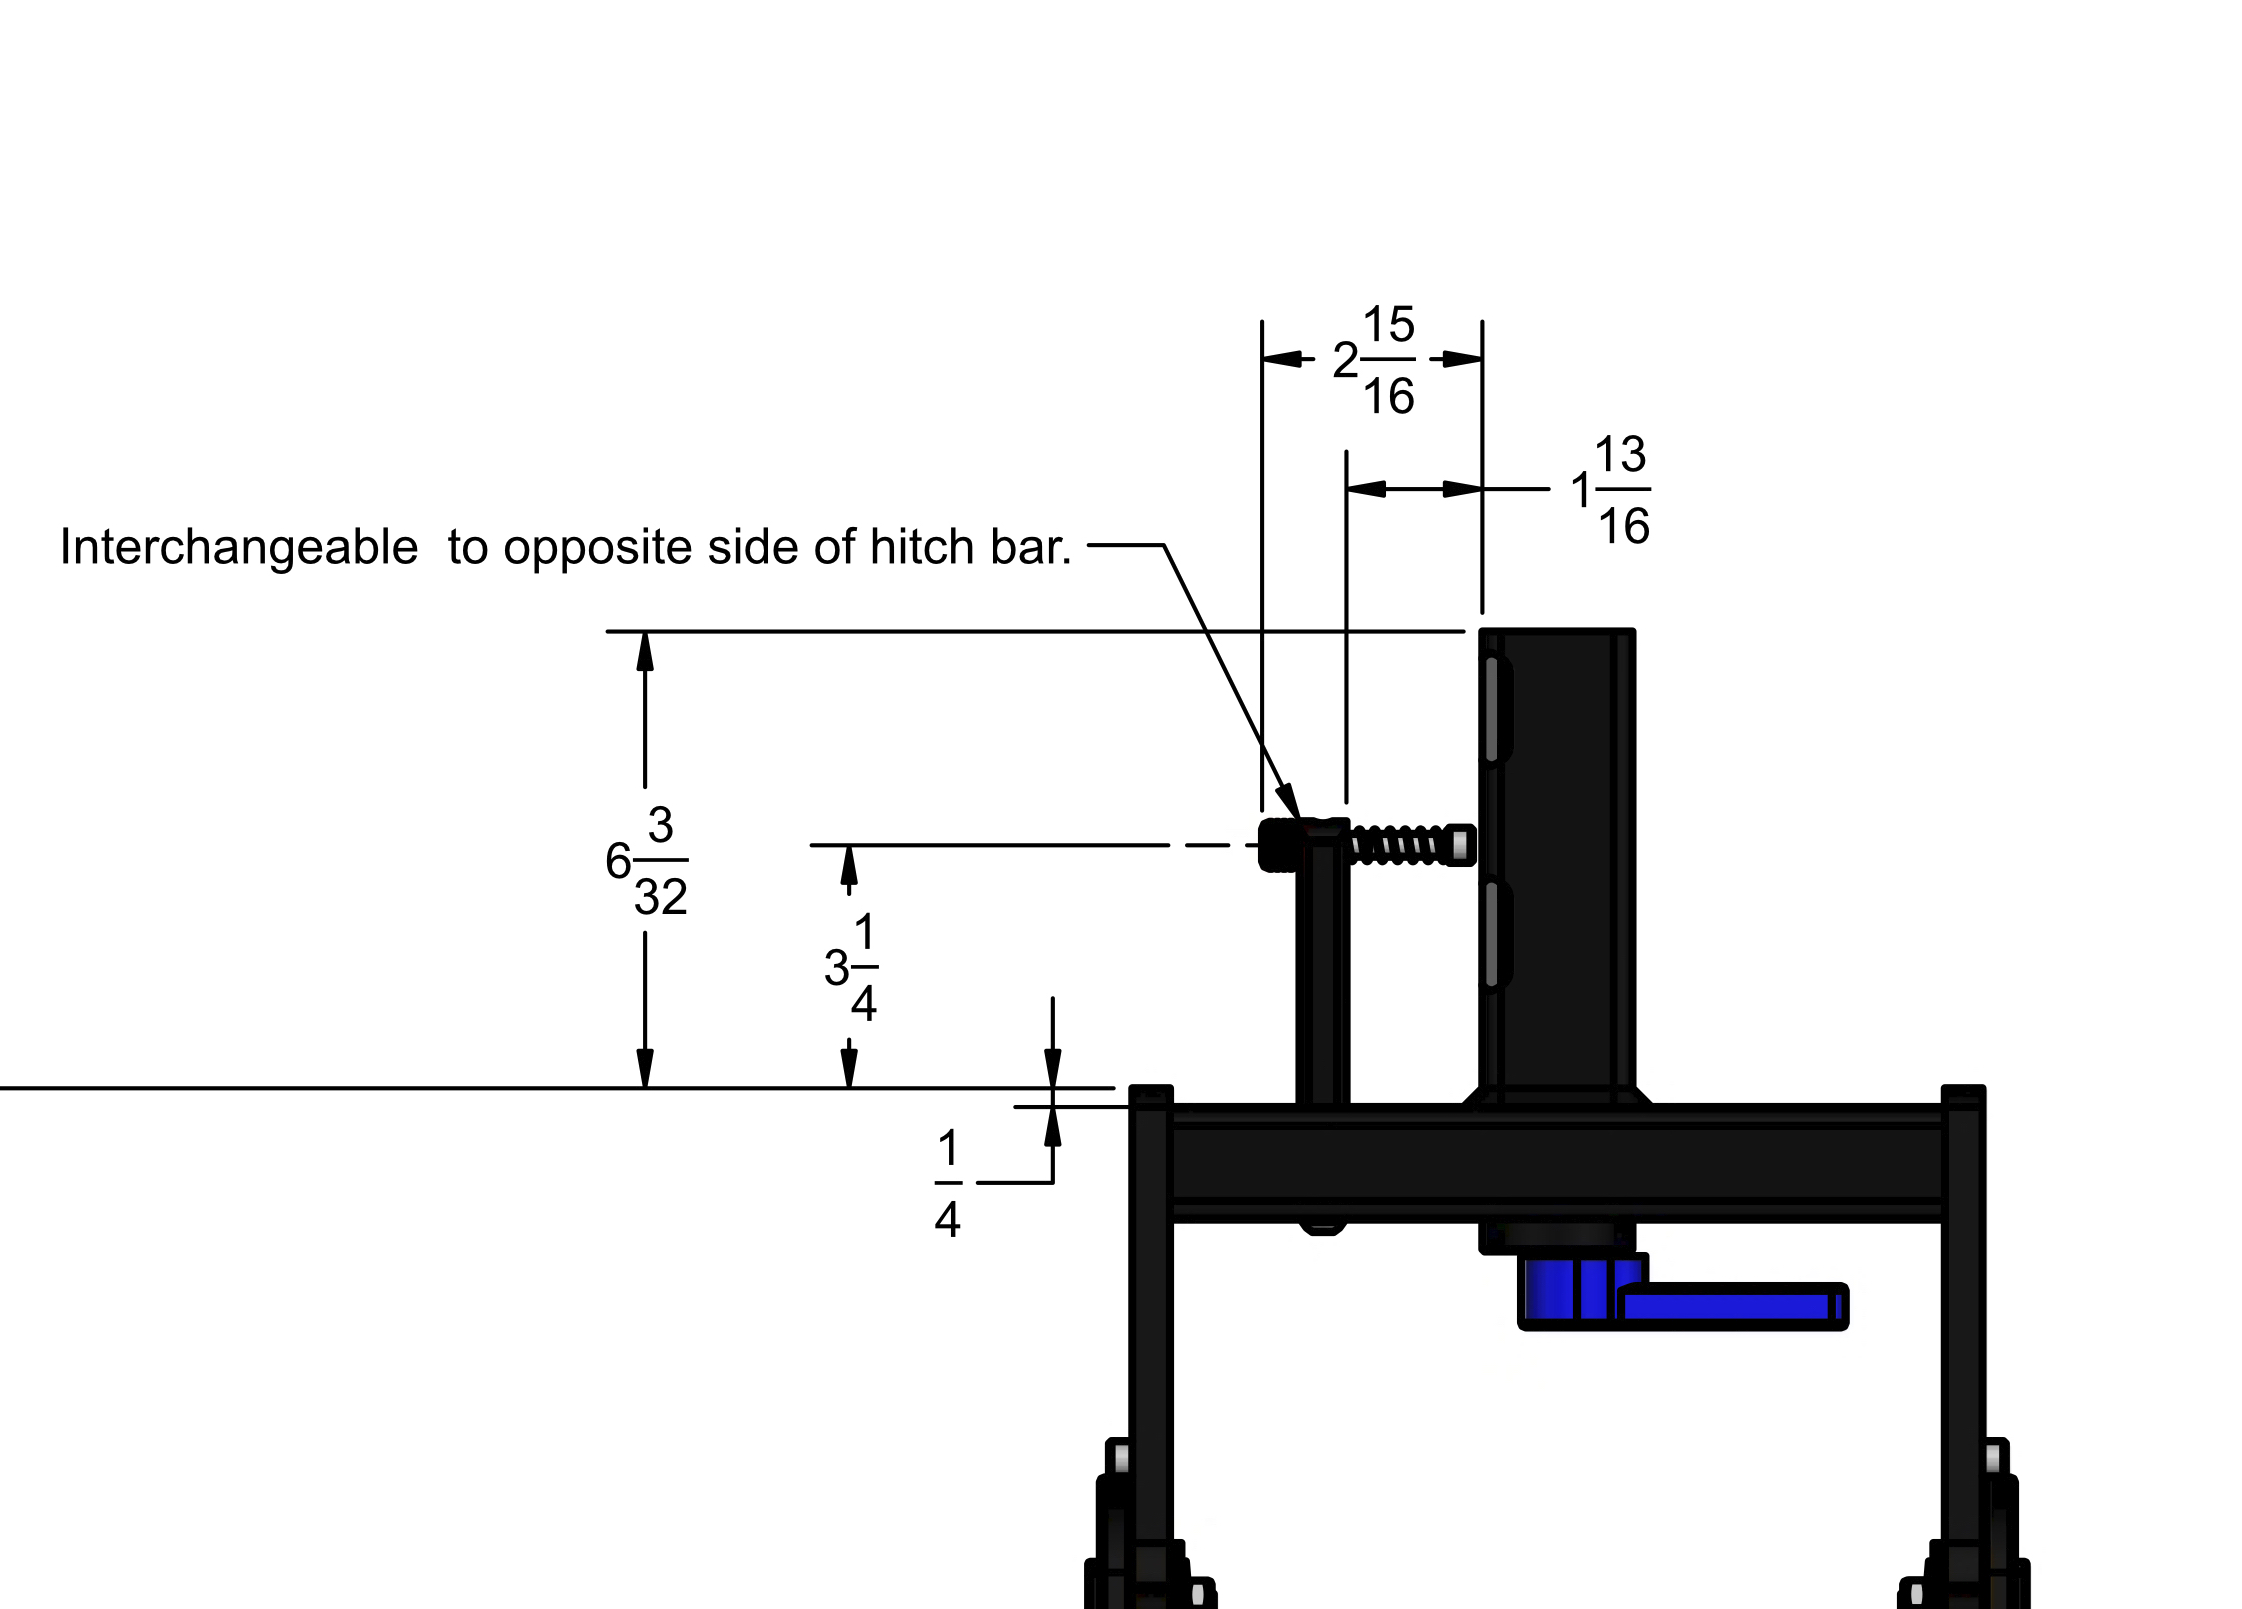
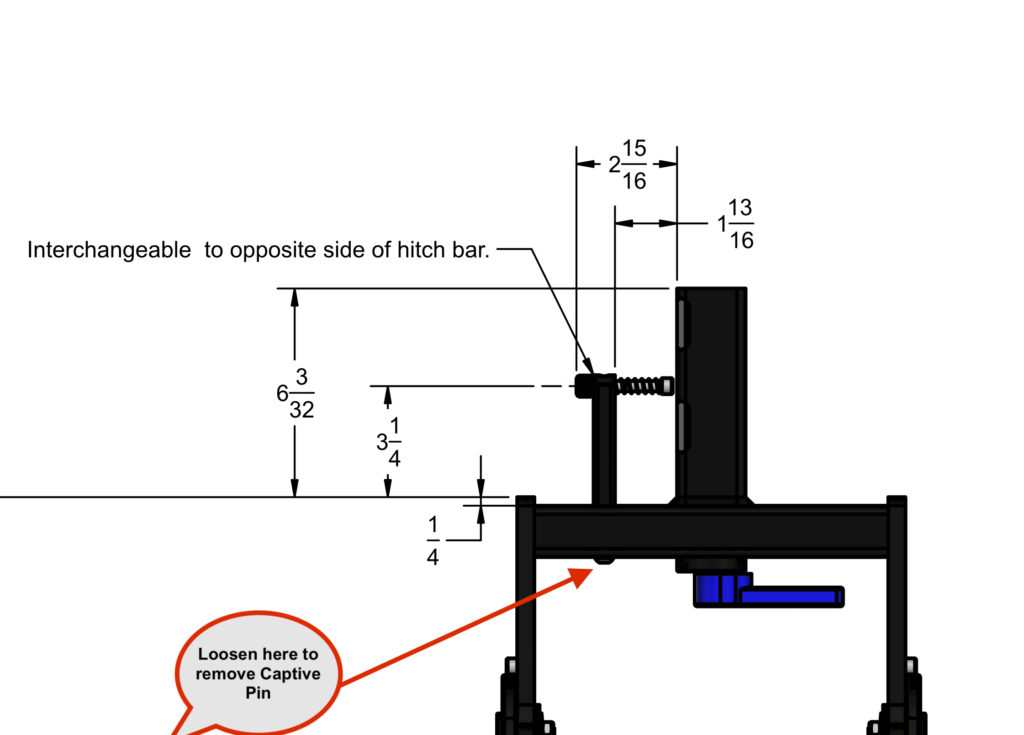
Here are the dimensions for the Hitch assembly.
UPDATED SEPTEMBER 2023
The ramp weighs 12 pounds and measures 56-1/4″ long. It does not fold like the rack and Add-Ons do. See it in action:
UPDATED SEPTEMBER 2023
We advise against it because it extends beyond DOT regulations and it would put excessive leverage and strain on the vehicle’s hitch and rack components.
We would not warranty this usage.
UPDATED SEPTEMBER 2023
Since everyone has a different model and spare tire size, we recommend a 2″ to 2″ extension to push the rack further rearward.
We do NOT recommend buying the 1.25″ Mach2 as it will put more strain on it.
There are many third-party products you can search for to solve this problem as we don’t have our own…yet.
Note: Our warranty does not cover racks used on 3rd party products (extenders, pivots, etc.) as we have no control over their integrity.
UPDATED SEPTEMBER 2023
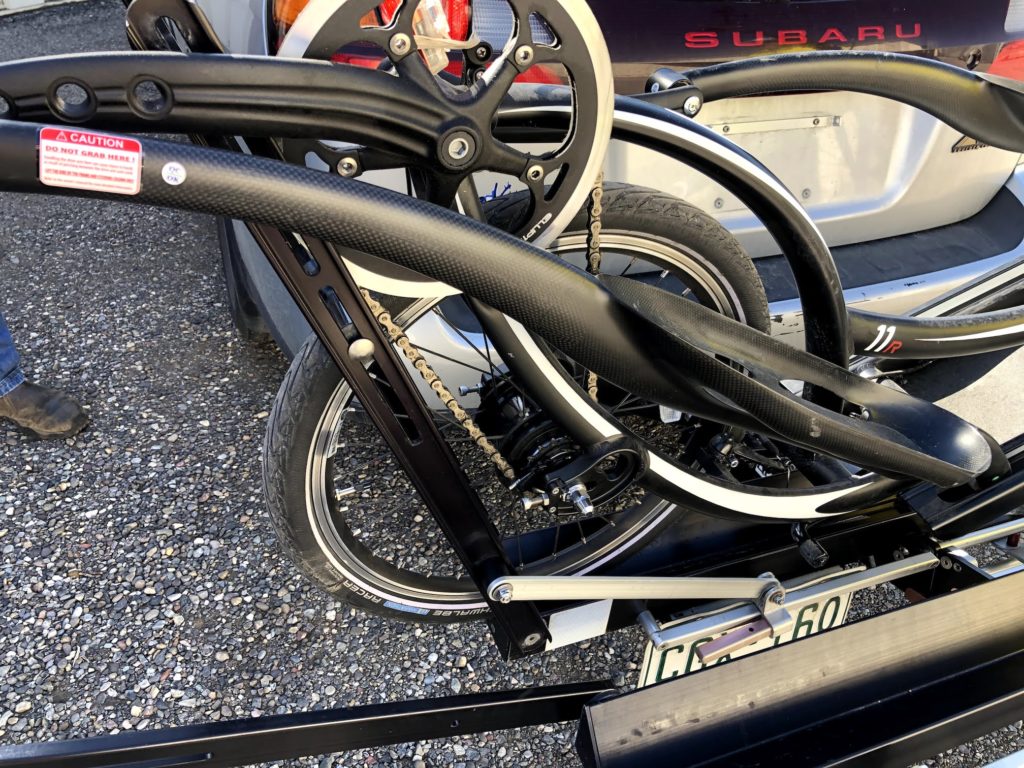
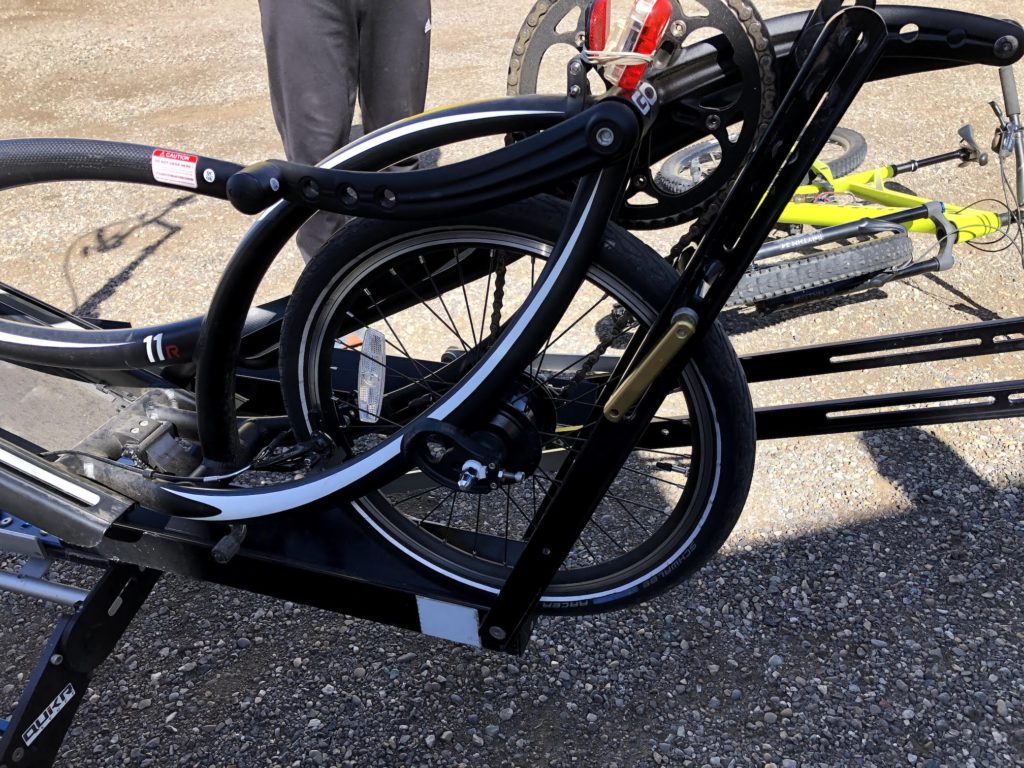
We recently met a doctor in our town who had an Elliptigo 11R bike and it fits fine on our rack with no modification.
If you wanted to carry two Elliptigo bikes, you would need to have one Add-on in between them because of the width of the base being larger than our width.
We may look into creating a customization to carry two Elliptigo bikes next to each other, but that will be some time off as we crank out higher demand items. 🙂
Some pics:

YES, the QuikrStuff Mach2 bike rack can be used on the popular Tesla Model Y.
Here’s what we know about the rack on a Tesla Y:
The rack fits very close to the car. If you insert the rack into the receiver just far enough to cover both expanding pads, you will still be able to get the rack into its upright position. Some Tesla owners report that this isn’t possible but that is because they are pushing the rack all the way into the receiver. You only need to push it in far enough to cover the two expanding pads. As long as both pads are covered, the rack will stay secured.
There are also rumors that a loaded bike may bump into the back of the car. This will not happen if you install the rack as suggested in the above paragraph.
You’ll need to change the Captive Safety Pin from the left side to the right side of the car. This is because there is an electrical connection in the way on the left side. Moving the Captive Safety Pin is easily done with no tools although it’s tight in there and if your hand doesn’t fit you may need to use needle nose pliers. The Captive Safety Pin does not need to go through the hole in the receiver; it does, however, need to sit behind the flange on the receiver. Remember, the Captive Safety Pin is not the primary mechanism holding the rack to your vehicle; it is the unique expanding pads in the hitch that do that job.
We haven’t noticed the rack interfering with the performance of the mirrors. We aren’t big fans of the tilting mirrors (when they tilt way down when you first put it into reverse) and know you can turn that feature off. The car will tell you to STOP when backing up because it thinks the rack is a separate object that you’re about to hit. You can turn on trailer mode so it realizes that something is attached.
We know these things because CEO Bryan Wachs has a Tesla Model Y and always has the rack on his car. If you have any further questions, he will be happy to respond to them. Email us at support @quikrstuff.com.
Specs and Fitment Questions
UPDATED SEPTEMBER 2023
Buying a new bike rack is like welcoming a new family member. Let’s make sure the Mach2 “fits” into your family!
- Weights:
Mach2 2″ & 1.25″ – 30.7 lbs (Shipping is 36.2 lbs and box outside dimensions are 31″x19″x9″ – inside dimensions are 29.5″x18″x8″) - Add-on – 22.7 lbs (Shipping is 27.9 lbs and outside dimensions are 31″x19″x9″ – inside dimensions are 29.5″x18″x8″)
- Ramp – 13lbs – Shipping is 14 lbs and box outside dimensions 60”x8”x8”
- Maximum tire width – 4.77 inches (5.05 tire is the maximum we have seen and it works – see this FAQ – Maximum Tire width
NOTE: We do NOT give opinions of fitment, as there are variables of changes in model spec, OEM & aftermarket hitches and adapters, and way too many cars to keep up a database. We give YOU the tools you should need to measure and make a determination yourself. If you can’t find the answer you need, contact us!
In the tilted down mode (see the image/specs below),
- The first Add-On is 1 7/16″ below the hitch,
- The second Add-On is 5 15/32″ below that for for a total of 6 15/16″ below the hitch.
- The third and fourth Add-On are each an additional 5 15/32″ below the Add-on above it.
1.25″ Version Hitch Insert (below).
Folded Dimensions:
UPDATED SEPTEMBER 2023
These are conservative numbers made to protect your investment in your bikes. Please check your tongue weight capacity for your vehicle/hitch as OEM will not be the same as an aftermarket hitch.
These numbers do NOT take into consideration hitch adapters or extenders that could put more leverage, and therefore stress, on the hitch/crossbar that would lower these capacities even more.
1.25″ Mach2
1 bike – 120 lbs
2 bikes – 140 lbs
3 bikes – 160 lbs
2″ Mach2
1 bike – 120 lbs
2 bikes – 240 lbs
3 bikes – 300 lbs
4 bikes – 185 lbs
Even though the 1.25″ rack can hold 160 pounds total and the 2″ rack can carry 300 pounds total, each bike rack tray and its components have a weight limit that cannot be exceeded. Doing so could cause the rack to fail.
Click here for a written explanation as to how much weight is possible per bike tray: Mach2 Load Capacity Explanation
UPDATED SEPTEMBER 2023
The base Mach2 hitch rack mount weighs approximately 30.7 lbs and each Add-on weighs 22.7 lbs.
UPDATED SEPTEMBER 2023
The bike rack can be used with a wheelbase of 56″ with wheel sizes from 12″ to 29″, and up to a 5″ wide tire with no adapters needed. See the no-tools tire size adjustment in action:
Here is an image of the bike size range dimensions.
Quik Rack Mach2 with Add-Ons: Loaded for vacation
UPDATED SEPTEMBER 2023
10.04 inches is the distance between one tray groove and the next. See full dimensions below.
Printable Mach2 CAD drawing from the top – PDF
UPDATED SEPTEMBER 2023
The rack can accommodate skinny road bike tires as well as tires as wide as 5” with no adapters needed. The distance is 4.77″ between the arms, but dare we say, tires are not really accurate in their dimensions?
Quik Rack Mach2: 5″ tire
The Mach2 fits the Vee Snow Shoe 2XL, which is 5.05″ wide. (stated by the manufacturer)
UPDATED SEPTEMBER 2023
We have also seen customers place additional pipe insulation or a cut section of a pool noodle between the tire and the fender. This will help maintain the shape of the fender and prevent it from rubbing against the tire.
It is possible (and easy) to lower the tire spool along the arm. Doing so changes the contact point on the tire and often results in it sitting lower than or tucked under the fender. Lowering the tire spool will change the angle of the arm, so be sure to check that it is still around the optimal 45 degrees.
Additionally, we recommend using the Wheel Strap accessory as another contact point. These are helpful for bikes with fenders that hang below the optimal 45 degrees
UPDATED SEPTEMBER 2023
Yes, you can remove the captive safety pin with one screw and use a standard hitch pin bolt with cotter pin or lock.
However, this is not possible with the 1.25″ hitch or the 1.25″ with the 2″ adapter installed. The reason is because there is no hole going through the adapter. In other words, you can only do this with the 2″ hitch model.
UPDATED SEPTEMBER 2023
Customers sometimes purchase a 1.25″ rack when they have a 2″ receiver on their vehicle. The reason for doing this is so they can use the rack with other cars, some of which may have a 1.25″ receiver. We manufacture a spacer to add to the 1.25″ male piece that pops on and off. This adapter is included with every Mach2 1.25″ purchase. See photos and keep reading.
(top picture – Adapter off for use in a 1.25″ hitch receiver)
1.25 Hitch with Adapter off
Adapter on for use in a 2″ hitch receiver. You then insert the male with adapter into the 2″ hitch receiver and tighten it down.
1.25″ Hitch Assembly for QuikrStuff Mach2
You might find this video helpful –> How to Use Hitch Adapter
There are other adapters on the market and they can be purchased separately. The CEO himself has a third-party hitch adapter/extender on his Subaru, converting his 1.25″ receiver to a 2″ hitch. Because of the extra play it created, he had the adapter welded into his 1.25″ receiver, alleviating the extra movement but also making his receiver permanently a 2″ receiver. If you use the QuikrStuff adapter that comes with your 1.25″ rack, you will not experience any extra play.
NOTE: We do not warranty any rack setup that uses an adapter other than the one QuikrStuff manufactures and includes with your 1.25″ rack purchase.
UPDATED SEPTEMBER 2023
You may use a hitch extender with your rack. We do not currently manufacture or sell a hitch extender. You can find these at etrailer.com or from other companies.
Often times using an extension can introduce more play and noise into the whole system. You can try an anti-rattle stabilizer (shown in photo below) to alleviate these issues. No, we do not sell these either. Another option is welding the extender into your receiver, but this does make it a permanent feature.
Be sure to consider the number and weight of the bikes you are hauling and realize that the limits will be reduced when an extension is used. Refer to the class rating and tongue weight of your vehicle’s hitch receiver. Typically, your tongue weight will be reduced by 50% when using an extension.
1.25″ Mach2
1 bike – 120 lbs
2 bikes – 140 lbs
3 bikes – 160 lbs
2″ Mach2
1 bike – 120 lbs
2 bikes – 240 lbs
3 bikes – 300 lbs
4 bikes – 185 lbs
NOTE: We do not warranty any rack setup that is using a hitch extender because they are not our products.
UPDATED SEPTEMBER 2023
We do not. We recommend a third party adapter. But we are thinking of creating one ourselves. 🙂
UPDATED SEPTEMBER 2023
Yes! It clears by about an inch without a hitch extender. But it was only on one 2019 model, so you must check it yourself.
See this post by one of our testers – https://www.facebook.com/matt.brenner.75/posts/10158448921359329
UPDATED SEPTEMBER 2023
Easy!
Remove it with one screw and use your own lock or hitch pin. Watch our demo to learn more about the adaptability of the redesigned hitch:
UPDATED SEPTEMBER 2023
The Mach2 hitch design uses two aluminum pads instead of one steel ball, which was what was used with the inventor’s previous bike rack. This is a huge improvement! The pads are stronger, smoother, and more stable, and the old steel ball version could deform the hitch over time.
Our rack also comes with a Captive Safety Pin for additional peace of mind. The Captive Safety Pin does not go through a hole in your receiver; rather, it sits just behind the flange on your receiver. A regular locking pin can be used, if so desired. And the Captive Safety Pin can be removed with one screw for vehicles that don’t have clearance for it.
Watch it in action:
Here are the dimensions for the Hitch assembly.
UPDATED SEPTEMBER 2023
The ramp weighs 12 pounds and measures 56-1/4″ long. It does not fold like the rack and Add-Ons do. See it in action:
UPDATED SEPTEMBER 2023
We advise against it because it extends beyond DOT regulations and it would put excessive leverage and strain on the vehicle’s hitch and rack components.
We would not warranty this usage.
UPDATED SEPTEMBER 2023
Since everyone has a different model and spare tire size, we recommend a 2″ to 2″ extension to push the rack further rearward.
We do NOT recommend buying the 1.25″ Mach2 as it will put more strain on it.
There are many third-party products you can search for to solve this problem as we don’t have our own…yet.
Note: Our warranty does not cover racks used on 3rd party products (extenders, pivots, etc.) as we have no control over their integrity.
UPDATED SEPTEMBER 2023
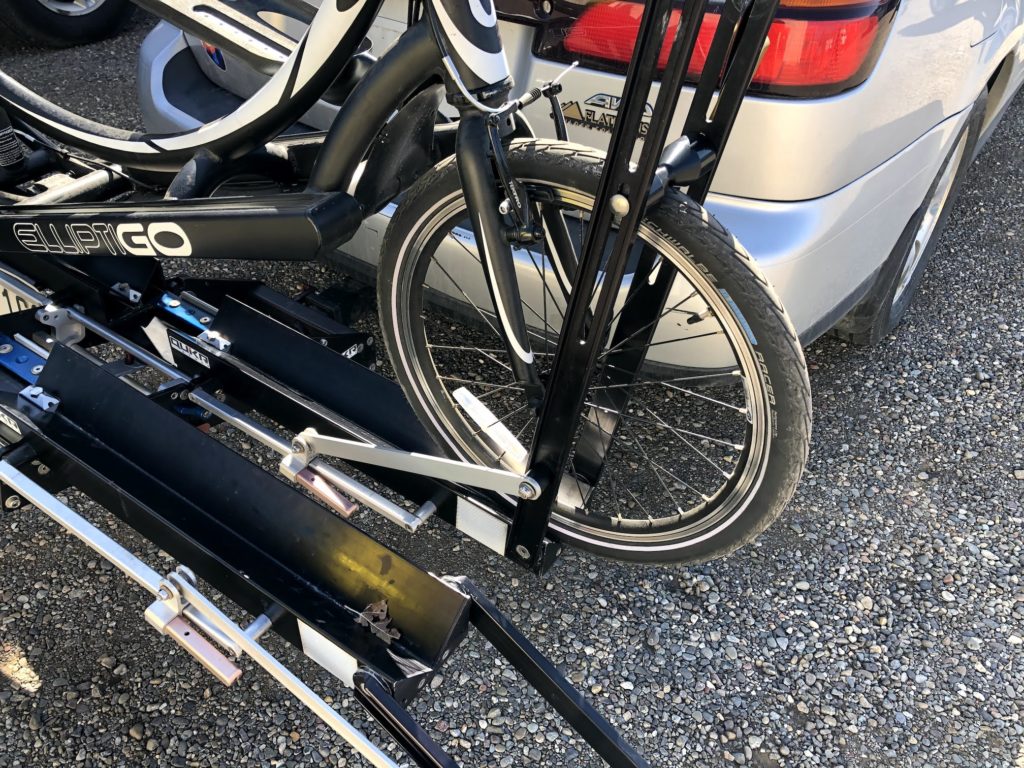
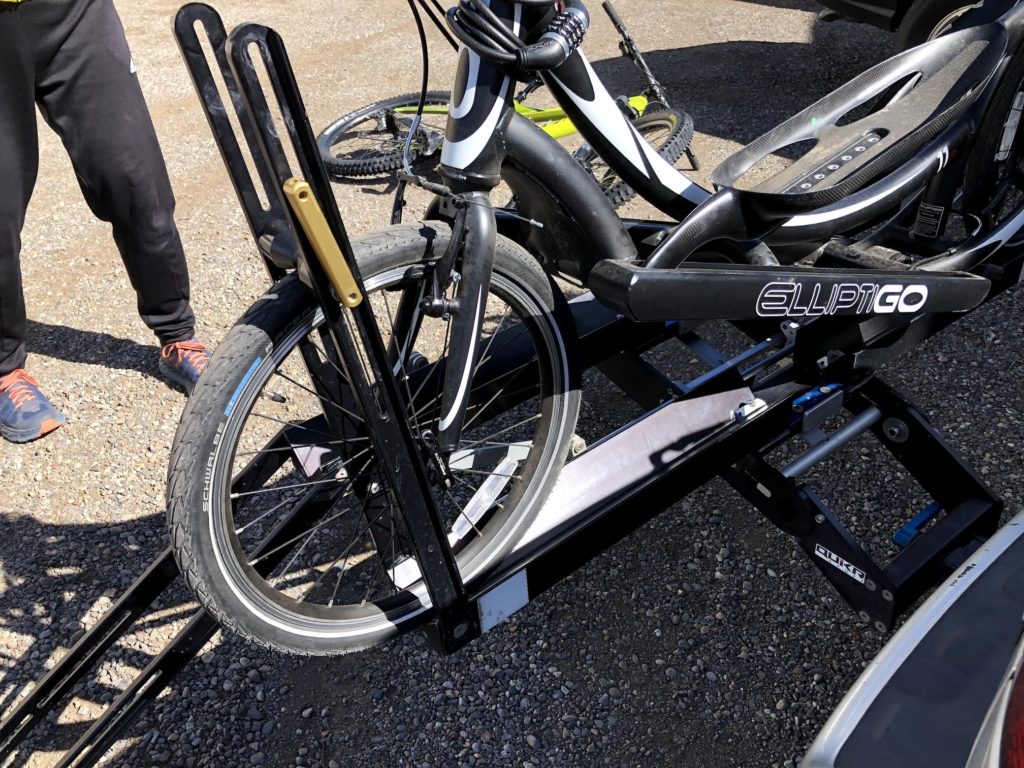
We recently met a doctor in our town who had an Elliptigo 11R bike and it fits fine on our rack with no modification.
If you wanted to carry two Elliptigo bikes, you would need to have one Add-on in between them because of the width of the base being larger than our width.
We may look into creating a customization to carry two Elliptigo bikes next to each other, but that will be some time off as we crank out higher demand items. 🙂
Some pics:
YES, the QuikrStuff Mach2 bike rack can be used on the popular Tesla Model Y.
Here’s what we know about the rack on a Tesla Y:
The rack fits very close to the car. If you insert the rack into the receiver just far enough to cover both expanding pads, you will still be able to get the rack into its upright position. Some Tesla owners report that this isn’t possible but that is because they are pushing the rack all the way into the receiver. You only need to push it in far enough to cover the two expanding pads. As long as both pads are covered, the rack will stay secured.
There are also rumors that a loaded bike may bump into the back of the car. This will not happen if you install the rack as suggested in the above paragraph.
You’ll need to change the Captive Safety Pin from the left side to the right side of the car. This is because there is an electrical connection in the way on the left side. Moving the Captive Safety Pin is easily done with no tools although it’s tight in there and if your hand doesn’t fit you may need to use needle nose pliers. The Captive Safety Pin does not need to go through the hole in the receiver; it does, however, need to sit behind the flange on the receiver. Remember, the Captive Safety Pin is not the primary mechanism holding the rack to your vehicle; it is the unique expanding pads in the hitch that do that job.
We haven’t noticed the rack interfering with the performance of the mirrors. We aren’t big fans of the tilting mirrors (when they tilt way down when you first put it into reverse) and know you can turn that feature off. The car will tell you to STOP when backing up because it thinks the rack is a separate object that you’re about to hit. You can turn on trailer mode so it realizes that something is attached.
We know these things because CEO Bryan Wachs has a Tesla Model Y and always has the rack on his car. If you have any further questions, he will be happy to respond to them. Email us at support @quikrstuff.com.
Features
UPDATED SEPTEMBER 2023
Buying a new bike rack is like welcoming a new family member. Let’s make sure the Mach2 “fits” into your family!
- Weights:
Mach2 2″ & 1.25″ – 30.7 lbs (Shipping is 36.2 lbs and box outside dimensions are 31″x19″x9″ – inside dimensions are 29.5″x18″x8″) - Add-on – 22.7 lbs (Shipping is 27.9 lbs and outside dimensions are 31″x19″x9″ – inside dimensions are 29.5″x18″x8″)
- Ramp – 13lbs – Shipping is 14 lbs and box outside dimensions 60”x8”x8”
- Maximum tire width – 4.77 inches (5.05 tire is the maximum we have seen and it works – see this FAQ – Maximum Tire width
NOTE: We do NOT give opinions of fitment, as there are variables of changes in model spec, OEM & aftermarket hitches and adapters, and way too many cars to keep up a database. We give YOU the tools you should need to measure and make a determination yourself. If you can’t find the answer you need, contact us!
In the tilted down mode (see the image/specs below),
- The first Add-On is 1 7/16″ below the hitch,
- The second Add-On is 5 15/32″ below that for for a total of 6 15/16″ below the hitch.
- The third and fourth Add-On are each an additional 5 15/32″ below the Add-on above it.
1.25″ Version Hitch Insert (below).
Folded Dimensions:
UPDATED SEPTEMBER 2023
These are conservative numbers made to protect your investment in your bikes. Please check your tongue weight capacity for your vehicle/hitch as OEM will not be the same as an aftermarket hitch.
These numbers do NOT take into consideration hitch adapters or extenders that could put more leverage, and therefore stress, on the hitch/crossbar that would lower these capacities even more.
1.25″ Mach2
1 bike – 120 lbs
2 bikes – 140 lbs
3 bikes – 160 lbs
2″ Mach2
1 bike – 120 lbs
2 bikes – 240 lbs
3 bikes – 300 lbs
4 bikes – 185 lbs
Even though the 1.25″ rack can hold 160 pounds total and the 2″ rack can carry 300 pounds total, each bike rack tray and its components have a weight limit that cannot be exceeded. Doing so could cause the rack to fail.
Click here for a written explanation as to how much weight is possible per bike tray: Mach2 Load Capacity Explanation
UPDATED SEPTEMBER 2023
The base Mach2 hitch rack mount weighs approximately 30.7 lbs and each Add-on weighs 22.7 lbs.
UPDATED SEPTEMBER 2023
The bike rack can be used with a wheelbase of 56″ with wheel sizes from 12″ to 29″, and up to a 5″ wide tire with no adapters needed. See the no-tools tire size adjustment in action:
Here is an image of the bike size range dimensions.
Quik Rack Mach2 with Add-Ons: Loaded for vacation
UPDATED SEPTEMBER 2023
10.04 inches is the distance between one tray groove and the next. See full dimensions below.
Printable Mach2 CAD drawing from the top – PDF
UPDATED SEPTEMBER 2023
The rack can accommodate skinny road bike tires as well as tires as wide as 5” with no adapters needed. The distance is 4.77″ between the arms, but dare we say, tires are not really accurate in their dimensions?
Quik Rack Mach2: 5″ tire
The Mach2 fits the Vee Snow Shoe 2XL, which is 5.05″ wide. (stated by the manufacturer)
UPDATED SEPTEMBER 2023
We have also seen customers place additional pipe insulation or a cut section of a pool noodle between the tire and the fender. This will help maintain the shape of the fender and prevent it from rubbing against the tire.
It is possible (and easy) to lower the tire spool along the arm. Doing so changes the contact point on the tire and often results in it sitting lower than or tucked under the fender. Lowering the tire spool will change the angle of the arm, so be sure to check that it is still around the optimal 45 degrees.
Additionally, we recommend using the Wheel Strap accessory as another contact point. These are helpful for bikes with fenders that hang below the optimal 45 degrees
UPDATED SEPTEMBER 2023
Yes, you can remove the captive safety pin with one screw and use a standard hitch pin bolt with cotter pin or lock.
However, this is not possible with the 1.25″ hitch or the 1.25″ with the 2″ adapter installed. The reason is because there is no hole going through the adapter. In other words, you can only do this with the 2″ hitch model.
UPDATED SEPTEMBER 2023
Customers sometimes purchase a 1.25″ rack when they have a 2″ receiver on their vehicle. The reason for doing this is so they can use the rack with other cars, some of which may have a 1.25″ receiver. We manufacture a spacer to add to the 1.25″ male piece that pops on and off. This adapter is included with every Mach2 1.25″ purchase. See photos and keep reading.
(top picture – Adapter off for use in a 1.25″ hitch receiver)
1.25 Hitch with Adapter off
Adapter on for use in a 2″ hitch receiver. You then insert the male with adapter into the 2″ hitch receiver and tighten it down.
1.25″ Hitch Assembly for QuikrStuff Mach2
You might find this video helpful –> How to Use Hitch Adapter
There are other adapters on the market and they can be purchased separately. The CEO himself has a third-party hitch adapter/extender on his Subaru, converting his 1.25″ receiver to a 2″ hitch. Because of the extra play it created, he had the adapter welded into his 1.25″ receiver, alleviating the extra movement but also making his receiver permanently a 2″ receiver. If you use the QuikrStuff adapter that comes with your 1.25″ rack, you will not experience any extra play.
NOTE: We do not warranty any rack setup that uses an adapter other than the one QuikrStuff manufactures and includes with your 1.25″ rack purchase.
UPDATED SEPTEMBER 2023
You may use a hitch extender with your rack. We do not currently manufacture or sell a hitch extender. You can find these at etrailer.com or from other companies.
Often times using an extension can introduce more play and noise into the whole system. You can try an anti-rattle stabilizer (shown in photo below) to alleviate these issues. No, we do not sell these either. Another option is welding the extender into your receiver, but this does make it a permanent feature.
Be sure to consider the number and weight of the bikes you are hauling and realize that the limits will be reduced when an extension is used. Refer to the class rating and tongue weight of your vehicle’s hitch receiver. Typically, your tongue weight will be reduced by 50% when using an extension.
1.25″ Mach2
1 bike – 120 lbs
2 bikes – 140 lbs
3 bikes – 160 lbs
2″ Mach2
1 bike – 120 lbs
2 bikes – 240 lbs
3 bikes – 300 lbs
4 bikes – 185 lbs
NOTE: We do not warranty any rack setup that is using a hitch extender because they are not our products.
UPDATED SEPTEMBER 2023
We do not. We recommend a third party adapter. But we are thinking of creating one ourselves. 🙂
UPDATED SEPTEMBER 2023
Yes! It clears by about an inch without a hitch extender. But it was only on one 2019 model, so you must check it yourself.
See this post by one of our testers – https://www.facebook.com/matt.brenner.75/posts/10158448921359329
UPDATED SEPTEMBER 2023
Easy!
Remove it with one screw and use your own lock or hitch pin. Watch our demo to learn more about the adaptability of the redesigned hitch:
UPDATED SEPTEMBER 2023
The Mach2 hitch design uses two aluminum pads instead of one steel ball, which was what was used with the inventor’s previous bike rack. This is a huge improvement! The pads are stronger, smoother, and more stable, and the old steel ball version could deform the hitch over time.
Our rack also comes with a Captive Safety Pin for additional peace of mind. The Captive Safety Pin does not go through a hole in your receiver; rather, it sits just behind the flange on your receiver. A regular locking pin can be used, if so desired. And the Captive Safety Pin can be removed with one screw for vehicles that don’t have clearance for it.
Watch it in action:
Here are the dimensions for the Hitch assembly.
UPDATED SEPTEMBER 2023
The ramp weighs 12 pounds and measures 56-1/4″ long. It does not fold like the rack and Add-Ons do. See it in action:
UPDATED SEPTEMBER 2023
We advise against it because it extends beyond DOT regulations and it would put excessive leverage and strain on the vehicle’s hitch and rack components.
We would not warranty this usage.
UPDATED SEPTEMBER 2023
Since everyone has a different model and spare tire size, we recommend a 2″ to 2″ extension to push the rack further rearward.
We do NOT recommend buying the 1.25″ Mach2 as it will put more strain on it.
There are many third-party products you can search for to solve this problem as we don’t have our own…yet.
Note: Our warranty does not cover racks used on 3rd party products (extenders, pivots, etc.) as we have no control over their integrity.
UPDATED SEPTEMBER 2023
We recently met a doctor in our town who had an Elliptigo 11R bike and it fits fine on our rack with no modification.
If you wanted to carry two Elliptigo bikes, you would need to have one Add-on in between them because of the width of the base being larger than our width.
We may look into creating a customization to carry two Elliptigo bikes next to each other, but that will be some time off as we crank out higher demand items. 🙂
Some pics:
YES, the QuikrStuff Mach2 bike rack can be used on the popular Tesla Model Y.
Here’s what we know about the rack on a Tesla Y:
The rack fits very close to the car. If you insert the rack into the receiver just far enough to cover both expanding pads, you will still be able to get the rack into its upright position. Some Tesla owners report that this isn’t possible but that is because they are pushing the rack all the way into the receiver. You only need to push it in far enough to cover the two expanding pads. As long as both pads are covered, the rack will stay secured.
There are also rumors that a loaded bike may bump into the back of the car. This will not happen if you install the rack as suggested in the above paragraph.
You’ll need to change the Captive Safety Pin from the left side to the right side of the car. This is because there is an electrical connection in the way on the left side. Moving the Captive Safety Pin is easily done with no tools although it’s tight in there and if your hand doesn’t fit you may need to use needle nose pliers. The Captive Safety Pin does not need to go through the hole in the receiver; it does, however, need to sit behind the flange on the receiver. Remember, the Captive Safety Pin is not the primary mechanism holding the rack to your vehicle; it is the unique expanding pads in the hitch that do that job.
We haven’t noticed the rack interfering with the performance of the mirrors. We aren’t big fans of the tilting mirrors (when they tilt way down when you first put it into reverse) and know you can turn that feature off. The car will tell you to STOP when backing up because it thinks the rack is a separate object that you’re about to hit. You can turn on trailer mode so it realizes that something is attached.
We know these things because CEO Bryan Wachs has a Tesla Model Y and always has the rack on his car. If you have any further questions, he will be happy to respond to them. Email us at support @quikrstuff.com.
General Quik-Rack Questions
UPDATED SEPTEMBER 2023
Buying a new bike rack is like welcoming a new family member. Let’s make sure the Mach2 “fits” into your family!
- Weights:
Mach2 2″ & 1.25″ – 30.7 lbs (Shipping is 36.2 lbs and box outside dimensions are 31″x19″x9″ – inside dimensions are 29.5″x18″x8″) - Add-on – 22.7 lbs (Shipping is 27.9 lbs and outside dimensions are 31″x19″x9″ – inside dimensions are 29.5″x18″x8″)
- Ramp – 13lbs – Shipping is 14 lbs and box outside dimensions 60”x8”x8”
- Maximum tire width – 4.77 inches (5.05 tire is the maximum we have seen and it works – see this FAQ – Maximum Tire width
NOTE: We do NOT give opinions of fitment, as there are variables of changes in model spec, OEM & aftermarket hitches and adapters, and way too many cars to keep up a database. We give YOU the tools you should need to measure and make a determination yourself. If you can’t find the answer you need, contact us!
In the tilted down mode (see the image/specs below),
- The first Add-On is 1 7/16″ below the hitch,
- The second Add-On is 5 15/32″ below that for for a total of 6 15/16″ below the hitch.
- The third and fourth Add-On are each an additional 5 15/32″ below the Add-on above it.
1.25″ Version Hitch Insert (below).
Folded Dimensions:
UPDATED SEPTEMBER 2023
These are conservative numbers made to protect your investment in your bikes. Please check your tongue weight capacity for your vehicle/hitch as OEM will not be the same as an aftermarket hitch.
These numbers do NOT take into consideration hitch adapters or extenders that could put more leverage, and therefore stress, on the hitch/crossbar that would lower these capacities even more.
1.25″ Mach2
1 bike – 120 lbs
2 bikes – 140 lbs
3 bikes – 160 lbs
2″ Mach2
1 bike – 120 lbs
2 bikes – 240 lbs
3 bikes – 300 lbs
4 bikes – 185 lbs
Even though the 1.25″ rack can hold 160 pounds total and the 2″ rack can carry 300 pounds total, each bike rack tray and its components have a weight limit that cannot be exceeded. Doing so could cause the rack to fail.
Click here for a written explanation as to how much weight is possible per bike tray: Mach2 Load Capacity Explanation
UPDATED SEPTEMBER 2023
The base Mach2 hitch rack mount weighs approximately 30.7 lbs and each Add-on weighs 22.7 lbs.
UPDATED SEPTEMBER 2023
The bike rack can be used with a wheelbase of 56″ with wheel sizes from 12″ to 29″, and up to a 5″ wide tire with no adapters needed. See the no-tools tire size adjustment in action:
Here is an image of the bike size range dimensions.
Quik Rack Mach2 with Add-Ons: Loaded for vacation
UPDATED SEPTEMBER 2023
10.04 inches is the distance between one tray groove and the next. See full dimensions below.
Printable Mach2 CAD drawing from the top – PDF
UPDATED SEPTEMBER 2023
The rack can accommodate skinny road bike tires as well as tires as wide as 5” with no adapters needed. The distance is 4.77″ between the arms, but dare we say, tires are not really accurate in their dimensions?
Quik Rack Mach2: 5″ tire
The Mach2 fits the Vee Snow Shoe 2XL, which is 5.05″ wide. (stated by the manufacturer)
UPDATED SEPTEMBER 2023
We have also seen customers place additional pipe insulation or a cut section of a pool noodle between the tire and the fender. This will help maintain the shape of the fender and prevent it from rubbing against the tire.
It is possible (and easy) to lower the tire spool along the arm. Doing so changes the contact point on the tire and often results in it sitting lower than or tucked under the fender. Lowering the tire spool will change the angle of the arm, so be sure to check that it is still around the optimal 45 degrees.
Additionally, we recommend using the Wheel Strap accessory as another contact point. These are helpful for bikes with fenders that hang below the optimal 45 degrees
UPDATED SEPTEMBER 2023
Yes, you can remove the captive safety pin with one screw and use a standard hitch pin bolt with cotter pin or lock.
However, this is not possible with the 1.25″ hitch or the 1.25″ with the 2″ adapter installed. The reason is because there is no hole going through the adapter. In other words, you can only do this with the 2″ hitch model.
UPDATED SEPTEMBER 2023
Customers sometimes purchase a 1.25″ rack when they have a 2″ receiver on their vehicle. The reason for doing this is so they can use the rack with other cars, some of which may have a 1.25″ receiver. We manufacture a spacer to add to the 1.25″ male piece that pops on and off. This adapter is included with every Mach2 1.25″ purchase. See photos and keep reading.
(top picture – Adapter off for use in a 1.25″ hitch receiver)
1.25 Hitch with Adapter off
Adapter on for use in a 2″ hitch receiver. You then insert the male with adapter into the 2″ hitch receiver and tighten it down.
1.25″ Hitch Assembly for QuikrStuff Mach2
You might find this video helpful –> How to Use Hitch Adapter
There are other adapters on the market and they can be purchased separately. The CEO himself has a third-party hitch adapter/extender on his Subaru, converting his 1.25″ receiver to a 2″ hitch. Because of the extra play it created, he had the adapter welded into his 1.25″ receiver, alleviating the extra movement but also making his receiver permanently a 2″ receiver. If you use the QuikrStuff adapter that comes with your 1.25″ rack, you will not experience any extra play.
NOTE: We do not warranty any rack setup that uses an adapter other than the one QuikrStuff manufactures and includes with your 1.25″ rack purchase.
UPDATED SEPTEMBER 2023
You may use a hitch extender with your rack. We do not currently manufacture or sell a hitch extender. You can find these at etrailer.com or from other companies.
Often times using an extension can introduce more play and noise into the whole system. You can try an anti-rattle stabilizer (shown in photo below) to alleviate these issues. No, we do not sell these either. Another option is welding the extender into your receiver, but this does make it a permanent feature.
Be sure to consider the number and weight of the bikes you are hauling and realize that the limits will be reduced when an extension is used. Refer to the class rating and tongue weight of your vehicle’s hitch receiver. Typically, your tongue weight will be reduced by 50% when using an extension.
1.25″ Mach2
1 bike – 120 lbs
2 bikes – 140 lbs
3 bikes – 160 lbs
2″ Mach2
1 bike – 120 lbs
2 bikes – 240 lbs
3 bikes – 300 lbs
4 bikes – 185 lbs
NOTE: We do not warranty any rack setup that is using a hitch extender because they are not our products.
UPDATED SEPTEMBER 2023
We do not. We recommend a third party adapter. But we are thinking of creating one ourselves. 🙂
UPDATED SEPTEMBER 2023
Yes! It clears by about an inch without a hitch extender. But it was only on one 2019 model, so you must check it yourself.
See this post by one of our testers – https://www.facebook.com/matt.brenner.75/posts/10158448921359329
UPDATED SEPTEMBER 2023
Easy!
Remove it with one screw and use your own lock or hitch pin. Watch our demo to learn more about the adaptability of the redesigned hitch:
UPDATED SEPTEMBER 2023
The Mach2 hitch design uses two aluminum pads instead of one steel ball, which was what was used with the inventor’s previous bike rack. This is a huge improvement! The pads are stronger, smoother, and more stable, and the old steel ball version could deform the hitch over time.
Our rack also comes with a Captive Safety Pin for additional peace of mind. The Captive Safety Pin does not go through a hole in your receiver; rather, it sits just behind the flange on your receiver. A regular locking pin can be used, if so desired. And the Captive Safety Pin can be removed with one screw for vehicles that don’t have clearance for it.
Watch it in action:
Here are the dimensions for the Hitch assembly.
UPDATED SEPTEMBER 2023
The ramp weighs 12 pounds and measures 56-1/4″ long. It does not fold like the rack and Add-Ons do. See it in action:
UPDATED SEPTEMBER 2023
We advise against it because it extends beyond DOT regulations and it would put excessive leverage and strain on the vehicle’s hitch and rack components.
We would not warranty this usage.
UPDATED SEPTEMBER 2023
Since everyone has a different model and spare tire size, we recommend a 2″ to 2″ extension to push the rack further rearward.
We do NOT recommend buying the 1.25″ Mach2 as it will put more strain on it.
There are many third-party products you can search for to solve this problem as we don’t have our own…yet.
Note: Our warranty does not cover racks used on 3rd party products (extenders, pivots, etc.) as we have no control over their integrity.
UPDATED SEPTEMBER 2023
We recently met a doctor in our town who had an Elliptigo 11R bike and it fits fine on our rack with no modification.
If you wanted to carry two Elliptigo bikes, you would need to have one Add-on in between them because of the width of the base being larger than our width.
We may look into creating a customization to carry two Elliptigo bikes next to each other, but that will be some time off as we crank out higher demand items. 🙂
Some pics:
YES, the QuikrStuff Mach2 bike rack can be used on the popular Tesla Model Y.
Here’s what we know about the rack on a Tesla Y:
The rack fits very close to the car. If you insert the rack into the receiver just far enough to cover both expanding pads, you will still be able to get the rack into its upright position. Some Tesla owners report that this isn’t possible but that is because they are pushing the rack all the way into the receiver. You only need to push it in far enough to cover the two expanding pads. As long as both pads are covered, the rack will stay secured.
There are also rumors that a loaded bike may bump into the back of the car. This will not happen if you install the rack as suggested in the above paragraph.
You’ll need to change the Captive Safety Pin from the left side to the right side of the car. This is because there is an electrical connection in the way on the left side. Moving the Captive Safety Pin is easily done with no tools although it’s tight in there and if your hand doesn’t fit you may need to use needle nose pliers. The Captive Safety Pin does not need to go through the hole in the receiver; it does, however, need to sit behind the flange on the receiver. Remember, the Captive Safety Pin is not the primary mechanism holding the rack to your vehicle; it is the unique expanding pads in the hitch that do that job.
We haven’t noticed the rack interfering with the performance of the mirrors. We aren’t big fans of the tilting mirrors (when they tilt way down when you first put it into reverse) and know you can turn that feature off. The car will tell you to STOP when backing up because it thinks the rack is a separate object that you’re about to hit. You can turn on trailer mode so it realizes that something is attached.
We know these things because CEO Bryan Wachs has a Tesla Model Y and always has the rack on his car. If you have any further questions, he will be happy to respond to them. Email us at support @quikrstuff.com.
Usage and Troubleshooting
UPDATED SEPTEMBER 2023
Buying a new bike rack is like welcoming a new family member. Let’s make sure the Mach2 “fits” into your family!
- Weights:
Mach2 2″ & 1.25″ – 30.7 lbs (Shipping is 36.2 lbs and box outside dimensions are 31″x19″x9″ – inside dimensions are 29.5″x18″x8″) - Add-on – 22.7 lbs (Shipping is 27.9 lbs and outside dimensions are 31″x19″x9″ – inside dimensions are 29.5″x18″x8″)
- Ramp – 13lbs – Shipping is 14 lbs and box outside dimensions 60”x8”x8”
- Maximum tire width – 4.77 inches (5.05 tire is the maximum we have seen and it works – see this FAQ – Maximum Tire width
NOTE: We do NOT give opinions of fitment, as there are variables of changes in model spec, OEM & aftermarket hitches and adapters, and way too many cars to keep up a database. We give YOU the tools you should need to measure and make a determination yourself. If you can’t find the answer you need, contact us!
In the tilted down mode (see the image/specs below),
- The first Add-On is 1 7/16″ below the hitch,
- The second Add-On is 5 15/32″ below that for for a total of 6 15/16″ below the hitch.
- The third and fourth Add-On are each an additional 5 15/32″ below the Add-on above it.
1.25″ Version Hitch Insert (below).
Folded Dimensions:
UPDATED SEPTEMBER 2023
These are conservative numbers made to protect your investment in your bikes. Please check your tongue weight capacity for your vehicle/hitch as OEM will not be the same as an aftermarket hitch.
These numbers do NOT take into consideration hitch adapters or extenders that could put more leverage, and therefore stress, on the hitch/crossbar that would lower these capacities even more.
1.25″ Mach2
1 bike – 120 lbs
2 bikes – 140 lbs
3 bikes – 160 lbs
2″ Mach2
1 bike – 120 lbs
2 bikes – 240 lbs
3 bikes – 300 lbs
4 bikes – 185 lbs
Even though the 1.25″ rack can hold 160 pounds total and the 2″ rack can carry 300 pounds total, each bike rack tray and its components have a weight limit that cannot be exceeded. Doing so could cause the rack to fail.
Click here for a written explanation as to how much weight is possible per bike tray: Mach2 Load Capacity Explanation
UPDATED SEPTEMBER 2023
The base Mach2 hitch rack mount weighs approximately 30.7 lbs and each Add-on weighs 22.7 lbs.
UPDATED SEPTEMBER 2023
The bike rack can be used with a wheelbase of 56″ with wheel sizes from 12″ to 29″, and up to a 5″ wide tire with no adapters needed. See the no-tools tire size adjustment in action:
Here is an image of the bike size range dimensions.
Quik Rack Mach2 with Add-Ons: Loaded for vacation
UPDATED SEPTEMBER 2023
10.04 inches is the distance between one tray groove and the next. See full dimensions below.
Printable Mach2 CAD drawing from the top – PDF
UPDATED SEPTEMBER 2023
The rack can accommodate skinny road bike tires as well as tires as wide as 5” with no adapters needed. The distance is 4.77″ between the arms, but dare we say, tires are not really accurate in their dimensions?
Quik Rack Mach2: 5″ tire
The Mach2 fits the Vee Snow Shoe 2XL, which is 5.05″ wide. (stated by the manufacturer)
UPDATED SEPTEMBER 2023
We have also seen customers place additional pipe insulation or a cut section of a pool noodle between the tire and the fender. This will help maintain the shape of the fender and prevent it from rubbing against the tire.
It is possible (and easy) to lower the tire spool along the arm. Doing so changes the contact point on the tire and often results in it sitting lower than or tucked under the fender. Lowering the tire spool will change the angle of the arm, so be sure to check that it is still around the optimal 45 degrees.
Additionally, we recommend using the Wheel Strap accessory as another contact point. These are helpful for bikes with fenders that hang below the optimal 45 degrees
UPDATED SEPTEMBER 2023
Yes, you can remove the captive safety pin with one screw and use a standard hitch pin bolt with cotter pin or lock.
However, this is not possible with the 1.25″ hitch or the 1.25″ with the 2″ adapter installed. The reason is because there is no hole going through the adapter. In other words, you can only do this with the 2″ hitch model.
UPDATED SEPTEMBER 2023
Customers sometimes purchase a 1.25″ rack when they have a 2″ receiver on their vehicle. The reason for doing this is so they can use the rack with other cars, some of which may have a 1.25″ receiver. We manufacture a spacer to add to the 1.25″ male piece that pops on and off. This adapter is included with every Mach2 1.25″ purchase. See photos and keep reading.
(top picture – Adapter off for use in a 1.25″ hitch receiver)
1.25 Hitch with Adapter off
Adapter on for use in a 2″ hitch receiver. You then insert the male with adapter into the 2″ hitch receiver and tighten it down.
1.25″ Hitch Assembly for QuikrStuff Mach2
You might find this video helpful –> How to Use Hitch Adapter
There are other adapters on the market and they can be purchased separately. The CEO himself has a third-party hitch adapter/extender on his Subaru, converting his 1.25″ receiver to a 2″ hitch. Because of the extra play it created, he had the adapter welded into his 1.25″ receiver, alleviating the extra movement but also making his receiver permanently a 2″ receiver. If you use the QuikrStuff adapter that comes with your 1.25″ rack, you will not experience any extra play.
NOTE: We do not warranty any rack setup that uses an adapter other than the one QuikrStuff manufactures and includes with your 1.25″ rack purchase.
UPDATED SEPTEMBER 2023
You may use a hitch extender with your rack. We do not currently manufacture or sell a hitch extender. You can find these at etrailer.com or from other companies.
Often times using an extension can introduce more play and noise into the whole system. You can try an anti-rattle stabilizer (shown in photo below) to alleviate these issues. No, we do not sell these either. Another option is welding the extender into your receiver, but this does make it a permanent feature.
Be sure to consider the number and weight of the bikes you are hauling and realize that the limits will be reduced when an extension is used. Refer to the class rating and tongue weight of your vehicle’s hitch receiver. Typically, your tongue weight will be reduced by 50% when using an extension.
1.25″ Mach2
1 bike – 120 lbs
2 bikes – 140 lbs
3 bikes – 160 lbs
2″ Mach2
1 bike – 120 lbs
2 bikes – 240 lbs
3 bikes – 300 lbs
4 bikes – 185 lbs
NOTE: We do not warranty any rack setup that is using a hitch extender because they are not our products.
UPDATED SEPTEMBER 2023
We do not. We recommend a third party adapter. But we are thinking of creating one ourselves. 🙂
UPDATED SEPTEMBER 2023
Yes! It clears by about an inch without a hitch extender. But it was only on one 2019 model, so you must check it yourself.
See this post by one of our testers – https://www.facebook.com/matt.brenner.75/posts/10158448921359329
UPDATED SEPTEMBER 2023
Easy!
Remove it with one screw and use your own lock or hitch pin. Watch our demo to learn more about the adaptability of the redesigned hitch:
UPDATED SEPTEMBER 2023
The Mach2 hitch design uses two aluminum pads instead of one steel ball, which was what was used with the inventor’s previous bike rack. This is a huge improvement! The pads are stronger, smoother, and more stable, and the old steel ball version could deform the hitch over time.
Our rack also comes with a Captive Safety Pin for additional peace of mind. The Captive Safety Pin does not go through a hole in your receiver; rather, it sits just behind the flange on your receiver. A regular locking pin can be used, if so desired. And the Captive Safety Pin can be removed with one screw for vehicles that don’t have clearance for it.
Watch it in action:
Here are the dimensions for the Hitch assembly.
UPDATED SEPTEMBER 2023
The ramp weighs 12 pounds and measures 56-1/4″ long. It does not fold like the rack and Add-Ons do. See it in action:
UPDATED SEPTEMBER 2023
We advise against it because it extends beyond DOT regulations and it would put excessive leverage and strain on the vehicle’s hitch and rack components.
We would not warranty this usage.
UPDATED SEPTEMBER 2023
Since everyone has a different model and spare tire size, we recommend a 2″ to 2″ extension to push the rack further rearward.
We do NOT recommend buying the 1.25″ Mach2 as it will put more strain on it.
There are many third-party products you can search for to solve this problem as we don’t have our own…yet.
Note: Our warranty does not cover racks used on 3rd party products (extenders, pivots, etc.) as we have no control over their integrity.
UPDATED SEPTEMBER 2023
We recently met a doctor in our town who had an Elliptigo 11R bike and it fits fine on our rack with no modification.
If you wanted to carry two Elliptigo bikes, you would need to have one Add-on in between them because of the width of the base being larger than our width.
We may look into creating a customization to carry two Elliptigo bikes next to each other, but that will be some time off as we crank out higher demand items. 🙂
Some pics:
YES, the QuikrStuff Mach2 bike rack can be used on the popular Tesla Model Y.
Here’s what we know about the rack on a Tesla Y:
The rack fits very close to the car. If you insert the rack into the receiver just far enough to cover both expanding pads, you will still be able to get the rack into its upright position. Some Tesla owners report that this isn’t possible but that is because they are pushing the rack all the way into the receiver. You only need to push it in far enough to cover the two expanding pads. As long as both pads are covered, the rack will stay secured.
There are also rumors that a loaded bike may bump into the back of the car. This will not happen if you install the rack as suggested in the above paragraph.
You’ll need to change the Captive Safety Pin from the left side to the right side of the car. This is because there is an electrical connection in the way on the left side. Moving the Captive Safety Pin is easily done with no tools although it’s tight in there and if your hand doesn’t fit you may need to use needle nose pliers. The Captive Safety Pin does not need to go through the hole in the receiver; it does, however, need to sit behind the flange on the receiver. Remember, the Captive Safety Pin is not the primary mechanism holding the rack to your vehicle; it is the unique expanding pads in the hitch that do that job.
We haven’t noticed the rack interfering with the performance of the mirrors. We aren’t big fans of the tilting mirrors (when they tilt way down when you first put it into reverse) and know you can turn that feature off. The car will tell you to STOP when backing up because it thinks the rack is a separate object that you’re about to hit. You can turn on trailer mode so it realizes that something is attached.
We know these things because CEO Bryan Wachs has a Tesla Model Y and always has the rack on his car. If you have any further questions, he will be happy to respond to them. Email us at support @quikrstuff.com.
Future Plans Questions
UPDATED SEPTEMBER 2023
Buying a new bike rack is like welcoming a new family member. Let’s make sure the Mach2 “fits” into your family!
- Weights:
Mach2 2″ & 1.25″ – 30.7 lbs (Shipping is 36.2 lbs and box outside dimensions are 31″x19″x9″ – inside dimensions are 29.5″x18″x8″) - Add-on – 22.7 lbs (Shipping is 27.9 lbs and outside dimensions are 31″x19″x9″ – inside dimensions are 29.5″x18″x8″)
- Ramp – 13lbs – Shipping is 14 lbs and box outside dimensions 60”x8”x8”
- Maximum tire width – 4.77 inches (5.05 tire is the maximum we have seen and it works – see this FAQ – Maximum Tire width
NOTE: We do NOT give opinions of fitment, as there are variables of changes in model spec, OEM & aftermarket hitches and adapters, and way too many cars to keep up a database. We give YOU the tools you should need to measure and make a determination yourself. If you can’t find the answer you need, contact us!
In the tilted down mode (see the image/specs below),
- The first Add-On is 1 7/16″ below the hitch,
- The second Add-On is 5 15/32″ below that for for a total of 6 15/16″ below the hitch.
- The third and fourth Add-On are each an additional 5 15/32″ below the Add-on above it.
1.25″ Version Hitch Insert (below).
Folded Dimensions:
UPDATED SEPTEMBER 2023
These are conservative numbers made to protect your investment in your bikes. Please check your tongue weight capacity for your vehicle/hitch as OEM will not be the same as an aftermarket hitch.
These numbers do NOT take into consideration hitch adapters or extenders that could put more leverage, and therefore stress, on the hitch/crossbar that would lower these capacities even more.
1.25″ Mach2
1 bike – 120 lbs
2 bikes – 140 lbs
3 bikes – 160 lbs
2″ Mach2
1 bike – 120 lbs
2 bikes – 240 lbs
3 bikes – 300 lbs
4 bikes – 185 lbs
Even though the 1.25″ rack can hold 160 pounds total and the 2″ rack can carry 300 pounds total, each bike rack tray and its components have a weight limit that cannot be exceeded. Doing so could cause the rack to fail.
Click here for a written explanation as to how much weight is possible per bike tray: Mach2 Load Capacity Explanation
UPDATED SEPTEMBER 2023
The base Mach2 hitch rack mount weighs approximately 30.7 lbs and each Add-on weighs 22.7 lbs.
UPDATED SEPTEMBER 2023
The bike rack can be used with a wheelbase of 56″ with wheel sizes from 12″ to 29″, and up to a 5″ wide tire with no adapters needed. See the no-tools tire size adjustment in action:
Here is an image of the bike size range dimensions.
Quik Rack Mach2 with Add-Ons: Loaded for vacation
UPDATED SEPTEMBER 2023
10.04 inches is the distance between one tray groove and the next. See full dimensions below.
Printable Mach2 CAD drawing from the top – PDF
UPDATED SEPTEMBER 2023
The rack can accommodate skinny road bike tires as well as tires as wide as 5” with no adapters needed. The distance is 4.77″ between the arms, but dare we say, tires are not really accurate in their dimensions?
Quik Rack Mach2: 5″ tire
The Mach2 fits the Vee Snow Shoe 2XL, which is 5.05″ wide. (stated by the manufacturer)
UPDATED SEPTEMBER 2023
We have also seen customers place additional pipe insulation or a cut section of a pool noodle between the tire and the fender. This will help maintain the shape of the fender and prevent it from rubbing against the tire.
It is possible (and easy) to lower the tire spool along the arm. Doing so changes the contact point on the tire and often results in it sitting lower than or tucked under the fender. Lowering the tire spool will change the angle of the arm, so be sure to check that it is still around the optimal 45 degrees.
Additionally, we recommend using the Wheel Strap accessory as another contact point. These are helpful for bikes with fenders that hang below the optimal 45 degrees
UPDATED SEPTEMBER 2023
Yes, you can remove the captive safety pin with one screw and use a standard hitch pin bolt with cotter pin or lock.
However, this is not possible with the 1.25″ hitch or the 1.25″ with the 2″ adapter installed. The reason is because there is no hole going through the adapter. In other words, you can only do this with the 2″ hitch model.
UPDATED SEPTEMBER 2023
Customers sometimes purchase a 1.25″ rack when they have a 2″ receiver on their vehicle. The reason for doing this is so they can use the rack with other cars, some of which may have a 1.25″ receiver. We manufacture a spacer to add to the 1.25″ male piece that pops on and off. This adapter is included with every Mach2 1.25″ purchase. See photos and keep reading.
(top picture – Adapter off for use in a 1.25″ hitch receiver)
1.25 Hitch with Adapter off
Adapter on for use in a 2″ hitch receiver. You then insert the male with adapter into the 2″ hitch receiver and tighten it down.
1.25″ Hitch Assembly for QuikrStuff Mach2
You might find this video helpful –> How to Use Hitch Adapter
There are other adapters on the market and they can be purchased separately. The CEO himself has a third-party hitch adapter/extender on his Subaru, converting his 1.25″ receiver to a 2″ hitch. Because of the extra play it created, he had the adapter welded into his 1.25″ receiver, alleviating the extra movement but also making his receiver permanently a 2″ receiver. If you use the QuikrStuff adapter that comes with your 1.25″ rack, you will not experience any extra play.
NOTE: We do not warranty any rack setup that uses an adapter other than the one QuikrStuff manufactures and includes with your 1.25″ rack purchase.
UPDATED SEPTEMBER 2023
You may use a hitch extender with your rack. We do not currently manufacture or sell a hitch extender. You can find these at etrailer.com or from other companies.
Often times using an extension can introduce more play and noise into the whole system. You can try an anti-rattle stabilizer (shown in photo below) to alleviate these issues. No, we do not sell these either. Another option is welding the extender into your receiver, but this does make it a permanent feature.
Be sure to consider the number and weight of the bikes you are hauling and realize that the limits will be reduced when an extension is used. Refer to the class rating and tongue weight of your vehicle’s hitch receiver. Typically, your tongue weight will be reduced by 50% when using an extension.
1.25″ Mach2
1 bike – 120 lbs
2 bikes – 140 lbs
3 bikes – 160 lbs
2″ Mach2
1 bike – 120 lbs
2 bikes – 240 lbs
3 bikes – 300 lbs
4 bikes – 185 lbs
NOTE: We do not warranty any rack setup that is using a hitch extender because they are not our products.
UPDATED SEPTEMBER 2023
We do not. We recommend a third party adapter. But we are thinking of creating one ourselves. 🙂
UPDATED SEPTEMBER 2023
Yes! It clears by about an inch without a hitch extender. But it was only on one 2019 model, so you must check it yourself.
See this post by one of our testers – https://www.facebook.com/matt.brenner.75/posts/10158448921359329
UPDATED SEPTEMBER 2023
Easy!
Remove it with one screw and use your own lock or hitch pin. Watch our demo to learn more about the adaptability of the redesigned hitch:
UPDATED SEPTEMBER 2023
The Mach2 hitch design uses two aluminum pads instead of one steel ball, which was what was used with the inventor’s previous bike rack. This is a huge improvement! The pads are stronger, smoother, and more stable, and the old steel ball version could deform the hitch over time.
Our rack also comes with a Captive Safety Pin for additional peace of mind. The Captive Safety Pin does not go through a hole in your receiver; rather, it sits just behind the flange on your receiver. A regular locking pin can be used, if so desired. And the Captive Safety Pin can be removed with one screw for vehicles that don’t have clearance for it.
Watch it in action:
Here are the dimensions for the Hitch assembly.
UPDATED SEPTEMBER 2023
The ramp weighs 12 pounds and measures 56-1/4″ long. It does not fold like the rack and Add-Ons do. See it in action:
UPDATED SEPTEMBER 2023
We advise against it because it extends beyond DOT regulations and it would put excessive leverage and strain on the vehicle’s hitch and rack components.
We would not warranty this usage.
UPDATED SEPTEMBER 2023
Since everyone has a different model and spare tire size, we recommend a 2″ to 2″ extension to push the rack further rearward.
We do NOT recommend buying the 1.25″ Mach2 as it will put more strain on it.
There are many third-party products you can search for to solve this problem as we don’t have our own…yet.
Note: Our warranty does not cover racks used on 3rd party products (extenders, pivots, etc.) as we have no control over their integrity.
UPDATED SEPTEMBER 2023
We recently met a doctor in our town who had an Elliptigo 11R bike and it fits fine on our rack with no modification.
If you wanted to carry two Elliptigo bikes, you would need to have one Add-on in between them because of the width of the base being larger than our width.
We may look into creating a customization to carry two Elliptigo bikes next to each other, but that will be some time off as we crank out higher demand items. 🙂
Some pics:
YES, the QuikrStuff Mach2 bike rack can be used on the popular Tesla Model Y.
Here’s what we know about the rack on a Tesla Y:
The rack fits very close to the car. If you insert the rack into the receiver just far enough to cover both expanding pads, you will still be able to get the rack into its upright position. Some Tesla owners report that this isn’t possible but that is because they are pushing the rack all the way into the receiver. You only need to push it in far enough to cover the two expanding pads. As long as both pads are covered, the rack will stay secured.
There are also rumors that a loaded bike may bump into the back of the car. This will not happen if you install the rack as suggested in the above paragraph.
You’ll need to change the Captive Safety Pin from the left side to the right side of the car. This is because there is an electrical connection in the way on the left side. Moving the Captive Safety Pin is easily done with no tools although it’s tight in there and if your hand doesn’t fit you may need to use needle nose pliers. The Captive Safety Pin does not need to go through the hole in the receiver; it does, however, need to sit behind the flange on the receiver. Remember, the Captive Safety Pin is not the primary mechanism holding the rack to your vehicle; it is the unique expanding pads in the hitch that do that job.
We haven’t noticed the rack interfering with the performance of the mirrors. We aren’t big fans of the tilting mirrors (when they tilt way down when you first put it into reverse) and know you can turn that feature off. The car will tell you to STOP when backing up because it thinks the rack is a separate object that you’re about to hit. You can turn on trailer mode so it realizes that something is attached.
We know these things because CEO Bryan Wachs has a Tesla Model Y and always has the rack on his car. If you have any further questions, he will be happy to respond to them. Email us at support @quikrstuff.com.
Current Patents
Quik Rack Mach2 founder/designer Cal M. Phillips owns these 14 patents covering the new Quik Rack Mach2 design:
Canada Patent 2956005: Carrier for a two-wheeled vehicle
U.S. Patent 9902222: Captive pin apparatus for retention of a drawbar in a trailer hitch receiver
U.S. Patent 9956922: Carrier for a two-wheeled vehicle
U.S. Patent 10005329: Captive pin apparatus for retention of a drawbar in a trailer hitch receiver (continuation in part)
U.S. Patent 10011237: Bike carrier pivot mechanism division patent
U.S. Patent 10059276: Carrier for a two-wheeled vehicle
U.S. Patent 10065568: Bike carrier tray assembly with automatic tray position lock
U.S. Patent 10071695: Sliding pawl on a ratchet bar
U.S. Patent 10086769: Bike carrier tray assembly with automatic tray position lock
U.S. Patent 10099525: Trailer hitch draw-bar tightening mechanism
U.S. Patent 10106100: Secure latch for coupled assemblies
U.S. Patent 10124740: Bike carrier with automatic tray position lock
U.S. Patent 10150424: Adjustable retention arm for a bike carrier
U.S. Patent 10167887: Beam joining apparatus with bolt and threaded wedge
Also:
U.S. Patent 5833074: Fast-loading, protective bicycle rack (Patent for the original Quik-Rack) **Now expired**
U.S. Patent 6620081: Exercise stand and centrifugal resistance unit for a bicycle. **Notice of infringement filed**
Cal Phillips has 19 other patents that cover bicycle-related products.